background image

8

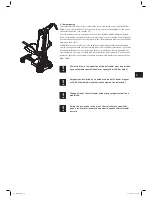
Never release the handlebar when climbing up a staircase!

The person transported on the scalacombi must only exit the climber 

after it has been placed on a firm surface away from the edge of the 

top step.

3.2 Climbing down a staircase

The passenger must take place on the scalacombi while it is standing on firm level 
ground. Do not allow the stair climber to be accessed when it is standing near the 
upper staircase edge. 
Ensure that the two drive wheels [5] and the brakes [4] are in pushing position (see 
chapter 2.2).
Check again that the person is properly seated on the scalacombi.
If the scalacombi is not yet switched on, do this by actuating the ON/OFF button [8] 
(see chapter 2.4).
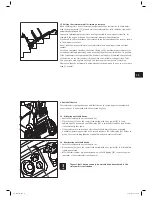
Tilt the scalacombi towards you until it is at an optimum angle so that the stair 
climber with the passenger is well balanced. Maintain this angle during the entire 
climb down the stairs. 
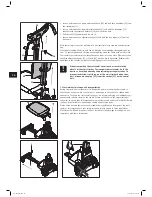
To tilt the scalacombi, you can place a foot against the panel between the two wheels 
(see diagram to the left).
Carefully move the scalacombi towards the edge of the top step of the staircase until 
the brakes of both wheels engage (see diagram to the left).
To move down one step, press the driving switch [17] into its lower position and hold 
it there until the stair climber has been lowered to the next step. Simultaneously 
move the scalacombi slightly forward.
After the stair climber has been lowered down the step, the climbing function is auto-
matically switched off. You can now release the driving switch.
The scalacombi is now positioned on the next lower step of the staircase and must be 
moved again carefully towards the edge (see diagram on next page).
Press the driving switch [17] again into its lower position and lower the stair climber 
down one step.
Repeat the above steps until you reach the bottom of the stairs.
After the stair climber has been lowered down the last step, move the scalacombi to a 
firm and level surface.
To do this, place the two drive wheels [5] and the brakes [4] in their pushing position 
(see chapter 2.2).
Switch the scalacombi off.
The person transported down the stairs can now exit the stair climber.

If the driving switch [7] is released during climbing operation, the 

wheels are immediately stopped in their position.

Do not release the driving switch when climbing down a step, unless 

in an emergency situation (see chapter 3.4).

Use the scalacombi only on staircases that are not wet, waxed or 

otherwise slippery. Ensure that carpets are properly secured to the 

floor. The step height may not exceed 20 cm. The minimum step 

depth should not be below 4 cm.


!!

!!

17

17

!!

!!

GA_S34_GB.indd   11

31.01.2011   09:47:50

Summary of Contents for Scalacombi Eco

Page 1: ...eisung D User manual GB US Instructions d utilisation F Istruzioni per l uso I Manual de instrucciones E Instruktionsbok S DAMIT TREPPENSTEIGEN EINFACH WIRD GA S34 Umschlag alle Sprachen in5 5 07 04 2...

Page 2: ...s Donnerstag von 8 00 18 00 Uhr Freitags von 8 00 16 00 Uhr erreichbar unter Telefon 49 0 7432 2006 0 Das scalacombi eco ist klassifiziert als Ger t Typ B 36 0001 4 99 03 Stand 01 02 2011 GA S34 Umsch...

Page 3: ...1 2 3 4 5 6 7 8 9 10 11 12 13 14 15 16 17 18 19 22 23 20 24 21 25 GA S34 Umschlag alle Sprachen in1 1 07 04 2009 15 38 10...

Page 4: ...evice 13 4 1 Activating anti theft device 13 4 2 Deactivating anti theft device 13 5 Automatic shut down 14 6 Batteries 14 6 1 Charging the batteries 14 6 2 Information on the batteries used in the sc...

Page 5: ...g walkways It is forbidden to make any technical modifications to the device Do not attach any parts other than accessories approved by Ulrich Alber GmbH for operation The scalacombi must only be oper...

Page 6: ...cannot slip The step height must not exceed 20 cm The minimum step depth should not be below 14 cm Please always observe the safety and hazard information in chapter 10 1 4 Standard scope of delivery...

Page 7: ...batteries ambient temperature around 20 C smooth travel etc The scalacombi complies with all applicable requirements of ISO 7676 23 The scalacombi conforms to the European Directive 93 42 EEC on medic...

Page 8: ...er Apart from technical information it contains important instructions for the correct and safe use of the device Before operating the stair climber on your own carefully read all instructions in this...

Page 9: ...delivery of the scalacombi If the height must be adjusted subsequently please proceed as follows Loosen and remove the adjustment knob 16 while holding the handlebar 18 to prevent it from dropping su...

Page 10: ...switched off Should the wheels fail to reach the correct pushing position despite switching the climber on and off refrain from using the scalacombi Switch the scalacombi off see chapter 2 5 Carefully...

Page 11: ...ow the person to sit down on the scalacombi and position his her feet properly on the footrest 2 Insert the armrests 21 in the receptacles 14 of the scalacombi Ensure that the armrests 21 properly eng...

Page 12: ...next 15 minutes the scalacombi is automatically shut down to save energy 2 5 Switching off the scalacombi To save energy we recommend switching off the scalacombi when not in use i e after the last c...

Page 13: ...scalacombi towards the stair until both wheels of the climber touch the first step see diagram to the left To move up one step press the driving switch 17 into its upper position and hold it there unt...

Page 14: ...ion and hold it there until the stair climber has been lowered to the next step Simultaneously move the scalacombi slightly forward After the stair climber has been lowered down the step the climbing...

Page 15: ...g metal grid stairs Special caution is required when using the scalacombi on stairs whose steps are made of metal grids On metal grid stairs with wide grid the brakes of the scalacombi might not work...

Page 16: ...m pieces of clothing Please note that the scalacombi is automatically shut down when it is not in use for more than 15 minutes 4 Anti theft device The scalacombi is equipped with an anti theft device...

Page 17: ...irst disconnect the plug 23 from the charger socket 7 and then disconnect the charger 25 from the mains socket The scalacombi cannot be switched on while it is being charged Switching on is only possi...

Page 18: ...bH The scalacombi is designed in such a way that best performance is achieved when using original batter ies from Ulrich Alber GmbH The batteries of your scalacombi can be recharged in any chosen posi...

Page 19: ...port the scalacombi hold the device as described above by the protruding rectangular tubes To prevent inadvertent switching on of the stair climber during trans port disconnect the plug 12 from the so...

Page 20: ...le signal The scalacombi has been switched off After short audible signal one of the above visual signals Short audible signal followed by visual signal The scalacombi has been switched on 9 First rem...

Page 21: ...t be grabbed by the passenger as there is a risk that they might be inadvertently pulled from their receptacles Only accessories designed specifically for the scalacombi are permitted to be used toget...

Page 22: ...ularly cleaned with spirit to ensure opti mum brake effect If the scalacombi is used on a daily basis you should clean these parts once every week If the stair climber is used less frequently monthly...

Page 23: ...not covered by the Electrical and Electronic Equipment Act implementing the WEEE Directive Alternatively return the product to your specialist dealer or agent of Ulrich Alber GmbH for proper and safe...

Page 24: ...bing we recommend a headrest which is available as an optional accessory Its height can be adjusted by sliding the guide up or down The guide is automatically locked in position The headrest is availa...

Page 25: ...22 GA_S34_GB indd 22 31 01 2011 09 47 56...

Page 26: ...299 info alber de www alber de Ihre Alber Vertretung Your Alber representative Votre repr sentation Alber Vostra rappresentanza Alber Su representaci n Alber Din Alber representant Din Alber agenturen...

Reviews: