8
5
If the batteries are stored (without charging) for a prolonged period of time, they will
suffer a loss of capacity. After a few charging/discharging cycles, the batteries will,
however, regain their full capacity.
The full capacity of the batteries is only reached after about 3 to 4 charging and dis-
charging cycles.
If the batteries are handled incorrectly, there is a risk of liquid electrolyte spilling out.
This liquid can cause injury to skin and damage to clothing.
In the event of contact of the electrolyte with eyes or skin, immediately rinse the
affected area with clean water and consult a doctor.
Do not burn batteries and protect them against naked flames as they can explode
when exposed to heat.
Do not short-circuit the batteries. Short-circuits result in high currents, which can
cause damage to the batteries and/or the scalacombi.
When the batteries have reached the end of their service life, return them to Ulrich
Alber GmbH or your authorised specialist dealer for proper disposal.
We recommend using only batteries supplied by Ulrich Alber GmbH. The scalacombi is
designed in such a way that best performance is achieved when using original batter-
ies from Ulrich Alber GmbH.
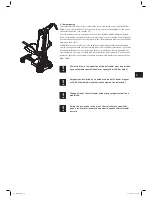
The batteries of your scalacombi can be recharged in any chosen
position. As regards their safety, they are classified in the same
group as dry cell batteries and approved for transport by air by DOT
(United States Department of Transportation) and IATA (Interna-
tional Air Transport Association).
7. Transport and storage
7. Disassembling and assembling individual components
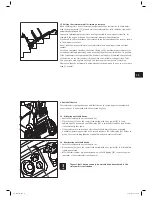
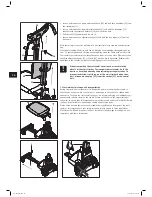
For transport purposes, your scalacombi can be dismantled into individual components
without the need for tools. It is entirely up to you to decide which components you wish
to remove. This might depend for example on the available stowing space. Therefore, only
dismantle the components that must be removed. The diagrams on this and the next page
show how components of the scalacombi can be dismantled step by step.
First remove the spiral cable connected to the handlebar. To do this, hold and press
together the release sleeve of the adapter [12] and then pull the adapter [12] from
the socket [11] on the control unit.
Pull the two armrests [21] upwards from their receptacles.
(Continued on next page)
•
•
•
•
•
•
•
•
•
•
!!
12
11
12
11
21
21
21
21
GA_S34_GB.indd 15
31.01.2011 09:47:53


