6
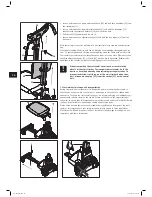
Loosen and remove the upper adjustment knob [16] and pull then handlebar [18] from
the standpipe [15].
Loosen and remove the lower adjustment knob [13] and pull the standpipe [15]
together with the attached backrest [19] from the drive unit.
Pull the seat [20] upwards and remove it.
Loosen and remove the adjustment knob [1] and pull the foot support [3] from the
drive unit.
After these simple steps, the scalacombi is dismantled for easy stowing and transporta-
tion.
To facilitate loading, the drive unit can be lifted by the protruding rectangular tube sec-
tions. To prevent hands and clothing becoming dirty, clean the tubes with a moist cloth.
To assemble the scalacombi, complete the above steps in reverse order. Please note that
the three adjustment knobs [1], [13] and [16] must be firmly tightened. Readjust the
handlebar to the shoulder height of the operating person (see chapter 2.1).
When transporting the scalacombi never touch or reach into the
wheels of the stair climber. To transport the scalacombi, hold the
device as described above by the protruding rectangular tubes. To
prevent inadvertent switching on of the stair climber during trans-
port, disconnect the plug [2] from the socket [] on the control
unit.
7.2 Instructions for storage and transportation
During transport, the scalacombi or its dismantled parts must be properly secured so
that they do not pose a risk to the driver or passengers in the event of a sudden brake
manoeuvre. To secure the scalacombi in the car, we recommend tying the individual com-
ponents with suitable straps to the vehicle. Please note that it is the responsibility of
the owner to ensure that all components are properly secured and that Ulrich Alber GmbH
shall not be held liable for any damage caused by unsecured parts.
Please check whether there are specific regulations regarding the transport of the scala-
combi or its components in your jurisdiction and strictly adhere to these regulations.
Ulrich Alber GmbH and its agents shall not be liable for any damage resulting from non-
compliance with these instructions.
•
•
•
•
20
15
13
20
15
13
18
15
16
18
15
16
20
20
1
3
1
3
!!
GA_S34_GB.indd 16
31.01.2011 09:47:54

