background image

User Manual  Albrecht GP 1 


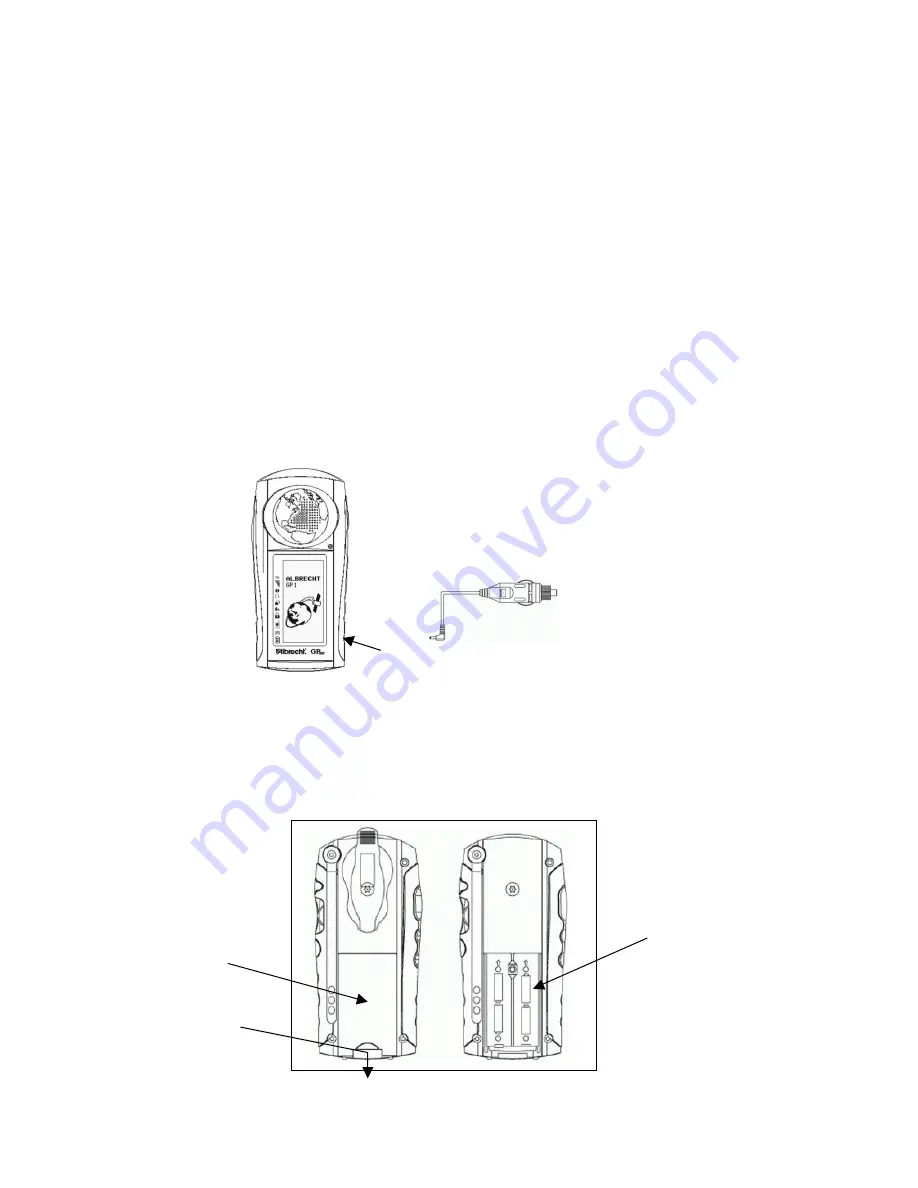
Cover of battery 
compartment 

With the memory effect, the operating time becomes shorter and shorter, if You should use the battery 
only for a short time and if You should always recharge it immediately. 

• 

If possible, recharge batteries only after they are completely discharged. 

• 

Do not shorten the charging periods. Stop charging only after charging process is completed. 

• 

Discharge and charge Your batteries  minimum 2 x per months 

• 

The best Idea is to use 2 battery sets. One set can be provided completely charged while the 
other set is in use!  

• 

3-4 complete discharge-charge cycles can repair memory effects! 


The lifetime of a battery set is about 300 to 400 cycles. It is normal, that the operating time will be 
reduced at the end of the battery lifetime. Please replace battery sets only complete and do not mix 
old and new battery cells. 


1.5. 

DC power supply


You may insert non rechargeable alkaline batteries (4 pcs AA type) or rechargeable NiMH batteries (4 
pcs AA size 1300 mAh recommended) While alkaline batteries have a longer operating time, they 
cannot be recharged. If You will use Your GP 1 often, we recommend to use NiMH rechargeable 
batteries. There are three ways of charging the batteries: with a rapid stand charger within approx. 3 
hours or with a 12 V cigarette lighter adaptor cable, which allows recharging from the 12 V car power 
supply or a 230V wall charger (Nr. 7360) within approx. 14 hours (normal charging).   


CAUTION:


Before You use the rapid stand charger, make sure that only the recommended 4 pcs 

1300 mAh NiMH batteries are inserted in the radio’s battery compartment! It is very dangerous to use 
not rechargeable or other type of batteries together with the rapid stand charger. Not approved 
batteries may leak, explode or even burn and can cause severe injuries!  
 

1.6. 

Installing batteries 


Insert batteries with correct 
polarity (see markings) 

Push down to 
open battery 
compartment 

12 V DC Cigarette lighter 
adaptor Nr. 29724 

6 V DC  charging 
socket  

Summary of Contents for GP 1

Page 1: ...User Manual Albrecht GP 1 1 Instruction Manual GP 1 ALAN Electronics GmbH www albrecht online de ...

Page 2: ... setting 12 5 1 3 Contrast adjustment 13 5 1 4 Backlight 13 5 1 5 Energy saving mode 13 5 1 6 Key beep tones 13 5 1 7 Software version 13 5 2 SETUP for GPS section 13 5 2 2 Different formats of LOCATION 14 5 2 3 Setting TIME ZONE 14 5 2 4 Programming DAYLIGHT time zones 14 5 2 5 Time display mode 12 hrs 24 hrs 14 5 2 6 Date display modes 14 5 2 7 Selecting units US nautical and metrical system 14 ...

Page 3: ...dio user functions 28 8 1 Direct functions 28 8 1 1 ON OFF 14 28 8 1 2 Volume adjustment 8 28 8 1 3 Monitor MON 15 28 8 1 4 Transmit button Push To Talk PTT 1 28 8 1 5 external sockets for mic earphone sets 5 29 8 2 Adjusting more PMR 446 functions via HOT KEY menu 29 8 2 5 Key lock Selection 30 9 Troubleshooting tables and warranty 31 9 1 Troubleshooting 31 9 2 European 2 years warranty 31 9 3 Wh...

Page 4: ...rtant to know Never attempt to charge alkaline or other normal dry cell batteries When recharging use only Albrecht s approved and recommended 1300 mAh rechargeable NiMH batteries order Nr 29723 and chargers Use of the charger with other batteries can cause damage to your PMR GPS unit Other types of batteries may burst and cause personal injury Nickel Cadmium batteries are not receommended because...

Page 5: ...insert non rechargeable alkaline batteries 4 pcs AA type or rechargeable NiMH batteries 4 pcs AA size 1300 mAh recommended While alkaline batteries have a longer operating time they cannot be recharged If You will use Your GP 1 often we recommend to use NiMH rechargeable batteries There are three ways of charging the batteries with a rapid stand charger within approx 3 hours or with a 12 V cigaret...

Page 6: ... GP LOCATOR Stores 10 Routes with Up to 20 Waypoints Each Provides 5 Tracks with 360 Legs on each track Map and Pointer Displays Provide Latitude and Longitude Current Average Maximum Speed Bearing and Heading Date and Time Sunrise and Sunset 2 2 PMR 446 features 8 PMR 446 Channels in 446 MHz Band 38 Privacy Codes For Each Main Channel Built In Hands Free VOX Capability Up to 5 Kilometers Range 2 ...

Page 7: ...of the travel time from the satellite to the ground If this travel time is multiplied by the speed of light the result is the satellite range distance from satellite to receiver The navigation information provided by each satellite consists of orbital and clock data plus delay information based on an ionospheric model Signal timing is provided by highly accurate atomic clocks Ground control There ...

Page 8: ...ur intended route and how long it will take you to arrive at that position By including three modes of operation your PMR GPS can act as a mobile radio transceiver only as a GPS unit only or as a combination of the two technologies for navigation and communication purposes The PMR GPS incorporates the following features and capabilities WAYPOINTS The unit provides 150 waypoints with user selected ...

Page 9: ...ls through menu pages in the forward direction 10 Battery compartment here You can insert 4 pcs AA type alkaline batteries or rechargeable NiMH batteries 11 DC6V charging socket for 230 V AC wall charger or 12 V DC cigarette lighter charging adapter cable only for normal charge 14 to 20 hrs 12 Battery bottom contacts Provide in unit charging of batteries when unit is placed in rapid stand charger ...

Page 10: ... screen will automatically enter the RADIO GPS mode default mode The GP 1needs to receive at least three strong satellite signals to find your location The standby page graphically shows the unit acquiring satellites as the satellite icons around the globe circumference become animated and darken SEARCHING appears under the ID bar at the top of the display When you see NAVIGATION appear your GMR G...

Page 11: ...on more than 1 5 seconds you can enter to the GATEWAY menu showing every 6 main pages on the screen And then you can move to the other page briefly by using UP DOWN ENTER wheel key 4 4 Flow chart Most important pages If You like to continue to operate the GPS section please read page 15 More flow charts can be found at the end of the manual in Chapter 9 Note Depending on software versions the grap...

Page 12: ...DE field and confirm with ENTER to get selections inside the sub menu Ø Select RADIO GPS RADIO ONLY oder GPS ONLY Ø RADIO GPS activates both sections of GP 1 while RADIO ONLY activates the radio transceiver part only and GPS ONLY the GPS section of the GP 1 5 1 2 USER ID setting A user ID is necessary when You intend to transmit Your position data to other partners via Your radio link Without User...

Page 13: ...1 5 Energy saving mode Activation of an energy saving mode is only possible for the GPS section This function is usefull to save battery life Note the radio part has already an automatic energy saving system To adjust the energy saving mode Ø Highlight PWR SAVE und confirm with ENTER The submenu appears Ø Select between OFF SHORT und LONG with UP DOWN OFF means no energy saving GPS continuously on...

Page 14: ...s Use the UP DOWN wheel key to select a location format Press ENTER 5 2 3 Setting TIME ZONE The time zone can be set to any one of forty preprogrammed zones or by selecting the UTC time offset value in the OTHER field of the TIME ZONE items To change the time zone Highlight the TIME ZONE field and press ENTER to display the available options Use the UP DOWN wheel key to select a preprogrammed time...

Page 15: ...d press ENTER Radio setup will appear on the display Any of radio setup options can be accessed using Up Down and press ENTER You can select to change the following options 5 3 1 Dual Watch operation Dual channel is used dual scanning channel It will be set up to maximum channel 8 To change the dual channel Highlight the DUAL CH field and press ENTER to select the available channels Use the UP DOW...

Page 16: ...GPS can be found on the different information pages PAGES RADIO GPS STANDBY PAGE LOCATION PAGE MAP PAGE POINTER PAGE GPS MENU PAGE SETUP PAGE To scroll through these pages press the PAGE button on the right side of the GP 1 If You hold the PAGE button pressed for longer than 1 5 seconds the System Menu page will open You can use the UP DOWN as a cursor to move through the System Menu page Dependin...

Page 17: ...atus display shows the relative position satellite numbers and their signal strength You can enter this STATUS page from the LOCATION PAGE by pressing ENTER This page provides following informations Satellite positions Where the satellite is located relative your position Satellite position graph The two circles indicates satellite elevation the outer circle represents the horizon and the inner ci...

Page 18: ...ust the map scale for a convenient display 6 3 3 Bar graph memory info A bar appears at the bottom of the display signifying the amount of memory used between 0 and 100 6 3 4 Information bars Two information bars at the top of the display automatically scroll through the following parameters changing the data presentation about every 3 seconds Present Position Longitude and Latitude Altitude Headi...

Page 19: ...on on the left side for this procedure When You touch this key only short time I will mark the present position Marking of a waypoint Ø Press shortly ON OFF MARK Ø The MARK PAGE appears With UP or DOWN You can highlight the fields SAVE SEND or MAP VIEW Confirm with ENTER Ø In SEND mode the position will be transmitted together with Your ID Code all partner stations will hear an alarm beep and see ...

Page 20: ...timated time to arrival to the destination based on the average speed SUNRISE Time in hours and minutes of sunrise dependent on setup selections SUNSET Time in hours and minutes of sunset dependent on setup selections MAX SPEED The maximum speed traveled since last trip reset AVG SPEED The average speed traveled since last trip reset SPEED Current speed of travel in MPH and knots KT When the wheel...

Page 21: ...highlight the WAYPOINTS field then press the Enter switch The WAYPOINTS display presents an alphanumeric listing of the waypoints you have marked along your trip In addition they appear automatically in alphanumeric order To access the waypoint column press ENTER the first waypoint designation will be highlighted The alphanumeric category 0 9 will be highlighted Toggle the wheel key switch to sele...

Page 22: ... MENU PAGE and confirm with ENTER Ø Toggle with UP DOWN until You find the symbol field highlighted confirm with ENTER Ø Select a waypoint symbol which should you can easily remember and confirm with ENTER The symbol appears in the LCD Ø Highlight the SAVE field and confirm with ENTER 6 5 1 2 Edit individual waypoint names for existing waypoints To edit Your waypoint names Ø Highlight one of the f...

Page 23: ...Down Press ENTER You will see the field EDIT ROUTE NAME With ENTER You will see an alphanumerical list where You can select Your characters with Up Down Highlight SAVE and confirm with ENTER 6 5 2 2 Add waypoints to a route You can insert up to 20 waypoints into each route Mark the selected route field Confirm with ENTER to see the waypoints window Mark the selected waypoint and confirm with ENTER...

Page 24: ...point DELETE a single track Press PAGE to return to the TRACKS field Other options CLEAR ALL This function will remove all stored tracks from the memory Press PAGE to return to the GPS MENU page 6 5 4 Receiving of GP LOCATOR data via radio link The GP LOCATOR field is used to display the coordinates received from other GP 1 units According to the European regulations only manual initiated selectiv...

Page 25: ... LOCATOR designation highlighted press the Enter button to access the review GP LOCATOR display The selected GP LOCATOR s coordinates and received time date and time will be displayed Any of GP LOCATOR options can be accessed using the Up Down switch when the desired option is highlighted you can perform the following tasks 1 GOTO the GP LOCATOR on the map page The name BEGIN and symbol B will use...

Page 26: ... Your partner stations Highlight the SEND field with UP DOWN and confirm with ENTER To have a good communication range take care that the antenna is in the upright position and hold Your GP 1 as high as possible during SEND procedure Within of less than 2 seconds Your GP 1 will transmit Your ID code together with the just marked position to Your partner s All people in Your communication range wor...

Page 27: ...lighted To change the degrees minutes and seconds information press the Up Down wheel key in the down position to scroll from left to right or press the wheel key in the up position to scroll from right to left respectively As each position is highlighted press Enter to select the value in question a menu appears as explained in step c After a value is changed press Enter to address the next chara...

Page 28: ... special functions like CTCSS Continuous Tone Coded Squelch System VOX automatic voice control SCAN automatic channel search Dual Channel priority scanning between 2 pre defined channels und Keylock 8 1 Direct functions 8 1 1 ON OFF 14 Hold the ON OFF MARK M key pressed for about 2 seconds You will hear a beep and the unit is ready To switch off hold the key pressed again for about 2 seconds 8 1 2...

Page 29: ...e transmitting on the selected channel press the MON button to check the activity on that channel If there is activity on the selected channel change to another channel that is clear The active channel will appear on the LCD To change the channel Press Up or DOWN wheel keys and the channel number will be highlighted Press the Enter switch The channel pop up screen appears Press the Up Down wheel k...

Page 30: ...separately your voice or signal is detected and the radio transmits and receives automatically There is no need to press the PTT button To change VOX sensitivity option Press UP or DOWN wheel keys and the VOX sensitivity option will be highlighted Press the Enter switch The VOX sensitivity option pop up screen appears Press the Up Down wheel key switch to select the VOX sensitivity option Confirm ...

Page 31: ...anship within 2 years from the date of original purchase such defect s will be repaired or replaced with new or reconditioned product at the company s option without charge for parts and repair labor To obtain repair or replacement within the terms of this warranty the product is to be delivered with proof of warranty coverage e g dated bill of sale specification of defect s to the distributor dea...

Page 32: ...User Manual Albrecht GP 1 32 9 4 Flow charts overview Note Due to regular software updates the graphic layout of some pages may appear slightly different compared to these flow chart overview ...

Page 33: ...User Manual Albrecht GP 1 33 ...

Page 34: ...User Manual Albrecht GP 1 34 ...

Page 35: ...User Manual Albrecht GP 1 35 ...

Page 36: ...User Manual Albrecht GP 1 36 ...

Page 37: ... 25 156 7 7 85 4 26 162 2 8 88 5 27 167 9 9 91 5 28 173 8 10 94 8 29 179 9 11 97 4 30 186 2 12 100 0 31 192 8 13 103 5 32 203 5 14 107 20 33 210 7 15 110 9 34 218 1 16 114 8 35 225 7 17 118 8 36 233 6 18 123 0 37 241 8 19 127 3 38 250 3 00 kein Subton 9 6 Frequency table Channel Frequency MHz 1 446 00625 2 446 01875 3 446 03125 4 446 04375 5 446 05625 6 446 06875 7 446 08125 8 446 09375 ...

Page 38: ...elgium free of charge and licence for less than 3 months Residents of Belgium must apply for a radio operating licence according to Belgian regulations Eastern Europe Please ask the local authorities before using the radio because only few countries apply already the european R TTE directive Following countries still apply special national approval regulations not yet valid for GP 1 Poland Estonia...

Reviews: