BACK cover
AtomsLabs.com
Full QSG with TIPs and NOTEs
ONE-YEAR LIMITED WARRANTY
IMPORTANT: Evidence of original purchase is required for warranty service.
WARRANTOR:
Atoms Labs LLC (“ALC”)
ELEMENTS OF WARRANTY:
The ALC warranty covers the product for one (1) year
from the documented date of purchase. The purchase date must be documented with either an original sales receipt from the
first retailer selling the product or by credit card receipts or statements.
WARRANTY DURATION:
This warranty to the original user shall terminate & be of no further effect 12 months after the date
of original retail sale. The warranty is invalid if the Product is (A) damaged or not maintained as reasonable or necessary, (B)
modified, altered, or used as part of any conversion kits, sub-assemblies, or any configurations not sold by ALC, (C) improperly
installed, (D) serviced or repaired by someone other than an authorized ALC service center for a defect or malfunction covered
by this warranty, (E) used in any conjunction with equipment or parts or as part of any system not manufactured by ALC, or (F)
installed or programmed by anyone other than as detailed by the owner’s manual for this product.
STATEMENT OF REMEDY:
If the product is under warranty, ALC will either, at its option, repair or replace the defective unit &
return it to you without charge for parts, service, or any other cost. ALC, at its option, may replace the unit with a new or
refurbished unit.
THE LIMITED WARRANTY SET FORTH ABOVE IS THE SOLE & ENTIRE WARRANTY PERTAINING TO THE PRODUCT
& IS IN LIEU OF & EXCLUDES ALL OTHER WARRANTIES OF ANY NATURE WHATSOEVER, WHETHER EXPRESS,
IMPLIED OR ARISING BY OPERATION OF LAW, INCLUDING, BUT NOT LIMITED TO ANY IMPLIED WARRANTIES OF
MERCHANTABILITY OR FITNESS FOR A PARTICULAR PURPOSE. THIS WARRANTY DOES NOT COVER OR PROVIDE
FOR THE REIMBURSEMENT OR PAYMENT OF INCIDENTAL OR CONSEQUENTIAL DAMAGES.
Some states do not allow
this exclusion or limitation of incidental or consequential damages so the above limitation or exclusion may not apply to you.
LEGAL REMEDIES:
This warranty gives you specific legal rights, & you may also have other rights which vary from state to
state. This warranty is void outside the United States of America & Canada.
PROCEDURE FOR OBTAINING PERFORMANCE OF WARRANTY:
If, after following the instructions in the owner’s manual you
are certain that the Product is defective, pack the Product carefully (preferably in its original packaging). The Product should
include all parts & accessories originally packaged with the Product. Include evidence of original purchase & a note describing the
defect that has caused you to return it. The Product should be shipped freight prepaid, by traceable means, to warrantor at:
Atoms Labs, LLC
1040 Trade Avenue
Customer Support:
844-767-8544
DFW Airport, TX 75261
9:00 am to 6:00 pm (CST)–Monday through Friday
ALC appreciates your support and feedback! If you come across software bugs or ways we could improve our products,
we would love to hear about them! Please email us at
support@atomslabs.com
and you will hear back from us within
(2) business days.
FCC Compliance Statement: This device complies
with Part 15 of the FCC rules. Operation is subjected
to the following two conditions: (1)this device may not
cause harmful interference, and (2) this device must
accept any interference received, including
interference that may cause undesired operation.
Products with CE Marking comply with EMC Directive
(2004/108/EC); Low Voltage Directive (73/23/EEC);
R&TTE (1999/5/EC); ROHS Directive (2011/65/EU) issued by the
Commission of the European Community. Compliance with these
directives implies conformity to the following European Norms:
EMC: EN 301 489 LVD: EN 60950 Radio: EN 300 328
If the camera system no longer functions or can no longer be repaired, it must be disposed of according to the valid
statutory regulations. Disposal of spent batteries/accumulators:
You are required by law (Battery Ordinance) to return all spent batteries and accumulators. Disposing of spent
batteries/accumulators with common household waste is prohibited! Batteries/accumulators that contain hazardous
substances are marked with the symbols on the side. These symbols indicate that it is prohibited to dispose of these
batteries/accumulators in the household waste. The abbreviations for the respective heavy metals are: Cd=cadmium,
Hg=mercury, Pb=lead. You can return spent batteries and accumulators that can no longer be charged to the
designated collection points in your community, outlets or wherever batteries or accumulators are sold. Following
these instructions will allow you to fulfill the legal requirements and contribute to the protection of our environment!
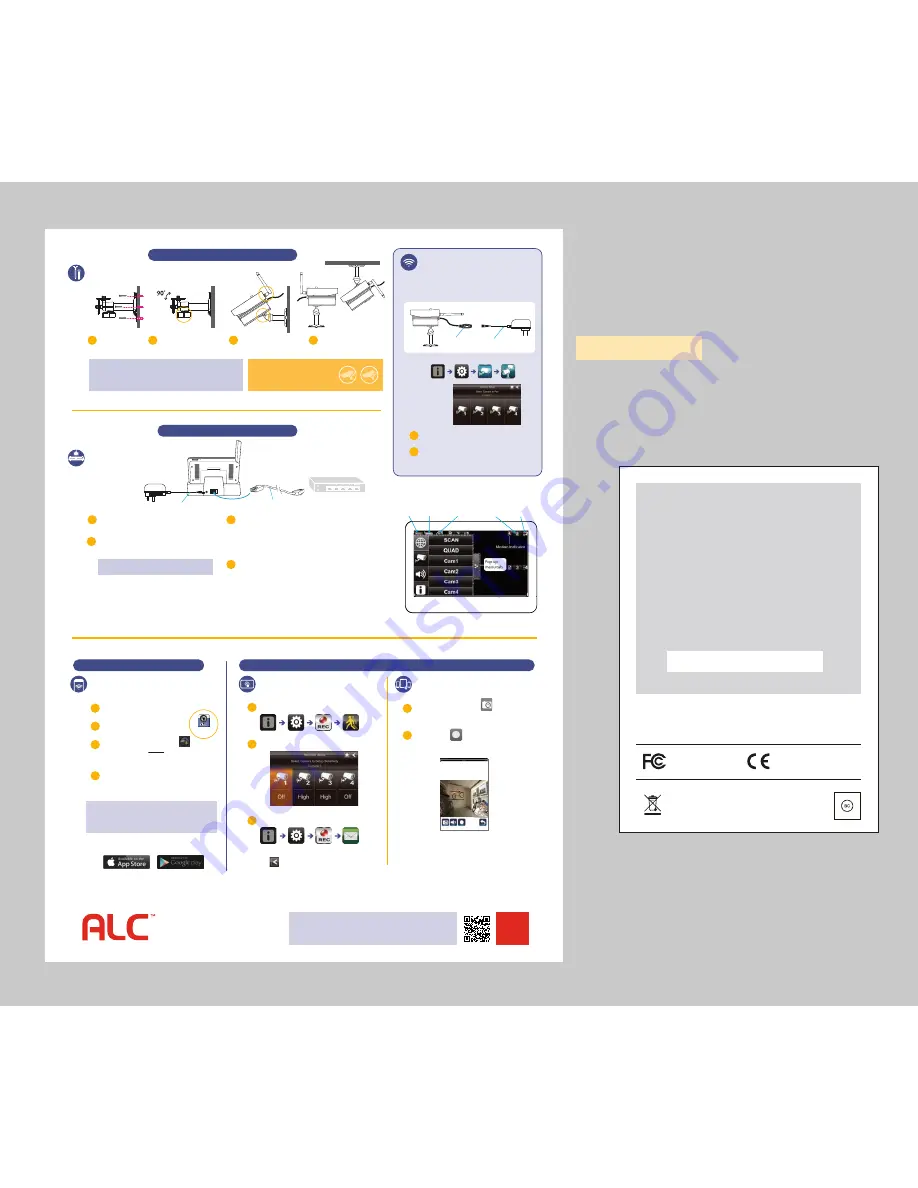
REMOTE VIEWING
RECORDING FROM SMART CONTROL PANEL
Ceiling Mount
Surface Mount
CAMERA MOUNTING
DOCKING STATION
MOTION RECORDING
FROM CONTROL PANEL
NOTE:
Cameras are IP66 rated for indoor/outdoor use. For outdoor use it is
recommended to install camera under shelter to protect from direct exposure to
sunlight and other environmental elements. Avoid pointing a camera directly at any
bushes or tree branches or objects that may naturally move due to winds.
NOTE:
Allow 8 hours to charge Control Panel before initial
use. The screen will remain dark until a camera is powered.
NOTE:
When the Control Panel monitor is placed in the docking
cradle and “CHARGE ONLY” is selected, you can still access your live
video from smartphone(s) or tablet(s) as long as those devices are
also connected to the same network as the monitor.
CAMERA INSTAL SETUP
1
1
2
2
4
3
AC power cable
Included Ethernet Cable
Internet Router (not included)
TIP:
For additional Camera Set Up options, alarm, recording
and system set-ups, see complete user manual at
www.atomslabs.com/support-AWS3266_manual.PDF
NOTE :
For detailed installation and setup, please refer to the
Model AWS3266 extended User’s Guide available on our website:
www.atomslabs.com/support-AWS3266_manual.PDF
PAIRING ADDITIONAL
CAMERAS TO CONTROL PANEL
Each camera in the system is already paired as Camera-1
and Camera-2.
If cameras do not show on the control panel
monitor after plugging in, or if you are adding additional
accessory cameras, use the following steps to pair each camera.
From the start menu select the follow icons as they appear
Select camera
station to
be paired
Tap the CAMERA STATION you want to pair;
a 60-second timer will start.
Within 60 seconds, press the PAIRING KEY
once
on the camera’s
power cord. When pairing is complete, LIVE Cam view for each
camera will appear on the Control Panel Monitor.
CONTROL PANEL SETUP
SCAN
TO VIEW
COMPLETE
USER’S GUIDE
Wireless
Made Simple.
x3
x4
EXPANDABLE
up to 4 cameras
Ask your retailer for accessory cameras
(Model AWSC36) compatible with this system.
Use of audio or video equipment for recording the image of a person without their knowledge and consent is prohibited in certain states or
jurisdictions. The end-user assumes all liability for compliance with applicable state, local and federal laws. Wireless cameras require a wired
connection to AC power outlet. Network conditions and environmental factors can adversely affect wireless signal range. Actual night vision range
and image clarity depends on installation location, viewing area and light reflection / absorption. Lithium-ion battery must be recycled or disposed
of properly. Photography and illustration may differ slightly from actual product.
©2014 Atoms Labs LLC, All rights reserved. iPhone, iPad, iPod Touch, and App Store are registered trademarks of Apple, Inc. Chrome and
Android are registered trademarks of Google, Inc. Certain other product names, brand names, and company names may be trademarks or
designations of their respective owners.
Secure the multi-position
camera stand to a stable
surface, ceiling or wall.
1
Place control panel monitor in docking station and
tap CONNECT TO INTERNET from the Start Menu.
2
From your smart device, DOWNLOAD and
INSTALL the ALC
Observer App
.
Open Observer App and tap +Camera icon
then tap SEARCH and the DID code from your system
will appear in a pop-up box. The DID code will
automatically copy to the System Information screen.
Observer
3
4
Add System NAME and the PASSWORD you entered into
your Control Panel Monitor and tap SAVE. Your system is
now added. Tap the GLOBE icon to view active cameras.
Loosen the T-Bolt on the camera
stand and adjust viewing angle using
the Thumb Screw to rotate position.
Align hole on bottom of camera
with T-Bolt to install camera.
Screw antenna into rear of camera.
Attach power cable to power
extension cord AC Adapter.
Plug into electric outlet.
5
6
8
7
Connect the AC/DC adapter to the power input on the back
of the Docking Station and plug into an electrical outlet.
Place Control Panel onto the Docking Station and extend the
antenna. Press and hold the Power button on the top of the
monitor for 3-4 seconds until screen illuminates.
The camera(s) installed and plugged in will automatically appear on the
control panel monitor, with or without Internet cable connected to a
wireless network router.
For remote viewing on smart devices, the control panel must be
connected to Internet. Plug one end of the provided cable into back of
Docking Station and the other end into an Ethernet port on router.
To Prepare for Recording, insert the SD card provided into the slot on
right side of the Control Panel. Most SD card brands are supported up
to 32 GB. The SD Card status icon on Control Panel will indicate proper
installation.
SD Card
Status
Battery
Status
Internet Connection
status
Recording
Status
Camera Number
Signal Status
On-screen Display
1
From Pop-Up menu, tap the following icons
2
Tap the camera’s Sensitivity to OFF, PIR, LOW or HIGH (default is PIR).
3
To set up EMAIL ALERT, tap the following icons from the pop-up menu,
fill in the information fields and tap OK to save,
then < to return to the previous screen.
FREE APP DOWNLOAD
FROM SMART DEVICE
FROM SMART DEVICES
1
From LIVE VIEW , Tap CAMERA Icon to capture screen
images from camera selected. Snapshots will be saved to
camera roll of your mobile device.
2
Tap RECORD icon to save video to the system’s SD Card.
Press record again to stop recording.
LIVE VIEW
System 1 (Live Video)
Connected
640x480
P2P, No1, 12.67FPS
AC power cable
Camera In-line
Pairing Button


