Installing the Chassis
9
Chapter 2
Mounting the Chassis
Verify that your rack environment meets requirements (see
“Selecting a Location”
on
page 8
).
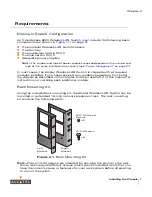
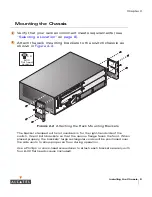
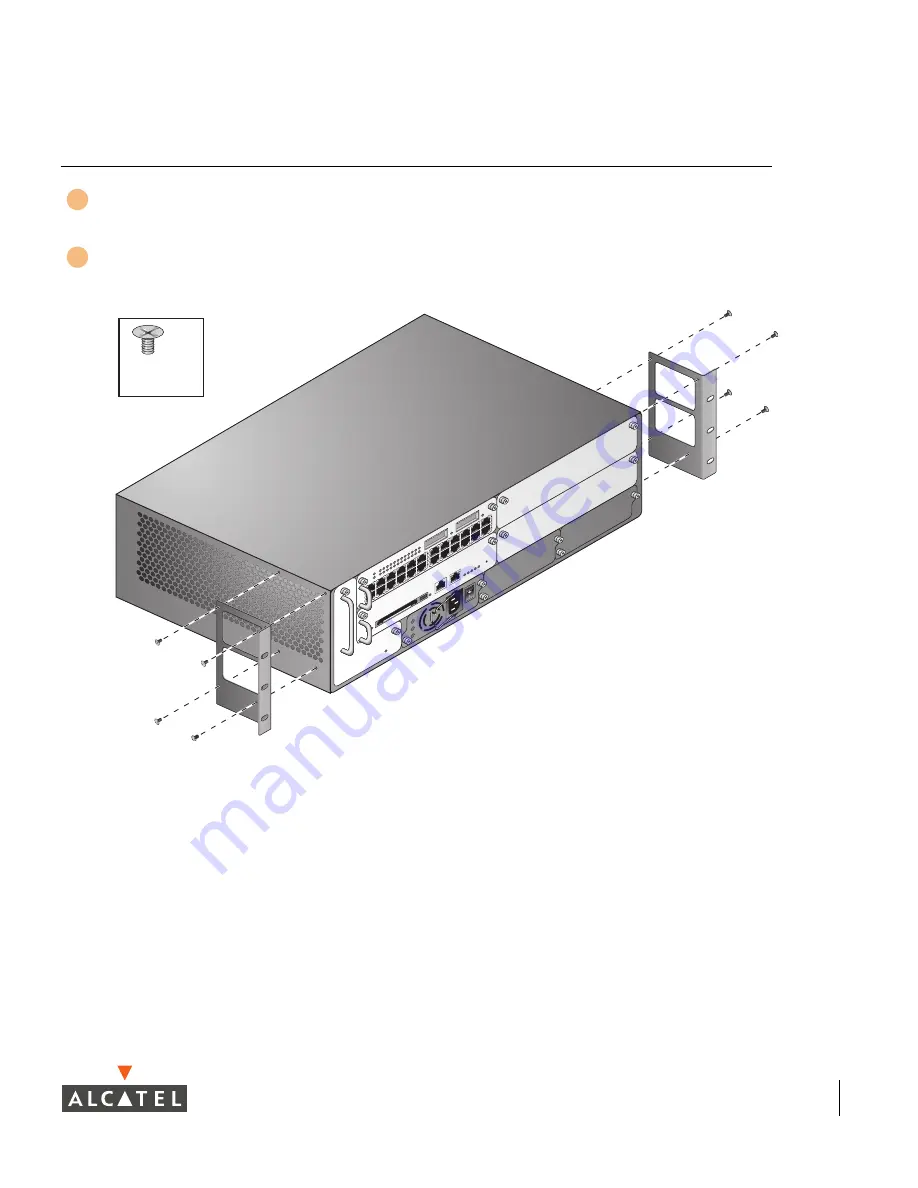
Attach the rack mounting brackets to the switch chassis as
shown in
Figure 2-2
.
F
IGURE
2-2
Attaching the Rack Mounting Brackets
The bracket stamped with slot numbers is for the right-hand side of the
switch. Orient both brackets so that the narrow flange faces the front. When
placed properly, the brackets’ large rectangular voids will be positioned over
the side vents to allow proper air flow during operation.
Use a Phillips or cross-head screwdriver to attach each bracket securely with
four 6-32 flat head screws (included).
1
2
SLO
T
SL
O
T
1
SLO
T
SL
O
T
3
SLO
T
1
SLO
T
3
x 8
6-32
flat head
screws
Summary of Contents for OmniAccess 6000
Page 1: ...i OmniAccess 6000 Wireless LAN Switch Installation Guide TM ...
Page 10: ...OmniAccess 6000 Installation Guide x Part 031639 00 May 2005 ...
Page 14: ...OmniAccess 6000 Installation Guide xiv Part 031639 00 May 2005 ...
Page 18: ...OmniAccess 6000 Installation Guide 4 Part 031639 00 May 2005 ...
Page 27: ...Installing the Chassis 13 Chapter 2 ...
Page 28: ...OmniAccess 6000 Installation Guide 14 Part 031639 00 May 2005 ...
Page 36: ...OmniAccess 6000 Installation Guide 22 Part 031639 00 May 2005 ...
Page 48: ...OmniAccess 6000 Installation Guide 34 Part 031639 00 May 2005 ...
Page 74: ...OmniAccess 6000 Installation Guide 60 Part 031639 00 May 2005 ...


