background image


Temporis IP80 User’s guide 

V1.0 

Page 7 

2.8.


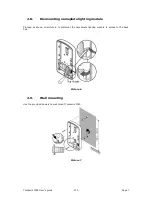
Dismounting nameplate lighting module 

 
Proceed as shown on picture 6 to dismount the nameplate lighting module to access to the back 
hole. 


Picture 6 


2.9.


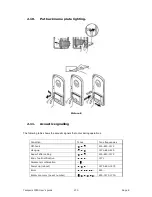
Wall mounting 

Use the provided dowels to wall mount Temporis IP80. 


Picture 7 


Summary of Contents for Temporis IP80

Page 1: ...Temporis IP80 User s guide ...

Page 2: ...8 2 11 Acoustic signalling 8 3 Visitor at the door 9 3 1 Incoming calls 9 3 2 Outgoing calls 9 4 Parameter setting 10 4 1 Access Temporis IP80 web interface 10 4 2 Language selection 10 4 3 Network settings DHCP or fixed IP mode 11 4 4 Basic parameters 12 4 5 P2P or SIP registration on IPBX 13 4 6 Audio settings 14 4 7 Video settings 14 4 8 Relay management 15 4 9 Time parameters 16 4 10 Dial up N...

Page 3: ...P connection P2P or IPBX network system Two 25 digit dial up numbers or IP address Day night switching mode Call duration extension by pressing or 2 relays to connect two independent locks or to control with the second relay another device such as camera lighting delayed opening etc Two codes controlling communication hang up Two codes to trigger the 2 relays Integrated heating of printed circuit ...

Page 4: ...our package Temporis IP80 Kit for wall mount Key to open the unit Name label Mini CD including user guide Temporis Pop up softphone datasheets 2 2 Modules Temporis IP80 is composed of an IP module assembled with the mother board the PoE module and the IP camera module picture 1 Picture 1 Basic module mother board ...

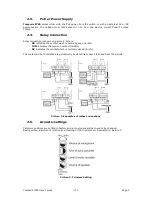
Page 5: ...O indicates the contact which is normally open in idle COM indicates the common contact middle NC indicates the contact which is normally closed in idle The contacts in both switches are galvanically insulated from each other and from the circuits Picture 2 Examples of relays connections 2 5 Acoustic settings Trimmers positions are settled in factory and in most cases will not need to be changed B...

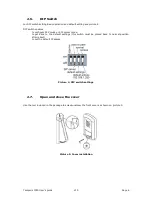
Page 6: ...o configure P2P mode or SIP server mode to get back to the default settings this switch must be placed back to normal position after reboot to set the default IP adress Picture 4 DIP switch settings 2 7 Open and close the cover Use the tool included in the package to screw unscrew the front cover as shown on picture 5 Picture 5 Cover installation ...

Page 7: ...ge 7 2 8 Dismounting nameplate lighting module Proceed as shown on picture 6 to dismount the nameplate lighting module to access to the back hole Picture 6 2 9 Wall mounting Use the provided dowels to wall mount Temporis IP80 Picture 7 ...

Page 8: ...ollowing table shows the acoustic signals that occur during operations Condition Tones Tone frequencies Off hook 425 850 1275 Hang up 1275 850 425 Report after calling 425 850 1275 End of call notification 1275 Parameter confirmation Power up reboot 1275 850 1275 Error 425 Empty memory no set number 850 1275 1700 ...

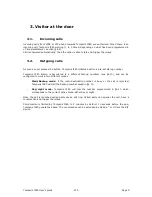
Page 9: ...button is associated to 2 different dial up numbers see 4 10 and can be configured to work in two different modes Main Backup mode if the main destination number is busy or the call is rejected Temporis IP80 will call the backup number saved in 4 10 Day night mode Temporis IP80 will dial the number programmed in 4 10 which corresponds to the current active mode either day or night Once the call is...

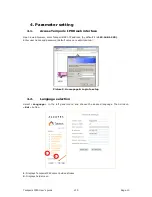
Page 10: ... IP80 IP address by default it is 192 168 1 250 Enter user name and password default values are admin admin Picture 9 Home page Login to setup 4 2 Language selection Select Language in the left panel menu and choose the desired language Then click on Set button 1 Displays Temporis IP80 camera video stream 2 Displays help screen 1 2 ...

Page 11: ...figuration By default the IP address is 192 168 1 250 You may change all the parameters in this page default setting can be recovered by clicking on default values button Once done click on save and restart button to save your settings DHCP configuration 1 Enable disable network settings via DHCP 2 DHCP assigned IP address and other settings are shown 3 Show Temporis IP80 mode Day Night 1 2 3 ...

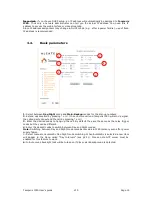
Page 12: ...ressing or 10 sec before call end Temporis IP80 will send a signal the called party can extend the call by pressing or 3 Enter the desired codes to hang up the call By default they are the same as the relay trigger codes but they can be different 4 Enter the desired codes to switch between Day and Night modes Note Switching between Day and Night mode remains remains in IP80 memory even after power...

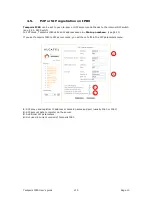
Page 13: ...tch In P2P mode Temporis IP80 calls an IP address saved in Dial up numbers see 4 10 If you set Temporis IP80 to SIP server mode you will have to fill in the SIP parameters menu 1 SIP proxy and registrar IP address or domain names and port usually 5060 or 5061 2 SIP account data to register on the server 3 Additional SIP parameters 4 Not used in current version of Temporis IP80 1 2 3 4 ...

Page 14: ...priority for SIP calls You can also disable a codec by choosing Available codecs are G711µ G711a G726 GSM 4 7 Video settings 1 Video resolution and frame rate 2 Video correction parameters 3 Choose the video codec priority for SIP calls You can also disable a codec by choosing 1 2 3 ...

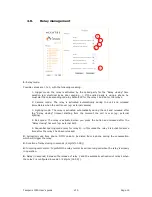
Page 15: ...eased after the Relay closing timeout starting from the moment the call is over eg external lighting 4 Bell mode The relay is activated when you press the button and released after the Relay closing timeout eg external bell 5 Sequential opening mode only for relay 2 in this mode the relay 2 is activated some time after the relay 1 has been released 2 Activation code from phone DTMF code to be dial...

Page 16: ...orised you can set the number rings before Temporis IP80 picks up the call The number of rings can be set from 1 to 9 3 Time sec Temporis IP80 will hang up before redialling when the called party is busy range 1 5 4 Time sec Temporis IP80 will stay in calling mode hear the ring back tone before hanging on then redialing when the called party doesn t answer range 10 99 5 Enable disable the acoustic...

Page 17: ... 2 Night Backup is the number that will be dialed when user presses IP80 while the device is in Night mode It is also the number that will be dialed automatically if in Main Backup mode and the call to Main is rejected By default Dial up Numbers are empty When using P2P mode you should enter your destination IP address e g 192 168 1 250 where means When using SIP proxy server mode you can save ext...

Page 18: ...y of the week The remaining intervals will be the considered as night mode Note Time server must be up and running see 4 12 4 12 User interface 1 Displays the video on login page 2 Requires the password to display the video stream Only a web browser will be able to display video 3 Enables video surveillance using codec H 264 4 Modifies the web interface port 5 Enables telnet service 1 2 3 4 5 ...

Page 19: ...ware upgrade click on browse select the firmware file then press save 6 Language upgrade 7 Save current configuration in a file 8 Upload a configuration file 9 Change the admin password 5 Electrical Parameters Parameter Value Conditions Communication interface Ethernet 10Base T 100Base TX VoIP protocol supported SIP Bandwidth 300Hz 3400Hz Power supply 12V 2V AC or DC Max consumption 300mA 12Vss Ma...

Page 20: ...Product part found during the warranty period to have a defect in design materials or workmanship shall be repaired or replaced at no cost to you by a product or part that is identical or at least equivalent in terms of function and performance If repair or replacement is not possible on a commercially reasonable basis ATLINKS will refund the purchase price of the Product or replace the Product by...

Page 21: ...ncome or revenue ii loss of profit iii loss of business iv loss of anticipated savings v loss of data vi any waste of time or vii downtime or loss of use However this clause shall not prevent claims for foreseeable loss of or damage to your physical property Nothing in this warranty excludes or limits in any way ATLINKS liability for i death or personal injury caused by our negligence ii fraud or ...

Page 22: ...nce with the household waste If you are the owner of the appliance you must deposit it at the appropriate local collection point or leave it with the vendor when buying a new appliance a If you are a professional user please follow your supplier s instructions b If the appliance is rented to you or left in your care please contact your service provider Please help us protect the environment in whi...

Reviews: