background image


Digital Inverter Generator with Pure Sine Wave

AFTER SALES SUPPORT

e-mail: help@powertoolsupport.com

1800 909 909

MODEL: №. EP2800i  •  09/2018  •  62007

(toll free)

AFTER SALES SUPPORT

(toll free)

Digital Inverter Generator with Pure Sine Wave

e-mail: help@powertoolsupport.com

1800 909 909

MODEL: №. EP2800i  •  09/2018  •  62007

30

31

Maintenance

Maintenance

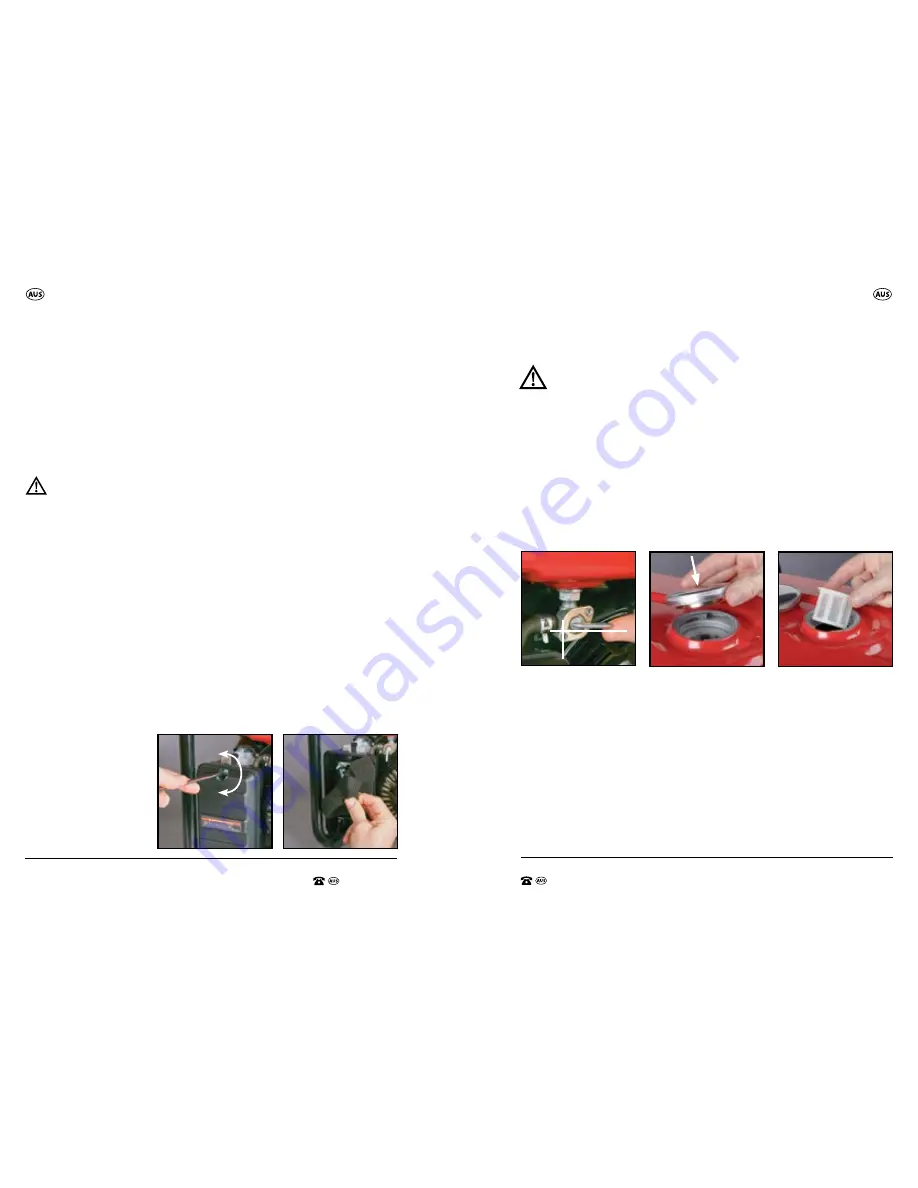
Fuel Tank Inlet Filter

WARNING: Ensure the engine is switched off while undertaking  

this task.

1.   Turn the fuel tap/ lever (23) to the ‘off’ position (Fig AC).
3.   The fuel tank inlet filter (24) is located directly under the fuel tank cap 

(27) and protects impurities entering the fuel tank (26) during refuelling.  

Remove the fuel tank cap (27) by turning in an anti-clockwise direction  

(Fig AD).

4.   Remove the fuel tank inlet filter (24) (Fig AE) and wash thoroughly  

in petrol.

5.   Re-assemble by putting the fuel tank inlet filter (24) back, and then 

securing the fuel tank cap (27) in a clockwise direction until firmly 

secured.

Fuel extension filter

A small fuel extension filter (22) has been fitted to the inlet side of the fuel 

lever tap (23), inside the tank. This fuel extension filter (22) prevents any dirt 

in the fuel from entering the fuel system. The procedure for removing this 

filter is as per follows:
NOTE: the following procedure should be performed in a well ventilated 

area, with no naked flames, sparks, or cigarettes. Safety glasses should also 

be worn and both the engine on/off switch (2), and the 240Va.c Outlet 

power on/off switch (1) need to be in the OFF position.

Air Filter

It is very important to maintain an air filter (18) in proper condition. Damage to 

the generator may arise if the filter has:
•   Improperly been serviced.
•    Dirt and other foreign elements adhering to the filter due to improper 

installation and engine wear.

It is recommended the air filter (18) is cleaned every 50 hours (every 10 hours 

under dusty conditions).
ALWAYS keep the filter clean at all times.

WARNING: Ensure the engine is switched off while undertaking this task.

1.   Remove the air filter cover (17) on the side of the generator using the 

supplied screwdriver (31) by removing (unscrewing) the two screws on the 

face of the cover, in an anti-clockwise direction (Fig AA).

2.  Remove the air filter (18) (Fig AB).
3.  Wash the air filter (18) in hot soapy water and allow to dry.
4.  Lubricate the air filter (18) using a small amount of engine oil (SAE 10W-30).
5.  Thoroughly squeeze the air filter (18) removing any excess oil.
6.  Replace the air filter (18).
7.   Secure the air filter cover (17) back on to the side panel of the air filter 

housing using the supplied screwdriver (31) by screwing back in the two 

screws in a clockwise direction until secure.

IMPORTANT. Never run the engine without the air filter element in place.

CAUTION: Never use fuel or low burning paint solvents to clean the air filter 

(18). A fire or explosion could result.

CAUTION: Ensure the air filter (18) is dry before re fitting.
Replacement air filters are available from https://help.tools/ or by calling 

Customer Service on  

1800 909 909.

AE.

AD.

AC.

ON

OFF

AB.

AA.

LOOSEN

TIGHTEN

Summary of Contents for Workzone Titanium+ 62007

Page 1: ...OR WITH PURE SINEWAVE User Manual Product Info https help tools Read all safety warnings and all instructions thoroughly before operating this product Ensure you keep your manual in a safe place for future reference IM Ed7 09 2018 ...

Page 2: ...Description of symbols 3 General safety warnings 4 Additional Safety Rules for Petrol Products 6 Safety Risk 8 Risk of electrocution and fire 8 Risk of fire 9 Risk of injury and property damage when transporting generator 9 Risk of breathing inhalation hazard 9 Risk of unsafe operation 10 Risk of hot surfaces 10 Risk of moving parts 10 Risk from lifting 10 Assembly 11 Parts List 12 Intended use of...

Page 3: ...sensitive equipment like computers sound systems televisions microwaves etc it is highly recommended to have a surge protector connected to the generator NOTE This petrol Generator is NOT suitable for Marine applications and should never be used on board water craft Continuous off the grid power Contents of carton 1 x Inverter Generator 1 x Instruction Manual 1 x Warranty Card details 1 x Quick St...

Page 4: ...g power tools with your finger on the switch or energising power tools that have the switch on invites accidents d Remove any adjusting key or wrench before turning the power tool on A wrench or key left attached to a rotating part of the power tool may result in personal injuries e Do not overreach Keep proper footing and balance at all times This enables better control of the power tool in unexp...

Page 5: ...e oil Any extension cable should be of heavy duty 3 core and rated to 15A and suitable for outdoor applications Never fill fuel tank indoors Never fill fuel tank when engine is running or hot Do not smoke when filling fuel tank NEVER REFUEL WHEN THE GENERATOR IS RUNNING Switch the generator to the off position prior to removing the fuel cap and refuelling Not suitable for ethanol fuels Engine spee...

Page 6: ...ettes sparks fires or other hot objects can cause fuel or fuel vapours to ignite Add fuel to tank in well ventilated area Make sure there are no sources of ignition near the generator Improper storage of fuel Improperly stored fuel could lead to accidental ignition Fuel improperly secured could get into the hands of children or other unqualified persons Store fuel in an approved container designed...

Page 7: ...moving parts Hazard What could happen How to prevent it Contact with moving parts can result in serious injury The generator contains parts which rotate at high speed during operation These parts are covered by guarding to prevent injury Never operate generator with guarding or cover plates removed Avoid wearing loose fitting clothing or jewellery which could be caught by moving parts Risk from li...

Page 8: ...ndicator light 6 Power Supply indicator light 7 Muffler 8 Exhaust spark arrestor 9 AC sockets X2 10 Fuel drain 11 Control panel 12 Oil Filler cap dipstick 13 Oil tank 14 Ground frame terminal 15 Recoil starter 16 Choke lever 17 Air filter cover 18 Air Filter 19 Spark plug lead cover 20 Spark Plug 21 FuelTap outlet 22 Fuel extension filter 23 Fuel tap lever 24 Fuel tank inlet filter 25 Feet x4 26 F...

Page 9: ...ectrical appliance s including televisions computers laptops caravans etc It comes fitted with 2 x 240V AC outlets giving you the ability to run 2 x electrical appliances at the one time as long as the combination of the maximum rating of each appliance does not exceed the maximum rated power of the generator The maximum operational combination on this generator is 2000W For a short period to aid ...

Page 10: ...e is overheated caused by high temperature Preparation information Preparation Information c Flashing 3 times indicates overload protection caused by an excessive electrical overload d Flashing 4 times indicates there is an electrical problem most likely caused by a short circuit In any of the above instances when the red load status indicator light 5 turns on the power supply to the control panel...

Page 11: ...oil indicator light 4 If the oil level is too low the engine will stop operating or the engine will not start It is advised to check the oil level each time the generator is used and fill to the upper mark on the oil filler cap dipstick 12 by the above method Do NOT over fill Preparation Information Preparation Information WARNING Do not refill fuel tank 26 while engine is running or is hot Check ...

Page 12: ...f the generator ensuring it is in front of the oil filler cap dipstick 12 area Commence removing the oil filler cap dipstick 12 by rotating in an anti clockwise direction to remove so that the oil can be completely drained from the oil reservoir WARNING Oil may be warm to hot It is recommended to wear gloves for protection 3 Tilt the generator forwards Fig I so that the oil can drain from the oil ...

Page 13: ... green position as indicated by an I down Fig O This generator will not start without this switch in the ON position 5 To start the engine slowly pull the recoil starter 15 until you feel it engage and then pull it briskly Fig P When starting the engine for the very first time it may require a number of attempts to start until the fuel has travelled from the tank to the engine Slowly pull the reco...

Page 14: ... All appliances are rated differently This generator will work only with Australian approved rated appliances with an input voltage of 220 240Va c FigT Check your appliances meet this requirement on its rating label before using them In simple terms if you cant use the product in your home you definitely cannot use it on this generator Overload condition Where the appliances want more power then t...

Page 15: ...ency protect people that could be in harms way first Carbon build up Carbon build up can be a problem on generators as the loading on the engine can vary considerably Running the generator at low loading for extended periods can cause carbon build up Carbon build up in the engine can be reduced by operating the generator at approximately 75 of rated load for 25 of the time the generator is used i ...

Page 16: ...d spark plug spanner by rotating in a clockwise direction FigY 2 Remove carbon deposits using a wire brush 3 Check for discoloration on the top of the spark plug 20 The standard colour should be a tan colour 4 Check the spark plug gap The acceptable gap should be between 0 6 0 8mm Fig Z CAUTION Check that no foreign material debris or dust enters the crankcase Replacement spark plugs are available...

Page 17: ...ch 2 and the 240Va c Outlet power on off switch 1 need to be in the OFF position Air Filter It is very important to maintain an air filter 18 in proper condition Damage to the generator may arise if the filter has Improperly been serviced Dirt and other foreign elements adhering to the filter due to improper installation and engine wear It is recommended the air filter 18 is cleaned every 50 hours...

Page 18: ... wire arms compressed slide the hose clamp up onto the connection of the hose and the tap 7 Refill the tank with fuel and ensure there are no leaks between the fuel tap lever 23 and the tank and with the fuel tap turned on ensure there are no leaks where the fuel hose is fitted to the outlet of the tap AG AF AH 1 Keep your machine clean The outside of the machine can be cleaned using a damp soft c...

Page 19: ...ents for repair or call us 1800 909 909 for advice A listing of our Service Agents is included with your product however you can also find our most updated listing on our website https help tools by clicking on the Service Agent link Environmental Protection Troubleshooting Service Support Environmental Protection What your 3 year warranty means Troubleshooting Trouble Possible cause Suggested rem...

Page 20: ...aulty power cord 3 Have an electrician replace cord 4 240Va c Outlet Power On Off switch 1 turned off 4 Check the 240Va c Outlet Power On Off switch 1 is ON Repeated overload 1 Overload 1 Reduce load 2 Faulty cords or equipment 2 Check for damaged bare or frayed wires on equipment Replace Generator overheating 1 Generator overloaded 1 Reduce load 2 Insufficient ventilation 2 Move to adequate suppl...

Page 21: ...products are developed to our stringent quality specifications If you are not entirely satisfied with this product please return it to your nearest ALDI store within 60 days from the date of purchase for a full refund or replacement or take advantage of our after sales support by calling the supplier s Customer Service Hotline Made in China WORKZONE TITANIUM is a registered trademark of ALDI Store...

Reviews: