background image

First use

16

www.isc-gmbh.info

GB

AFTER SALES SUPPORT

16

IRE

GB
IRE

0044 151 649 1500 

0044 1890 946 244

First use

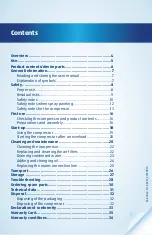
Checking the compressor and product contents


WARNING!

Risk of swallowing and choking!

Children must not play with plastic bags, wrappers and small parts. There is a 
risk of being swallowed and suffocation.


− Keep children away from the compressor, small parts and the packaging 

material.


− The compressor is not a children’s toy.

1. Lift the compressor out of the packaging with both hands.

2. Place the compressor on a level, stable surface. 
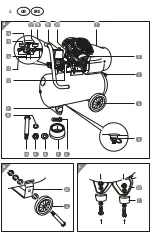
3. Check to make sure that the delivery is complete (see 

fig. A 

and 

and

 the list on p. 6

).

4. Check whether the compressor or the accessories exhibit damage. If this is the 

case, do not use the compressor. Contact the manufacturer at the service address 

specified on the warranty card.

5. To the extent possible, store the packaging until the warranty period has expired.

Preparations and assembly

The following assembly steps must be performed before using the compressor for the 

first time. You will need two open-ended spanners or ring spanners with a width of  

AF 14 and AF 17 as well as a flat-headed screwdriver for removing the transport caps.

Mounting the wheels

The wheels must be mounted before using the compressor for the first time. To do so, 

proceed as follows (see 

fig. B)

:

1. Place the back part of the compressor on a stable, slightly elevated base  

(e.g. a tool box) so that the wheels

  4

 can be mounted on the wheel support 

brackets

  21

 (see 

fig. A 

and 

B

).

2. Insert the axle screw

  10

 through the wheel from the outside.

3. Put a washer

  8

 on the axle screw.

4. Insert the axle screw through the wheel support brackets on the compressor.
5. Put the second washer on the axle screw.
6. From the back, place the spring washer

  11

 on the axle screw.

7. With one hand, screw a nut

  9

 onto the axle screw.

Summary of Contents for Workzone WAC 3050/1

Page 1: ...3HP 50 L AIR COMPRESSOR WAC 3050 1 ID 05007 m y hansecontrol c o m M A N U A L DEVELOPED IN G E R M A N Y User friendly Manual User Manual Spend a little Live a lot Original instructions...

Page 2: ...bsite or contact details for example Advantage You do not need to manually enter a website address or contact details This is how it works To scan the QR code all you need is a smartphone with QR code...

Page 3: ...s 16 Preparations and assembly 16 Start up 18 Using the compressor 19 Starting the compressor after an overload 20 Cleaning and maintenance 20 Cleaning the compressor 22 Replacing and cleaning the air...

Page 4: ...B C A 4 5 1 2 20 19 3 13 18 14 16 15 7 8 9 10 6 7 12 21 11 22 17 7 4 4 GB IRE...

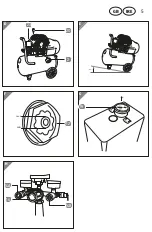
Page 5: ...H F G D E Max 10 min max 23 2 19 16 12 14A 14B 20 5 GB IRE...

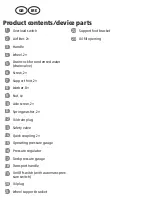
Page 6: ...densed water drain valve 6 Screw 2 7 Support foot 2 8 Washer 8 9 Nut 4 10 Axle screw 2 11 Spring washer 2 12 Oil drain plug 13 Safety valve 14 Quick coupling 2 15 Operating pressure gauge 16 Pressure...

Page 7: ...ncerning the use of this product must be complied with Store the user manual for future use If you pass the compressor on to third parties please be absolutely sure to include this user manual This us...

Page 8: ...device is 412 l min 2 2 kW The power consumption of the device amounts to 2 2 kW 50 L The tank volume is 50 litres The compressor is heavy Get help before lifting the compressor Safety Proper use The...

Page 9: ...shocks risk of injury and fire Read all these notes before using the power tool and keep the safety notes in a safe place Failure to follow the safety notes and instructions may result in an electric...

Page 10: ...our body and earthed parts e g pipes radiators electric stoves cooling units 4 Keep other persons away Do not allow other persons particularly children to touch the compressor or cable Keep them away...

Page 11: ...reasonable manner Do not use the compressor if you are unconcentrated tired or under the influence of drugs alcohol or medication 15 Check the compressor for any damages Before you use the compressor...

Page 12: ...as ures made by the manufacturers of such substances Observe the information and labels in accordance with the safety warnings pro vided on the outer packaging of the materials you are working with If...

Page 13: ...ent temperature in an enclosed working environ ment does not exceed 25 C to ensure that the compressor continues to function properly when continuously and completely filled with air Only operate the...

Page 14: ...ING Risk of electric shock Afaultyelectricalinstallationorexcessivemainsvoltagemayresultinanelectric shock Only connect the compressor if the mains voltage of the socket corre sponds to the operating...

Page 15: ...or the accessories at persons objects or ani mals to prevent severe injury to persons Do not point the compressed air jet at persons or animals and do not use it to clean clothing that is being worn...

Page 16: ...card 5 To the extent possible store the packaging until the warranty period has expired Preparations and assembly The following assembly steps must be performed before using the compressor for the fi...

Page 17: ...foot 4 Run the screw through the support foot bracket 5 Fit a washer on the screw 6 Screw a nut 9 onto the screw by hand 7 Use two open ended spanners to tighten the screw Use one open ended spanner...

Page 18: ...ny long feed lines extension cords or cable drums NOTICE Risk of damage If you set up the compressor in an unsuitable location you could damage it Place the compressor on an easily accessible level dr...

Page 19: ...ssed air tank with air at maximum pressure after the device has been switched on Using the compressor 1 Make sure that the compressor is fully assembled as described in the chapter Preparations and as...

Page 20: ...cou pling 14 back and pulling the pneumatic tool off see fig A and H 14 Let the compressor cool off completely 15 Clean the compressor as described in the chapter Cleaning and maintenance Starting th...

Page 21: ...ls from the compressor before clean ing WARNING Burn hazard The compressor will become hot during operation Each time before you clean the compressor let it cool off completely NOTICE Risk of damage C...

Page 22: ...compressor at low pressure 8 Use a damp cloth and a small amount of soft soap to wipe the outside of the com pressor Make sure that no water or soap penetrates the inside of the device 9 Let all parts...

Page 23: ...ressure Always be careful when opening the drain cock and don t unscrew it all the way NOTICE Risk of pollution The condensed water contains oil If it ends up in the environment or the sewer system it...

Page 24: ...e multigrade oils SAE 10W40 15W40 Perform a complete oil change no later than after 100 operating hours or 6 months Fill the compressor with no more than 175 ml of oil NOTICE Risk of pollution Used oi...

Page 25: ...n plug back onto the compressor and tighten it with an open ended spanner or a ring spanner 5 Add new oil as described in the chapter Adding oil Adding oil 1 Make sure that the compressor is switched...

Page 26: ...position Never tip the compressor by more than 10 When transporting the compressor over longer distances carry it on the two handles with the help of another person Always use the handles for transpor...

Page 27: ...and do not tip it Always store the compressor in a room that is not accessible for children Always store the compressor so that it cannot be operated by unauthor ised persons 1 Pull the mains plug of...

Page 28: ...bient temperature is too low Do not operate the compressor at am bient temperatures below 5 C There is not enough oil in the crankcase Check the oil level and if necessary add oil as described in the...

Page 29: ...ot closed or has a leak Close the drain cock for condensed water Check the gasket for the screw and if necessary replace it Close the drain cock for condensed water The compressor is oper ating pressu...

Page 30: ...rts Device type EH product number of the device see data plate The identity number of the device see data plate Spare part number of the required spare part You can find current prices and information...

Page 31: ...dB A depending on the environment where the compressor is set up The compressor fulfils the requirements of EN 61000 3 11 and is subject to con ditional connection This means it is not permitted to u...

Page 32: ...Dispose of the compressor in accordance with the applicable disposal regulations for your country Old devices must not be disposed of with household waste If the compressor can no longer be used every...

Page 33: ...t jelenti ki PL deklaruje zgodno wymienionego poni ej artyku u z nast puj cymi normami na podstawie dyrektywy WE BG LV paskaidro du atbilst bu ES direkt vai un standartiem LT apib dina atitikim EU rei...

Page 34: ...34 www isc gmbh info GB AFTER SALES SUPPORT 34 IRE GB IRE 0044 151 649 1500 00441890946244...

Page 35: ...ess Park Plantation Road Bromborough Wirral CH62 3QG sales einhell co uk Your details Name Address E mail Date of purchase We recommend you keep the receipt with this warranty card Location of purchas...

Page 36: ...with the original purchase receipt and the completed warranty card the product with all components included in the packaging The warranty does not cover damage caused by Accident or unanticipated even...

Page 37: ......

Page 38: ......

Page 39: ......

Page 40: ...e unlikely event of such an occurrence or if you require any information about the product please con tact us via our helpline support services details of which are to be found both in this manual and...

Reviews: