background image


20


played 

(i.e.,

 past the downbeat of the next Pattern), the Performance Pad will return to 

the original Main Pattern. 

Example:

 Suppose an 8-beat A Main Pattern is playing and 

you press the FILL button on beat 4 but hold it down past beat 8. The A Fill Pattern will 
play the last 4 beats, then the Performance Pad will return to the A Main Pattern. 
 
Fills cannot start on the downbeat since a Fill, by definition, starts at some point into 
the Main Pattern. However, anything you record on the Fill downbeat will play on the 
first downbeat following the Fill 

(i.e.,

 the downbeat of the next Pattern). To show why 

this is a useful feature, consider that when coming out of a fill, you'll often want to hit 
something like a cymbal crash on the downbeat of the next Pattern yet not have that 
crash repeat every time the Pattern plays. This way of handling Fills lets the downbeat 
cymbal crash be part of the Fill instead of the Pattern. 
 
A footswitch plugged into the Count/A/B/Fill jack duplicates the FILL button function 
when playing Patterns in Perform mode. 
 

Background  

This way of handling Patterns explains the logic behind having A, B, and 

Fill Patterns. In typical pop tunes, A would be the verse and B the chorus. A Fill 
provides the Fill that transitions from verse to chorus, and B Fill provides the Fill that 
transitions from chorus to verse. Thus, one of the numbered Patterns may be all you 
need to put together a tune. 

 
This structure makes it possible to put together songs in minutes using the Preset 
Patterns. It also makes it easy to play drum parts live. For example, if there's a solo 
happening over the A Main Pattern, you can keep the Pattern repeating until the solo 
is about to end, at which point you select the Fill that leads out of the A Main Pattern. 


3.1

  Record a Pattern 


An empty Pattern defaults to an 8 beat length, with 16th note quantization and swing 
off (50%). If you need to change the length, it's best (though not essential) to do so 
before recording. Other parameters can be changed while you're recording. 
 
To record, select the desired User Pattern. Select Compose mode and press PLAY. 
Remember that you can switch between Compose and Perform while recording. 
 
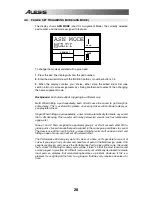
As you record, the display will show the current beat number and the tempo indicator 
will flash at the current tempo. You will hear any drum sounds already recorded in the 
currently selected Pattern. 
 
To record drum parts into the Pattern, strike the drum pads, or send MIDI data to the 
Performance Pad (sections 6.1 and 6.2) that triggers corresponding drum notes. The 
Pattern will "loop" during the record process so that you can overdub different drums 
on different passes. 
  
To exit Record mode, press STOP. Pressing PLAY while in Compose mode will re-
start the Pattern from the beginning; the Performance Pad remains in record mode. 
 

Note:

 When sending MIDI data into the drums when the Performance Pad is not 

recording 

(i.e.,

 the Performance Pad serves as a drum sound expander module), the 

drum sounds respond to 127 different levels of dynamics. However, if MIDI is used as 
a trigger during the recording process, the Pattern will "quantize" the incoming level to 
the nearest of eight levels—the same eight levels produced by striking the pads at 
various levels. 


Summary of Contents for Performance Pad

Page 1: ...REFERENCE MANUAL...

Page 2: ......

Page 3: ...CREATING DRUM SETS 25 4 1 PAGE 1 SELECT DRUM SET DRUMSET SELECT 25 4 2 PAGE 2 ASSIGN SOUNDS TO PADS 26 4 3 PAGE 3 SET PAD VOLUME VOLUME 26 4 4 PAGE 4 SET PAD STEREO POSITION PANNING 27 4 5 PAGE 5 SET...

Page 4: ......

Page 5: ...e Pad offers two main modes Perform for playback and Compose for recording You can switch between these while the Performance Pad is playing making it easy to test out different sounds without recordi...

Page 6: ...their Main Patterns e g if A is 16 beats A Fill is 16 beats Otherwise they are independent The reason for pairing the two different A and B Patterns together is simply so that you can switch back and...

Page 7: ...1 2E About Defaults A default is a setting that is automatically assumed until you purposely change it Example When you turn on a VCR it automatically defaults to Stop you have to purposely tell the...

Page 8: ...and Fill variations for a Pattern Mode buttons These choose between Pattern and Song modes Perform playback and Compose record modes and the Preset and User patterns Tape recorder buttons These contro...

Page 9: ...portion of the display will say PRESS PLAY if it is necessary to press PLAY to complete an operation Page number and tempo display When stopped or running this shows the current tempo and includes a...

Page 10: ...e Pressing the DEC button once decreases the value of the entire number indicated by the cursor not just a single digit by one Example If the display shows 00 and you want to enter 01 tap the INC butt...

Page 11: ...d not SONG if it shows SONG press the PATTERN SONG button and the display will show PATTERN PRESS PLAY TEMPO PERFORM EMPTY PATT PATTERN A USER 6 Start striking the pads with the drumsticks Adjust the...

Page 12: ...attern Press the B button to select the B variation of the selected Pattern Press the A button to select the A variation of the selected Pattern Press FILL briefly while a Main A or B Pattern is playi...

Page 13: ...ed changes press RECORD SETUP again to exit or choose another page One of the pages Step Mode contains several sub pages 2 1 PAGE 1 SELECT THE QUANTIZATION VALUE QUANTIZE SELECT The display shows QUAN...

Page 14: ...nearest selected rhythmic value to eliminate small timing errors Example With a quantize value of 1 16 all drum events you play will be shifted to the nearest 16th note Quantization is most effective...

Page 15: ...aying out your rhythms Background Swing affects the timing of pairs of equal value notes Each note normally defaults to taking up 50 of the total duration of both notes adding swing lengthens the firs...

Page 16: ...h the INC DEC or number buttons 1 quarter note 2 quarter note triplet 3 8th note 4 8th note triplet 5 16th note 6 16th note triplet 7 0 Click Off The click is audible only in Compose mode 2 4 PAGE 4 S...

Page 17: ...e length of the associated Fill Pattern The display says BEAT and LENGTH This indicates a Pattern s length in beats quarter notes Enter the desired length with the INC DEC or number buttons this must...

Page 18: ...eats 002 009 Because a beat was added to the beginning the Pattern will be 9 beats long and the beat added at the beginning will be silent 2 7 PAGE 7 OFFSET A PATTERN OR DRUM PART Offset shifts a Patt...

Page 19: ...Step mode provides detailed Pattern editing Note that step does not refer to Song steps but to the steps in a Pattern that hold drum events You can move through a Pattern one step at a time stop at ea...

Page 20: ...will be erased 2 8C Change a Drum Sound s Volume in a Given Step Use the PAGE buttons to select the step containing the drum whose volume needs to be changed Either press a number button from 1 8 1 so...

Page 21: ...selected by the PERFORM COMPOSE button To record choose Compose mode as shown in the display This also activates the click To listen choose Perform this de activates the click You can drop in and out...

Page 22: ...over to Song mode Chapter 5 and the programmed Song tempo is different the Performance Pad will assume the Song s tempo even if you switch back into Pattern mode until the tempo is changed again eith...

Page 23: ...e current Pattern pressing INC calls up Pattern 00 To choose the next lower numbered Pattern than the one in the display press the DEC button if 00 is the current Pattern pressing DEC calls up Pattern...

Page 24: ...also makes it easy to play drum parts live For example if there s a solo happening over the A Main Pattern you can keep the Pattern repeating until the solo is about to end at which point you select t...

Page 25: ...gain at which point the Performance Pad will revert to the associated Main Pattern 3 1K Using Fill to Create Repetitive Drum Hits As mentioned earlier the FILL button performs two different functions...

Page 26: ...ontains previously programmed data the numbered Pattern will remember the Drum Set assignment name and length 1 The Performance Pad must be in Pattern mode and stopped to allow erasing a Pattern 2 Ent...

Page 27: ...ill The only copy technique that appends a Pattern to another Pattern is copying a Main Pattern to another Main Pattern 3 3A Copy Append and Double Patterns 1 The Performance Pad should be in Pattern...

Page 28: ...As long as COPY is held down the destination pad can still be changed by selecting another drum pad 6 Press PLAY The display says COPY DONE 7 Release the COPY and PLAY buttons 3 3C Copy a Single Drum...

Page 29: ...tion are 1 Press the DRUM SET button 2 Use the Page up and down buttons to select different pages of functions the display s lower right window shows the page number These pages are described below 3...

Page 30: ...he edited Drum Set see section 4 8 or do more assignments by striking another pad to select it and assigning a drum sound to it 4 3 PAGE 3 SET PAD VOLUME VOLUME The display shows VOLUME the currently...

Page 31: ...e either store the edited Drum Set see section 4 8 or do more assignments by striking another pad to select it then assigning the pan position Background The Performance Pad has two pairs of stereo ou...

Page 32: ...ll automatically terminate any sound that is still decaying This is useful with many percussion sounds such as tambourine agogo etc Group 1 and 2 Pads assigned to a particular group 1 or 2 will cut ea...

Page 33: ...opy one Drum Set to a different Drum Set Also remember that if you change Patterns before saving your Drum Set all of your edits will be lost 4 8 PAGE 8 MANUAL DRUM SET OVERRIDE SET MODE The display s...

Page 34: ...ys include two digits enter a leading zero if necessary 4 Press PLAY to begin playback Press STOP to stop playback 5 To exit Song mode and return to Pattern mode first stop the Song with the STOP butt...

Page 35: ...a Song You need not start a Song from the beginning each time in Compose mode a Song can start at any Song step 1 Make sure the Performance Pad is in Compose mode even if you don t plan to record any...

Page 36: ...repeats 7 In addition to selecting different Patterns you can press FILL at any time The Performance Pad will remember where you pressed FILL As in Pattern mode pressing FILL will automatically transi...

Page 37: ...ns respectively It is not necessary to press PLAY the step will remember where the Fill is to occur 4 As the Song plays the step where the Fill occurs the display will show FILL when the Fill begins p...

Page 38: ...ropriate A or B Fill or User Preset options Since the step is replaced no renumbering of subsequent steps occurs 5 3G Erase an Entire Song 1 The Performance Pad should be in Song and Perform modes 2 U...

Page 39: ...ber to which the source Song should be copied using the number or INC DEC buttons 5 While you continue to hold the COPY button down press PLAY The copy is complete and the display says COPY DONE 6 Rel...

Page 40: ...nto a sequencer for recording or drive other drum sound expander modules If the Performance Pad is acting as a drum machine and provides the master clock to a MIDI system select OFF so that other devi...

Page 41: ...e Pad data can take up to 35K allowing it to be captured by most system exclusive storage devices After the transfer is complete the Performance Pad display reverts to either Song or Pattern mode whic...

Page 42: ...to do this Enable the slave s Song Position Pointer if it is available 3 Press PLAY on the Performance Pad The slave units should start at the same time and progress at the same tempo If the slaves r...

Page 43: ...uppose you have a 16 measure figure where the first three groups of four measures are identical and the final group of four measures provides some sort of variation Recording this as one 16 measure Pa...

Page 44: ...However there are some cases where you want to divide a beat into thirds giving three notes per beat Dividing a quarter note by three results in eighth note triplets The reason why we use the term eig...

Page 45: ...ice 0 127 0 127 X X Velocity Note On Note Off 1 127 0 X X After Touch Ch s X X X X Pitch Bend X X Program Change True 0 127 X System Exclusive O X System Common Song Pos Song Sel Tune 0 0 X X X X MIDI...

Page 46: ...Dynmc Hat 116 Wet Hat 1 117 Wet Hat 2 118 Randm Hat 119 Wet Randm 120 Sweet Hat 121 Open Hat 1 122 Half Hat 123 Open Hat 2 124 Bakwz Hat 125 L 2 R Bk Hat 126 Lo Bkwz Ht 127 Back N 4th 128 Soft Ride 1...

Page 47: ...110 100 115 18 140 130 145 19 95 90 100 20 120 110 130 21 140 135 150 22 120 120 130 23 125 120 130 24 135 130 140 25 130 120 140 26 100 95 110 27 130 120 140 28 125 115 135 29 75 70 90 30 80 70 90 3...

Page 48: ...rable enclosure TECHNICAL SPECIFICATIONS Audio Outputs 2 stereo Pads 8 velocity sensitive w Dynamic Articulation Sample DAC Bit Resolution 16 18 Sounds 233 Sounds Accessible via Pads 8 Sounds Accessib...

Page 49: ......

Page 50: ......

Page 51: ......

Page 52: ...www alesis com...

Reviews: