background image


            Installation 


Algas-SDI Operation and Maintenance Manual - VH100-VH200 

2-7  


Installing the Igniter 


Verify the gap between the center electrode and grounding rod is no 

less than 1.5mm and no more than 2.0mm. 


Install the igniter into the opening opposite to the flame supervision in 

the rear cover.  


CAUTION: 

Do 

NOT 

apply any assembly compound to the threads of the 

igniter. You can cause bad grounding of the spark plug if you apply grease 

to it. Bad ground of the spark may result in a weak spark.  


Burner Installation 


Verify that the wall of the chamber is strong enough to 

support the weight of the burner. If necessary, reinforce 

the area where you plan to install the burner to support 

the weight of the burner. 


Refractory furnace walls must allow for thermal expansion as 

recommended by the refractory supplier – the wall should 

apply no stress on the combustor or refractory layer 

surrounding the combustor. Expansion joints built into the 

furnace wall shall permit the furnace shell, combustor or 

burner block surrounding the combustor to move as a unit in 

the event of unequal expansion in the refractory wall and 

furnace shell. 


The combustor shall not extend beyond the inside of the 

furnace wall more than 1”. Beyond this length it is necessary 

to add a spacer on the outside of the furnace to keep the 

end of the combustor within 1” of the furnace wall. 


CAUTION: 

If the combustor is shorter than the furnace wall thickness the 

combustor should be recessed into the wall. To prevent refractory 

overheating, a 45° chamfer should be applied. 
 

Summary of Contents for PHOENIX VH100

Page 1: ...nce Manual 151 South Michigan Street Seattle Washington USA 98108 Tel 206 789 5410 Fax 206 789 5414 Web www algas sdi com This manual covers units built after April 2022 After S N 3220019135 FILE MANU...

Page 2: ...and a thorough understanding of the equipment is required to allow safe operation and maintenance Allow only a TRAINED and FULLY QUALIFIED PERSON to service this equipment Any time a component must b...

Page 3: ...s a potential hazard which can result in severe personal injury or death Use extreme care and follow the instructions given ELECTRICAL DISCONNECT REQUIRED Indicates a potentially dangerous situation w...

Page 4: ...URNER INSTALLATION 7 ALLOY COMBUSTOR 8 CHECKLIST AFTER INSTALLATION 9 PREPARE FOR START UP ADJUSTMENT 9 3 OPERATION 1 INITIAL SETUP 1 FIXED AIR SYSTEMS AIR FLOW 2 FIXED AIR SYSTEMS GAS FLOW 2 ON RATIO...

Page 5: ...bustion air to supply a focused high temperature flame with flexibility of fuel options The Phoenix VH burners are available in three models all with high velocity and medium velocity combustor option...

Page 6: ...1 2 Burner Body Burner Nozzle Burner Rear Cover Combustor Fuel Inlet Block Air Inlet Block Igniter Flame Supervision O rings Orifice Plates Utilizing a nozzle mix design fuel enters through the cente...

Page 7: ...the burner in the original package if possible Checklist Before Installation Intake To admit fresh combustion air from outdoors provide an opening in the room of at least one square inch per 4 000 BT...

Page 8: ...the burner Check the following items Type and supply pressure of the fuel Availability of enough fresh clean combustion air Humidity altitude and temperature of air Absence of damaging corrosive fumes...

Page 9: ...Remove the four bolts on fuel inlet 1 Remove the inlet block O rings and Orifice Plate from the rear cover 1 NOTE Be careful not to lose or damage the orifice plate or the O rings Remove the four bol...

Page 10: ...lt ignition transformer must be used to supply power to igniter If equipment other than those that are recommended are used performance may vary from Algas SDI published values Install the flame super...

Page 11: ...rner to support the weight of the burner Refractory furnace walls must allow for thermal expansion as recommended by the refractory supplier the wall should apply no stress on the combustor or refract...

Page 12: ...supplied with the burner is installed between the burner and the chamber wall Verify the gasket does not leak Check the size of the clearance between the furnace wall and combustor If the gap around...

Page 13: ...electrician rewire the blower to reverse its rotation Verify all valves are installed in the proper location and correctly orientated relative to the gas or air flow direction Prepare for Start Up Adj...

Page 14: ...line to the air differential pressure between taps A and B to the stated pressure for high fire in the Phoenix VH specification sheet Ignite burner per instructions on the following pages for gas flo...

Page 15: ...ion Sheet Remove manometer and close pressure taps A and B Fixed Air Systems Gas Flow Turn gas valves down to low fire position Start the ignition sequence Visually check for flame to confirm that bur...

Page 16: ...h fire position Confirm air differential pressure is still at the set point and adjust accordingly Use a small flat head screwdriver to open pressure taps C and D Attach manometer to taps C and D Adju...

Page 17: ...check for flame to confirm that burner has lit DANGER If no flame can be seen close the gas valve to stop gas flow Allow flame safety to purge the body of gas before attempting to restart the burner...

Page 18: ...ition Do not operate any equipment that may create a spark during maintenance WARNING High voltage ignition transformer can cause severe injury or death when handled incorrectly Do not perform mainten...

Page 19: ...proper gap Check valve motors and control valves for free smooth action and adjustment Check for proper operation of ventilating equipment Test the interlock sequence of all safety equipment manually...

Page 20: ...oes not open Check solenoid valve coil for proper orientation Replace if needed Not enough gas The gas pressure out of the main gas pressure regulator is too low Check start up setting Check regulator...

Page 21: ...ntrols and valves The burner is unstable or produce soot and or smoke The air gas ratio is incorrect Measure all gas pressures and air pressures Compare to initial start up settings and adjust as nece...

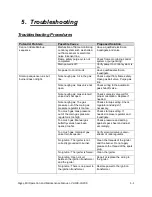
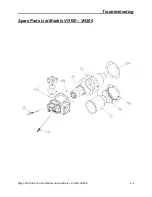
Page 22: ...Troubleshooting Algas SDI Operation and Maintenance Manual VH100 VH200 5 3 Spare Parts List Models VH100 VH200...

Page 23: ...h Velocity 1 N A 7001 4004 N A 10 Combustor Alloy Medium Velocity 1 N A 7001 4003 N A 10 Combustor Alloy High Velocity 1 7001 4002 N A N A 10 Combustor Alloy Medium Velocity 1 7001 4001 N A N A 30 Noz...

Page 24: ...Algas SDI International LLC 151 South Michigan Street Seattle Washington 98108 Ph 1 206 789 5410 Fax 1 206 789 5414 www algas sdi com...

Reviews: