background image

User Manual for WTF Freezers 

Beverage-Air

Rev. 07/22

Beverage-Air

10

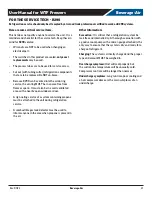
This is a cord-connected unit, and must be connected to its own 

dedicated

 power supply. Check the dataplate on the 

machine to confirm the voltage and per the dataplate use the correct fuses or HACR circuit breakers.

Note: Do not connect to GFI / GFCI outlets. Connection to that type of outlet can result in product loss due to unsafe 
cabinet temperature when GFI device trips from moisture.

Power Cord

This 115 volt model is equipped with a cord and a 5-15P plug.

If the power cord becomes damaged, it must be replaced 
with the identical cord.

Follow All National and Local Codes 

This unit must be grounded. Do not use extension cords 
and do not disable or by-pass ground prong on electrical 
plug.

Initial Start Up

Plug the power cord into the proper power supply.

The cabinet will soon begin to blow warm air out of the 
top area, and cool air will flow from the inside blower.

The cabinet temperature has been set at the factory and 
should not need adjustment, however if it was changed, 
the standard setting is 0º F.

Cautions

Care must be taken whenever moving or servicing the 
unit. The refrigerant is contained in a sealed system, but if 
released it may be flammable.

Door Reversal Instructions

1.  Remove hinge cover

2.  Remove door from the unit to include the hinge 

mounting brackets

3.  Remove white hole covers from the side of the door 

opening you would like the hinges to be located (do 
not throw away)

4.  On the bottom of the door the same hole plugs are 

present and need to be removed

5.  Take the hole plugs and insert them into the screw 

holes where the hinges were originally located on the 
unit

6.  Install the hinge bracket upright on the unit.  The 

thick portion of the hinge bracket should be on the 
bottom as you mount them

7.  The door portion of the hinges need to be removed 

and rotated 180 degree and remounted

8.  Install the hole plugs that were removed from the 

bottom of the door into the holes where the handle 
was first mounted

9.  Install the handle on what is now the top of the door

10.  Slide door back into position and gently lower into the 

white pivot cam

11.  Replace hinge cover

ELECTRICAL

5-15P

Summary of Contents for Beverage-Air WTF20HC

Page 1: ... OPERATING INSTRUCTIONS for all WTF Worktop Freezer Models 3779 CHAMPION BLVD WINSTON SALEM NC 27105 Phone 888 845 9800 Fax 800 253 5168 Web beverage air com 809 171A 07 20 2022 SEE BACK COVER FOR WARRANTY REGISTRATION ...

Page 2: ...tion information is located with this manual Please complete the card and submit it to Beverage Air within TEN days of installation Failure to properly register equipment may limit or void the warranty Beverage Air reserves the right to change specifications and product design without notice Such revisions do not entitle the buyer to corresponding changes improvements additions or replacements for...

Page 3: ...or on the cabinet Persons unable to use this product must be prevented access Follow all instructions There are many safety labels and directions on the unit Heed them Watch your fingers There may be pinch points near the door hinges Maintenance Do NOT Clean a frozen evaporator with a sharp object Clean a dirty condenser with a sharp object Store gasoline kerosene or any other flammable material n...

Page 4: ...ge Air Rev 07 22 Beverage Air 4 Risk of Personal Injury From Falling Stay OFF top of unit WARNING Note The top panel of this unit can be damaged by standing on it Damage like that is NOT covered by warranty NO STEP NO STEP NO STEP SAFETY ...

Page 5: ...red in any way Alterations or part substitutions will void the warranty Limitations The machine is designed for use indoors in a controlled environment It must be kept dry not overheated or subjected to excessive cold May only be connected to a dedicated electrical circuit Extension cords are not permitted Minimum Maximum Voltage 103 5 126 5 Room Air Temp 60º F 100º F Air Flow All Models regardles...

Page 6: ...290 75 2 65 SHALLOW DEPTH UNITS WITH DOORS WTF20HC 20 x 24 1 2 x 36 1 8 Solid 1 Door 2 5 5 15P R 290 95 3 22 WTF27HC 27 x 29 7 8 x 39 5 8 Solid 1 Door 2 5 5 15P R 290 45 1 59 WTF27HC 25 27 x 29 7 8 x 39 5 8 Glass 1 Door 2 5 5 15P R 290 55 1 94 UNITS WITH DRAWERS WTFD27AHC 2 27 x 32 x 39 5 8 Solid 2 Drawers 2 5 5 15P R 290 45 1 59 WTFD32AHC 2 32 x 32 x 39 1 2 Solid 2 Drawers 4 5 15P R 290 75 2 65 W...

Page 7: ...he freezer is located must be even and level free from vibrations and strong enough to support the combined weights of the unit and maximum product load Ventilation Grille area at front must be free and clear of any object or wall Power Outlet The installation of this appliance requires a dedicated power outlet located within the length of the unit s power cord and be accessible for the purpose to...

Page 8: ...at the process while the cabinet is held in the opposite direction 2 None of the threads on the leg or caster stem should be visible once screwed in 3 Tilt the cabinet in one direction approximately 8 and block it securely with pieces of 2x4 lumber or other suitable material 4 Thread the stem casters or legs into the 13 holes in the bottom of the cabinet Tighten by hand as much as possible 5 Once ...

Page 9: ...s 5 Install shelves onto clips with the product retention bar facing up Be careful not to dislodge clips during installation 6 Place shelves so that the retaining tab on the clip captures the shelf as shown 7 Confirm that the shelf is resting on ALL 4 clips and that the clips are securely attached to the pilasters 8 Improper shelf clip installation could cause the shelf and or the product on it to...

Page 10: ...tory and should not need adjustment however if it was changed the standard setting is 0º F Cautions Care must be taken whenever moving or servicing the unit The refrigerant is contained in a sealed system but if released it may be flammable Door Reversal Instructions 1 Remove hinge cover 2 Remove door from the unit to include the hinge mounting brackets 3 Remove white hole covers from the side of ...

Page 11: ... temperature The freezer will automatically defrost as needed there is no set time for defrost Push and immediately release the melting or defrost button for a manual defrost Note Holding the defrost button in too long will shut the controller off The internal fan will be on when the compressor is on and when the doors are closed The compressor and condenser fan motor will only be on when the cont...

Page 12: ...on when the Compressor is running The Evaporator Fan is wired to the Fan Contact The Evaporator Fan turns off when the Compressor is not running The Evaporator Fan is wired to the Fan Contact ERC 112 Terminal 5 ERC 112 Terminal 5 DEFROST HEATER The Defrost Heater will activate on cumulative Compressor runtime of 6 hours and when temperature drops too low The Defrost Heater Contact is energized Whe...

Page 13: ... x t p ÿ ÿ ÿ ÿ ÿ ÿ ÿ ª ÿ ÿ ª ª ÿ ÿ ÿ ÿ ª ÿ ÿ ÿ µ ÿ µ º ÿ µ ÿ º µ ÿ ÿ º ÿ À ÿ Á À º Â Ã Ä ÿ Å Â µ Æ ÿ À ÿ Ã Ç µ ÿ  ÿ È ÿ à µ ÿ Â É À Ä µ  ÿ À ÿ Ⱥ ÿ µ µ Ê ÿ Ë ÿ È ÿ Ç ÿ Ì ÿ Á À º Â Ã Ä ÿ Å Â µ Æ ÿ É Ç ÿ À º  ÿ  ÿ µ ÿ ͵ Ì ÿ Ã Ç º ÿ Ç º ÿ µ ÿ Â É À Ä ÿ µ À  ÿ Î Ê Ï 01 2 3 ÿ 56 7 8 6 9 ÿ3 ÿ ÿ3 2 2 2 3 1 ÿ 2 2 3 6 2 3 ÿ 0 12 3 4 5 5 3 4 5 4 3 ÿ 7 8 9 8 2 3 8 0 3 ÿ 7 8 4 3 5 0 ÿ 4 8 0 4 3 7 8 4 3 ...

Page 14: ...User Manual for WTF Freezers Beverage Air Rev 07 22 Beverage Air 14 01 2 3 ÿ 56 7 8 6 9 ÿ3 ÿ ÿ 9 ÿ 5 9 ÿ 9 2 3 ÿ 2 2 3 6 2 3 ÿ ...

Page 15: ...Beverage Air Rev 07 22 Beverage Air 15 01 2 3 ÿ 56 786 9 ÿ3 ÿ ÿ 2 2 3 6 2 3 ÿ ÿ ÿ 0 1 0 2 3ÿ 4 5 6 1 7 8 9 ÿ 9 34 8 ÿ 0 2 4 ÿ 9 ÿ 2 2 4 8 8 ÿ A ÿ 1 C 4 2 ÿ ÿ D 4 ÿ 0 2 0 34 4 2 ÿ 0 E 1 4 F G ÿ D 4 ÿ 0 1 0 2 3ÿ 9 8 ÿ ÿ 8 9 0 1 4 C H ...

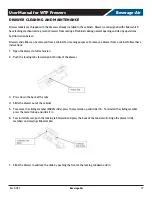
Page 16: ...se with clean water 3 Dry with a soft cloth 4 Polish with a soft cloth wiping with the grain 5 Wipe weekly with stainless steel cleaner Weekly Interior Cleaning 1 Remove all food food related items and shelves Store the food at a safe temperature 2 Disconnect power to the unit unplug it or switch the breaker off 3 Remove all loose food particles from the inside walls floor door liner and ceiling 4...

Page 17: ...binet follow these instructions 1 Open the drawer to full extension 2 Push the locking tabs forward on both sides of the drawer 3 Press down the back of the tabs 4 Slide the drawer out of the cabinet 5 To remove the sliding member Middle slide press the metal tab up and slide it 6 To reinstall the sliding member press the metal tab up and slide it in 6 To reinstall drawer push the locking tab forw...

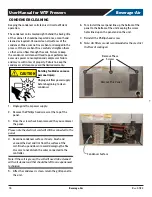
Page 18: ...clean may void the limited warranty 1 Unplug unit from power supply 2 Remove the Phillips head screws at the top of the panel 3 Once the screws have been removed the you can lower the panel Please note the electrical cord will still be connected to the panel 4 Examine condenser surface if dusty brush and vacuum the dust and lint from the surface of the coil Brush up and down to avoid damaging the ...

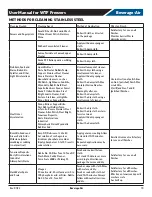
Page 19: ...all amount of cleaner Heat tint or discoloration Penny Brite or Copper Brite Past NuSteel DuBois Temp or Tarnite Revere Stainless Steel Cleaner Allen Polish Steel Bright Tenacious Deposits Rusty Discolorations Industrial Atmospheric Stains Wyandotte Bab O or Zud Rub with a dry cloth Rub with a dry cloth or stain less steel wool Apply with damp sponge or cloth Rub with a damp cloth Burnt On Foods a...

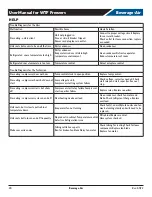
Page 20: ...on Replace temp control No cooling compressor hums but does not start Low voltage to unit Compressor starting system failure Check voltage correct as needed Check start relay and start capacitor See next step No cooling compressor starts but shuts off Compressor start relay failure Compressor start capacitor failure Replace relay Replace capacitor No cooling compressor cycles on and off Overheatin...

Page 21: ...an area free from flame or spark It must also be in a well ventilated area with a nearby open window or door A sign noting service of a system containing propane must be attached to the unit during refrigeration service A combustible gas leak detector must be used to inform anyone in the area when propane is present in the air Other Information Evacuation It is critical that a refrigeration system...

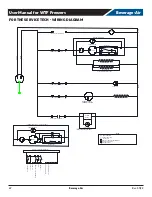
Page 22: ... MODELS WHITE BLACK COMPRESSOR DETAIL L E D LAMP START RELAY 10 COMP CONDENSER FAN C R S 2 4 OL 1 R C S C START RELAY 5 COMP CONDENSER FAN C R S 2 OL 1 R C S C 1 2 3 4 S2 DANFOSS CONTROLLER DETAIL COMPRESSOR SUPPLY L SUPPLY N 5 S1 S3 S4 DI 6 DEFROST FAN LIGHT NOT ALL MODELS TEMP SENSOR AIR TEMP SENSOR COIL 2 4 SEE CONTROLLER DETAIL LEGEND RC RUN CAPACITOR SC START CAPACITOR OL OVERLOAD DANFOSS CON...

Page 23: ...GE AIR Also this extended compressor part only warranty does NOT apply to any electrical controls condenser evaporator fan motors overload switch starting relay capacitors temperature control filter drier accumulator refrigeration tubing wiring harness labor charges or supplies which are covered by the warranty above Normal wear type parts such as light bulbs lamps and gaskets are not covered by t...

Page 24: ...ND WE NEITHER ASSUME NOR AUTHORIZE ANY OTHER PERSON TO ASSUME FOR US ANY OBLIGATION OR LIABILITY IN CONNECTION WITH THE SALE OF SAID REFRIGERATION UNITS OR ANY PARTS THERE OF This warranty shall not be assignable and shall be honored only in so far as the original purchaser This warranty does not apply outside the limits of the United States of America and Canada nor does it apply to any part that...

Page 25: ...____________ Date Of Installation _________________ Cabinet Serial Number _____________________________________________ Location Of Product Business Name ____________________________________________________ Business Street ____________________________________________________ Business City ____________________________________ State _________ Postal Code ___________ Mail to Beverage Air 3779 Champio...

Reviews: