16
2483 · Stand/Update
: 11.2021
EN
4.
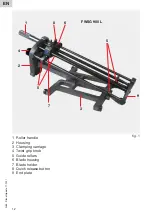
Assembly of the scraper tool
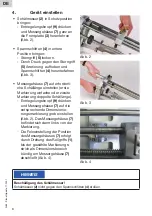
fig. 4
fig. 2
fig. 3
• Place blade
(2) in protective
position:
- Press release button
(9) and
bring
- blade casing
(7) close to the front
- plate (box) (fig. 2).
• Place clamping carriage
(4) into
lower position:
- Loosen twist grip knob
(5).
- Cancel lock by applying pressure
on the twist grip knob
(5) and
drive clamping carriage
(4) down
(fig. 3).
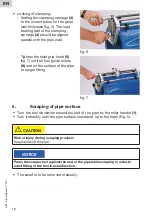
• Adjust the blade housing
(7) to the
required scraping length (first
marking simple or second marking
double scraping length).
- Press the release button
(9) and
roughly adjust the blade housing
(7) to the relevant dimensioning
marking (fig. 2). The blade hous-
ing
(7) is then located left of the
marking.
- Final adjustments of the position
of the blade casing
(4) takes
place by rotating the roller handle
(1) until the marked line on the
blade casing
(7) is flush with the
selected dimension range on the
guide rod
(7) (fig. 4).
NOTICE
Damage of the scraper blade!
Do not allow the scraper blade
(2) to butt at the clamping carriage (4).


