background image

61

22/08/2019

1

2

4

5

3

6

8

7

6

4

5

6

2


FR

Retirez la quincaillerie préassemblée sur 

l’axe de roue avant, puis assemblez la 

roue directrice 

4

 en suivant le schéma 

ci-dessus. Répétez cette étape pour as-

sembler la roue opposée.


ES

Retire la quincalla premontada sobre el 

eje de la rueda delantera y poste-

riormente monte la rueda motriz 

4

 si-

guiendo el esquema que viene a conti-

nuación. Repita este paso para montar la 

rueda opuesta.


EN

Remove the prebuilt hardware from the 

front wheel axle, then assemble the guide 

wheel 

4

 following the below schema. 

Repeat this step to assemble the oppo-

site wheel. 


NL

Verwijder de voorgemonteerde hard-

ware van de voorwielas en monteer het 

stuur 

4

 volgens bovenstaand schema.

Herhaal deze stap om het wiel aan de 

andere zijde te monteren.


PT

Retire as ferragens pré-montadas no 

eixo da roda dianteira e, a seguir monte a

roda 

4

 seguindo o esquema direcional, 

acima. Repita esta fase para montar a 

roda oposta.

Summary of Contents for BMW 6 GT

Page 1: ...ROCBMW6RC BMW 6 GT 22 08 2019 30 MIN 1 3 8 ANS 30 KG alicesgarden fr alicesgarden be alicesgarden es alicesgarden nl alicesgarden co uk alicesgarden pt alicesgarden it alicesgarden com au ...

Page 2: ...mmande 13 Garantie 14 Montage 55 IMPORTANT À CONSERVER POUR CONSULTATION ULTÉRIEURE À LIRE ATTENTIVEMENT ESPAÑOL Advertencias 15 Instrucciones de seguridad 16 Consejos en caso de avería 20 Mantenimiento 21 Uso del coche 22 Uso de la radio 23 Uso del control remoto 23 Garantía 24 Montaje 55 IMPORTANTE CONSÉRVELO PARA FUTURAS REFERENCIAS LEA ATENTAMENTE INDEX ÍNDICE CONTENTS INHOUD ...

Page 3: ...emote control 33 Warranty 34 Assembly 56 IMPORTANT KEEP FOR FUTURE REFERENCE READ CAREFULLY NEDERLANDS Waarschuwingen 35 Veiligheidsinstructies 36 Tips in geval van storing 40 Onderhoud 41 Gebruik van uw auto 42 Gebruik van de autoradio 43 Gebruik van de afstandsbediening 43 Garantie 44 Montage 56 BELANGRIJK BEWAAR VOOR TOEKOMSTIGE REFERENTIE ZORGVULDIG LEZEN ...

Page 4: ...truções de segurança 46 Conselhos em caso de avaria 50 Manutenção 51 Utilização do carro 52 Utilização do autorrádio 53 Utilização do comando à distância 53 Garantia 54 Montagem 57 IMPORTANTE CONSERVE A REFERÊNCIA DA FATURA LEIA CUIDADOSAMENTE ...

Page 5: ...tion des composants par le Service Après Vente Avant le montage s assurer qu aucune pièce n est manquante Vous pouvez disposer d un surplus qui vous servira de pièce de rechange Avant de commencer le montage de votre voiture veuillez vérifier qu elle est bien en position OFF Avant la première utilisation nous vous conseillons de laisser charger votre voiture pendant au moins 4 6 heures Batterie Au...

Page 6: ...éviter les chutes ou collisions pouvant causer des blessures au conducteur ou aux personnes aux alentours Vérifiez régulièrement l état de votre voiture ATTENTION cette voiture ne possède pas de frein Cette voiture possède une ceinture de sécurité ajustable Enseignez à votre enfant comment mettre sa ceinture de sécurité avant d utiliser le véhicule afin de garantir sa sécurité SÉCURITÉ DES ENFANTS...

Page 7: ...peau ou vos yeux lavez les immédiatement à grande eau et contactez votre médecin au plus vite Ne court circuitez pas le pack batterie Il y aurait un risque d explosion Protégez le pack batterie de l humidité et de l eau ne rechargez pas cet appareil en milieu humide ou mouillé Vous réduirez ainsi les risques de choc électrique Si la batterie est endommagée ou utilisée de façon inappropriée des vap...

Page 8: ... utilisation vous devrez charger la batterie pendant 4 6 heures Ne chargez pas la batterie plus de 10 heures afin d éviter la surchauffe du chargeur Lorsque le véhicule commence à ralentir rechargez la batterie Après chaque utilisation ou une fois par mois rechargez la batterie pendant 8 à 12 heures Ne laissez pas la batterie en charge plus de 20 heures L affichage de la tension sur le tableau de ...

Page 9: ...le pendant 1 à 3 ans Suivez ces étapes pour remplacer et recycler la batterie 1 Retirez le siège 2 Débranchez les connecteurs de la batterie 3 Retirez tous les caches de la batterie 4 Soulevez la batterie soigneusement En fonction de l état de la batterie ex fuites portez des gants de protection Ne soulevez pas la batterie par ses connecteurs ou ses câbles 5 Placez la batterie usagée dans un sac e...

Page 10: ...erie Véhicule surchargé Réduisez le poids dans le véhi cule Poids maximum 30kgs Le véhicule est utilisé dans des conditions difficiles Vérifiez les consignes de sécu rité Le véhicule doit être poussé pour avancer Mauvais contact entre les fils et les connecteurs Vérifiez que les connecteurs de la batterie sont fermement branchés Changement difficile entre marche avant et marche arrière Transition ...

Page 11: ... à l intérieur ou couvrez le avec une bâche pour le protéger des intempéries Éloignez le véhicule de toute source de chaleur Les parties en plastique pourraient fondre Rechargez la batterie après chaque utilisation Seul un adulte peut manipuler la batterie Rechargez la batterie au moins une fois par mois quand le véhicule n est pas utilisé Ne pas nettoyer le véhicule avec un tuyau d arrosage Ne pa...

Page 12: ...et de choisir la vitesse lente ou rapide NOTE Le véhicule est conçu pour que la marche arrière ne puisse être effectuée qu à basse vitesse 5 Levier AVANT STOP ARRIERE Permet de choisir le sens de marche du véhicule AVANT Forward ARRET Stop et ARRIERE Reverse Pour faire avancer la voiture poussez le levier vers l avant Pour faire reculer la voiture tirez le levier vers l arrière Pour arrêter la voi...

Page 13: ...lusieurs niveaux de vitesse Lent 1 LED Moyen 2 LED Rapide 3 LED Marche avant Indicateur de vitesse lent moyen rapide Marche arrière Sélecteur de vitesse Appairage Tourner à gauche Tourner à droite Parking La télécommande s éteindra automatiquement après 10 secondes de non utilisation Veuillez répéter l étape 1 de connexion à la voiture lorsque vous changerez les piles MP3 TF TF USB MP3 V USB V V U...

Page 14: ...dre professionnel annulerait automatiquement toutes les garanties LISTE DES EXCLUSIONS DE LA GARANTIE Les dommages pannes défaillances ou défauts imputables à des causes d origine externe Les pannes résultant de la modification de la construction et des caractéristiques d origine de l ap pareil Les pannes affectant les pièces non conformes à celles préconisées par le constructeur Les réglages acce...

Page 15: ...dad espe cialmente para la identificación de los componentes por parte del servicio posventa Antes de llevar a cabo el montaje asegúrese de que no falta ninguna pieza Es posible que dispon ga de piezas de más estas le servirán como piezas de repuesto Antes de comenzar el montaje del coche por favor compruebe que esté en posición de OFF Antes del primer uso le aconsejamos que deje cargar el coche d...

Page 16: ...da Este juguete se debe utilizar con precaución para evitar caídas o colisiones que puedan causar lesiones al conductor o las personas de su alrededor Compruebe de manera regular el estado del coche ATENCIÓN este coche no dispone de freno El presente coche dispone de un cinturón de seguridad ajustable Enseñe al niño cómo ponerse el cinturón de seguridad antes de usar el vehículo con el objetivo de...

Page 17: ...del elec trolito con la piel o los ojos lávelos inmediatamente con agua abundante y póngase en contacto con su médico lo antes posible No cortocircuite el paquete de batería Esto podría provocar una explosión Proteja el paquete de batería de la humedad y del agua no recargue el aparato en un medio húme do o mojado De esta manera reducirá los riegos de descarga eléctrica Si la batería está dañada o...

Page 18: ...OFF durante la carga Antes del primer uso deberá cargar la batería durante 4 6 horas No cargue la batería más de 10 horas para evitar el sobrecalentamiento del cargador Cuando el vehículo comience a ralentizarse recargue la batería Tras cada uso o una vez al mes recargue la batería durante 8 12 horas No deje cargando la ba tería más de 20 horas La visualización del voltaje en el cuadro de mandos l...

Page 19: ... durante un plazo de 1 a 3 años Siga los siguientes pasos para sustituir y reciclar la batería 1 Retire el asiento 2 Desenchufe los conectores de la batería 3 Retire la carcasa de la batería 4 Retire la batería con cuidado En función del estado de la batería p ej fugas equípese con guantes de protección No extraiga la batería tirando de sus conectores o cables 5 Coloque la batería usada en una bol...

Page 20: ...Sustituya la batería Vehículo sobrecargado Reduzca el peso del vehículo Peso máximo 30 kg El vehículo se utiliza en condiciones difíciles Compruebe las instrucciones de seguridad El vehículo debe ser impulsado para avanzar Mal contacto entre los cables y los conectores Compruebe que los conectores de la batería están firmemente conectados Cambio difícil entre marcha hacia delante y hacia atrás Tra...

Page 21: ...lo en el interior o cúbralo con una lona para protegerlo de las inclemencias meteo rológicas Mantenga el vehículo lejos de fuentes de calor Las partes de plástico se podrían fundir Recargue la batería después de cada uso Solo un adulto puede manipular la batería Recargue la batería al menos una vez al mes cuando no se use el vehículo No limpie el vehículo con una manguera No limpie el vehículo con...

Page 22: ...a o rápida NOTA el vehículo está diseñado para que la marcha atrás no pueda llevarse a cabo salvo en condiciones de baja velocidad 5 Palanca de dirección DELANTE STOP ATRÁS esta permite seleccionar el sentido de la marcha del vehículo DELANTE Forward DETENCIÓN Stop y ATRÁS Reverse Para que el vehículo avance empuje la palanca hacia delante Para que el vehículo recule tire de la palanca hacia atrás...

Page 23: ... niveles de velocidad Lenta 1 LED Media 2 LED Rápida 3 LED Marcha hacia Indicador de velocidad lenta media y rápida Marcha atrás Selector de velocidad Vinculación Girar a la izquierda Girar a la derecha Parking El control remoto se apagará automáticamente después de 10 segundos de inoperancia Repita el paso 1 de conexión al coche cuando cambie las pilas MP3 TF TF USB MP3 V USB V V USB permite la l...

Page 24: ...uso en un ámbito privado y personal Su uso en un ámbito profesional anularía automáticamente cualquier garantía LISTA DE EXCLUSIONES DE LA GARANTÍA Los daños caídas incumplimientos o defectos imputables a causas de origen externo Las caídas resultantes de la modificación de la construcción y de las características originales del aparato Las caídas que afectan a las piezas no conformes a las recome...

Page 25: ...e especially useful when identifying the specific parts for potential after sales cases Before assembly make sure that there are no pieces missing You may have extra pieces that can be kept as spares Before beginning to build the car make sure that it s in the OFF position Before the first use we recommend that you let the car charge for a minimum of 4 6 hours Battery Lead 2x 6V 4Ah Dimension of a...

Page 26: ...ecting the safety precautions to avoid injuring the driver or those around them Regularly check the condition of the car WARNING this car doesn t have breaks of any form For safety the car has an adjustable seat belt For their safety show your child how to put the seat belt on before use CHILD SAFETY GUIDELINES Always keep your child in plain sight when using they re using the car Make sure your c...

Page 27: ...if ingested If you have come into contact with it rinse the affected area immediately and contact your doctor or NHS direct Do not short circuit the battery pack this could cause an electric shock Avoid direct contact with the terminals of the battery This could cause fire or an explosion Protect the battery pack from humidity and water don t charge the apparatus in wet and humid conditions Charge...

Page 28: ...hen the vehicle begins to slow down recharge the battery Charge the battery for 8 12 hours after each use or once a month if the car isn t in use Never let the battery charge for more than 20 hours The display on the dashboard will allow you to check the battery level Battery Tension Status of the battery 2x 6V 4Ah 13 2 The battery is charged 13 1 11 1 The car can function normally 11 Stop the car...

Page 29: ...attery has an estimated lifespan of 1 3 years Follow these steps to replace and recycle the battery 1 Remove the seat 2 Unplug the connectors to the battery 3 Remove all the covers from the battery 4 Lift the battery carefully If the battery has a fault eg leak wear protective gloves Do not lift the battery by its connectors or its cables 5 Place the used battery in a plastic bag The battery compo...

Page 30: ...e the weight in the vehicle Max weight 30kg The car is being used in difficult conditions Check the safety guidelines provided The car must be pushed to moved forward Poor contact between the wires and the connectors Make sure that the battery connectors are tightly secured Difficult to change between forward and reverse The driver is trying to transition when the car is in motion Stop the car com...

Page 31: ...doors or cover it with tarpaulin to protect it from bad weather Keep the car away from heat sources as the plastic parts could melt with intense heat Recharge the battery after each use Only an adult should touch the battery Recharge the battery at least once a month when the car isn t in use Don t clean the vehicle by spraying it with the hose nor with soapy water Don t use the vehicle in the rai...

Page 32: ...or allows you to choose the speed fast or slow NOTE The vehicle is designed so that the reverse function can only be used when travelling at a low speed 5 Lever FORWARD STOP REVERSE allows you to choose the direction of the vehicle To make the car go forward position the lever towards forward To make the car reverse pull the level towards reverse To stop the vehicle leave the gear lever in neutral...

Page 33: ...king 3 CHANGING THE SPEED The speed selector S allows you to choose several different levels of speed Slow LED 1 Medium LED 2 Fast LED 3 Forward Speed indicator Slow medium fast Reverse Speed selector Pairing Turn left Turn right Park The remote control will automatically turn off after 10 seconds of non use You must repeat step 1 of the connection process if you have changed the batteries MP3 TF ...

Page 34: ... are meant for personal and private use using these goods in a professional environ ment automatically voids all warranties WARRANTY EXCLUSIONS Damage breakages failures or faults caused by external factors Breakages caused by modifying the construction or the original features of the apparatus Breakages to non conforming pieces which were not present on delivery Affordable repairs that don t requ...

Page 35: ...od te bewaren vooral voor de identificatie van componenten door de Klantenservice Zorg er vóór de montage voor dat er geen onderdelen ontbreken U kunt een overschot hebben dat als reserveonderdeel zal dienen Controleer voordat u begint met het in elkaar zetten van uw auto of deze in de UIT stand staat Voor het eerste gebruik raden wij aan om uw auto minstens 4 6 uur lang op te laden Batterij Lood ...

Page 36: ...ruikt om vallen of botsingen te voorkomen die tot verwonding van de bestuurder of derden kunnen leiden Controleer regelmatig de staat van uw auto WAARSCHUWING deze auto heeft geen rem Deze auto heeft een verstelbare veiligheidsgordel Leer uw kind hoe u een veiligheidsgordel moet dragen voordat u het voertuig gebruikt om de veiligheid te garanderen VEILIGHEID VAN KINDEREN Houd uw kind altijd in gat...

Page 37: ... en water laad dit apparaat niet op in vochtige of natte omstandighe den Dit vermindert het risico op een elektrische schok Als de batterij is beschadigd of onjuist is gebruikt kunnen er dampen vrijkomen Onmiddellijke ventilatie van het gebied is noodzakelijk en neem contact op met een arts in geval van ademhalings moeilijkheden De dampen zijn erg irriterend Explosieve gassen ontstaan tijdens het ...

Page 38: ...rhit raakt Laad de batterij op als het voertuig begint te vertragen Laad de batterij na elk gebruik of eenmaal per maand 8 tot 12 uur op Laat de accu niet langer dan 20 uur achtereen in de lader De weergave van de spanning op het dashboard laat u het resterende laadniveau van de batterij zien Accu Spanning Status van de accu 2x 6V 4Ah 13 2 De batterij is opgeladen 13 1 11 1 De auto kan normaal fun...

Page 39: ...unctioneren gedurende 1 tot 3 jaar Volg deze stappen om de batterij te vervangen en te recyclen 1 Verwijder de zitting 2 Koppel de batterijconnectors los 3 Verwijder alle afdekkingen van de accu 4 Til de accu voorzichtig op Draag beschermende handschoenen afhankelijk van de staat van de accu bijv Lekkage Til de accu niet op aan de connectoren of kabels 5 Plaats de gebruikte accu in een plastic zak...

Page 40: ...u Overladen voertuig Verminder het gewicht in het voertuig Maximaal gewicht 30kgs Het voertuig wordt gebruikt in moeilijke omstandigheden Controleer de veiligheidsinstruc ties Het voertuig moet worden geduwd om verder te gaan Slecht contact tussen draden en connectoren Controleer of de connectors van de accu goed zijn aangesloten Moeilijke omschakeling tussen vooruit en achteruit Moeilijke omschak...

Page 41: ...ertuig binnenshuis of bedek het met een zeil om het te beschermen tegen weersinvloe den Houd het voertuig uit de buurt van warmtebronnen Kunststof onderdelen kunnen smelten Laad de batterij na elk gebruik op Alleen een volwassene mag de batterij hanteren Laad de batterij minstens één keer per maand op wanneer het voertuig niet in gebruik is Reinig het voertuig niet met een tuinslang Reinig het voe...

Page 42: ...et deze knop kunt u langzame of hoge snelheid selecteren OPMERKING Het voertuig is zo ontworpen dat de achteruitversnelling alleen op lage snelheid kan worden gebruikt 5 Hendel VOORUIT STOP ACHTERUIT selecteert de richting van het voertuig VOORUIT forward STOP stop en ACHTERUIT reverse Duw de hendel naar voren om de auto vooruit te rijden Trek de hendel naar achteren om de auto achteruit te rijden...

Page 43: ...S maakt het mogelijk om verschillende snelheidsniveaus te kiezen Lang zaam 1 LED Middel 2 LED s Snel 3 LED s Vooruit Snelhiedsindicator langzaam middel snel Achteruit Snelheidsschakelaar Verbinding Draai naar links Draai naar rechts Parking De afstandsbediening schakelt automatisch uit als deze 10 seconden niet gebruikt is Herhaal stap 1 van het verbinden met de auto wanneer u de batterijen vervan...

Page 44: ...oerd Onze apparaten zijn bedoeld voor gebruik in een privé en persoonlijke omgeving gebruik in een professionele omgeving doet automatisch alle garanties vervallen LIJST VAN UITSLUITINGEN VAN DE GARANTIE Schaden storingen tekortkomingen of fouten door externe oorzaken Storingen die zijn ontstaan door de wijziging van deconstructie van het apparaat Storingen door onderdelen die niet aanbevolen zijn...

Page 45: ...onentes pelo Serviço de pós venda Antes da montagem assegure se de que não falta nenhuma peça Pode dispor de peças restantes que servirão como peças sobresselentes Antes de começar a montagem do carro certifique se de que verifica que o mesmo está na posição OFF DESLIGADO Antes da primeira utilização aconselhamos a que deixe carregar o carro durante pelo menos entre 4 a 6 horas Bateria De chumbo 2...

Page 46: ...uções a fim de evitar quedas ou colisões que podem causar ferimentos ao condutor ou às pessoas à volta Verifique regularmente o estado do carro ATENÇÃO este carro não dispõe de travões Este carro dispõe de um cinto de segurança ajustável Ensine o seu filho a colocar o cinto de segu rança antes de utilizar o carro a fim de garantir a sua segurança SEGURANÇA DAS CRIANÇAS Vigie sempre o seu filho qua...

Page 47: ...gua e consulte o seu médico o quanto antes Não coloque o pack da bateria em curto circuito Poderá haver risco de explosão Proteja o pack da bateria da humidade e da água e não carregue este aparelho em meio húmido ou molhado Deste modo reduz os riscos de choque elétrico Se a bateria estiver danificada ou tiver sido utilizada de forma inadequada podem ser libertados vapores Areje imediatamente os l...

Page 48: ...carregar a bateria durante 4 a 6 horas Não carregue a bateria por mais de 10 horas a fim de evitar o sobreaquecimento do carregador Quando o veículo começar a abrandar carregue a bateria Após cada utilização ou uma vez por mês carregue a bateria durante 8 a 12 horas Não deixe a bateria a carregar por mais de 20 horas A apresentação da tensão no painel de instrumentos permite lhe conhecer o nível d...

Page 49: ...urante 1 a 3 anos Siga estas fases para substituir e reciclar a bateria 1 Retire a base 2 Desligue os conectores da bateria 3 Retire todas as tampas da bateria 4 Levante a bateria cuidadosamente Em função do estado da bateria ex fugas use luvas de proteção Não levante a bateria pelos seus conectores ou os seus cabos 5 Coloque a bateria gasta dentro de um saco de plástico Os componentes da bateria ...

Page 50: ...a antiga Substitua a bateria Veículo sobrecarregado Reduza o peso no veículo Peso máximo 30 kg O veículo é utilizado em condições difíceis Verifique as instruções de segu rança O veículo deve ser empurrado para avançar Mau contacto entre os fios e os conectores Verifique que os conectores da bateria estão bem ligados Carregamento difícil entre a marcha à frente e a marcha atrás Transição enquanto ...

Page 51: ...eza Arrume o veículo no interior ou proteja o com um toldo contra as intempéries Afaste o veículo de qualquer fonte de calor As peças em plástico poderão derreter Carregue a bateria após cada utilização Só um adulto pode manusear a bateria Carregue a bateria pelo menos uma vez por mês quando o veículo não for utilizado Não lave o veículo com uma mangueira Não lave o veículo com água e sabão Não ut...

Page 52: ...enta ou rápida NOTA O veículo está concebido para que a marcha atrás apenas possa ser efetuada a uma velocidade reduzida 5 Alavanca DIANTEIRA PARAGEM TRASEIRA Permite escolher o sentido de marcha do veículo DIANTEIRA Forward PARAGEM Stop e TRASEIRA Reverse Para fazer avançar o carro puxe a alavanca para a frente Para fazer recuar o carro puxe a alavanca para trás Para parar o veículo deixe a alava...

Page 53: ...ápido 3 LED Marcha à frente Indicador de velocidades lento médio e rápido Marcha atrás Seletor de velocidades Emparelhamento Virar à esquerda Virar à direita Estacionamento O comando à distância apaga automaticamente após não ser utilizado durante 10 segundos Certifique se de que repete a fase 1 da ligação ao carro quando mudar as pilhas MP3 TF TF USB MP3 V USB V V USB Permite a leitura de qualque...

Page 54: ...ma utilização num contexto profissional anularia automaticamente qualquer garantia LISTA DAS EXCLUSÕES DA GARANTIA Os danos as avarias as falhas ou os defeitos imputáveis a causas de origem externa As avarias que resultam da modificação da construção e das características de origem do aparelho As avarias que afetam as peças não conformes às indicadas pelo construtor Os ajustes acessíveis ao utiliz...

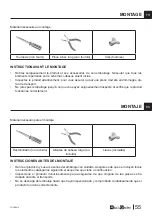
Page 55: ...ectement Tournevis non fourni Pince à bec long non fournie Clés fournies Material necesario para el montaje INSTRUCCIONES ANTES DEL MONTAJE Retire el producto y sus accesorios del embalaje con cuidado Asegúrese de que se incluyen todos los elementos catalogados siguiendo el esquema que viene a continuación Inspeccione el producto minuciosamente para asegurarse de que ninguna de las piezas se ha da...

Page 56: ...leerd of het product naar behoren werkt Schroevendraaier niet meegeleverd Langbektang niet meegeleverd Sleutels meegeleverd Required tools for assembly ADVICE BEFORE BUILDING Carefully remove the product and all parts from their packaging make sure all the parts listed in the parts list are accounted for Thoroughly inspect the product to check that nothing was damaged during transport Don t throw ...

Page 57: ...os enumerados no esquema acima estão incluídos Inspecione o produto atentamente para se assegurar de que nenhuma peça tenha sido danificada durante o transporte Não deite fora a embalagem até ter inspecionado e verificado cuidadosamente que o produto está a funcionar corretamente Chave de parafusos não fornecida Alicate de pontas compridas não fornecido Chaves fornecidas MONTAGEM PT ...

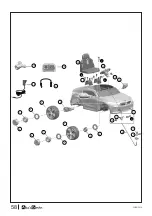
Page 58: ...58 22 08 2019 1 9 6 2 3 4 5 25 26 27 6 18 6 7 8 6 7 8 10 13 14 15 19 11 12 20 21 16 22 23 24 21 19 16 15 13 12 10 18 1 2 3 6 6 6 6 9 17 14 11 4 5 7 7 8 8 20 C B A D ...

Page 59: ...59 22 08 2019 1 x1 12 x1 2 x2 13 x2 3 x2 14 x1 4 x2 15 x1 5 x2 6 x7 16 x1 7 x4 17 x1 8 x4 18 x2 9 x1 19 x2 10 x1 20 x1 11 x1 21 x1 x1 x8 x2 x1 A B C D M5x25 M5x16 M5x35 Ø4x12 ...

Page 60: ...e diagram pictured below The right motor is labelled R and the left motor is labelled L The wheel drive 3 has a hole which is notched on the inner part TIP 2 keys are provided to help you screw the 2 nuts 7 into the axle After fitting all the wheels make sure that there s enough space between the wheel and the nut for the wheel to turn freely so that it doesn t damage the motor NL Plaats de motor ...

Page 61: ... a conti nuación Repita este paso para montar la rueda opuesta EN Remove the prebuilt hardware from the front wheel axle then assemble the guide wheel 4 following the below schema Repeat this step to assemble the oppo site wheel NL Verwijder de voorgemonteerde hard ware van de voorwielas en monteer het stuur 4 volgens bovenstaand schema Herhaal deze stap om het wiel aan de andere zijde te monteren...

Page 62: ...reti rando la tornillería premontada Sigua el esquema que viene a continuación EN Place the car on its side and proceed to build the steering system removing the pre built fittings Follow the schema pic tured below NL Plaats de auto op zijn kant en monteer de stuurstangen door de voorgemonteerde bouten te verwijderen Volg het schema hierboven PT Coloque o carro de lado e proceda à montagem das bar...

Page 63: ...steriormente inserte dos pilas AA LR6 EN Take the cover off the centre of the stee ring wheel by removing the screws then insert 2 AA batteries LR6 NL Verwijder de kap in het midden van het stuurwiel door de schroef te verwijderen en plaats vervolgens twee AA LR6 bat terijen PT Retire a tampa no centro do volante re movendo o parafuso e a seguir insira as duas pilhas AA LR6 ...

Page 64: ... y atornille la tuerca 12 EN Remove the screw A and the nut 12 from the steering wheel Align the holes of the steering wheel and the steering axle 9 then replace the screws and tighten the bolts NL Draai de schroef A en de moer 12 van het stuurwiel los Lijn de gaten in het stuurwiel en de stuuras 9 uit plaats dan de schroef A terug en haal de moer 12 aan PT Desaparafuse o parafuso A e a porca 12 d...

Page 65: ...65 22 08 2019 2 1 3 6 ...

Page 66: ...66 22 08 2019 13 2 B 8 B x8 1 2 Fuse box Battery Car Motor 7 ...

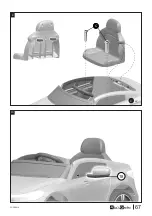
Page 67: ...67 22 08 2019 2 C 3 18 9 10 C x2 ...

Page 68: ...n siempre bien cerra das ayudándose del seguro de la puerta Lock EN Before using the toy make sure that all the doors are firmly closed using the door looking system NL Voordat u het speelgoed gebruikt moet u erop letten dat de deuren altijd gesloten zijn met behulp van de deurvergrendeling Lock PT Antes de utilizar o brinquedo tenha aten ção a que as portas estão bem fechadas com os trincos respe...

Page 69: ......

Page 70: ...JK NL 020 262 1095 BE 033 313 383 After sales aftersales alicesgarden nl aftersales alicesgarden be IMPORTADO POR WALIBUY SPAIN SL Ed Palau de Mar Plaça Pau Vila 1 oficina 3B3 08039 BARCELONA ESPAÑA ES 931 993 006 911 337 937 Servicio postventa desistimiento alicesgarden es defecto IMPORTÉ PAR WALIBUY SAS 270 avenue de l Espace 59118 WAMBRECHIES FRANCE FR 0805 650 000 BE 081 280 149 Service après ...

Page 71: ...rviço pós venda livreresolucao alicesgarden pt defeito IMPORTATO DA WALIBUY ITALIA S R L Via Torino 60 20123 MILANO ITALIA IT 0039 02 87368397 Contatto contatto alicesgarden it IMPORTED BY ALICE S GARDEN OUTDOOR PTY LTD SHOP 1 1 Denham Street Bondi 2026 NSW AUSTRALIA AU 1300 827 171 Contact service alicesgarden com au ...

Page 72: ......

Reviews: