Ŷ
chapter 4 upgrading your computer
6.
Locate and remove the 4 Screw B’s from the HDD module.
Remove the upper and lower metal cases.
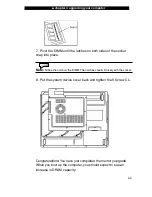
7. Re-attach the metal cases to the new hard drive and tighten the
4 Screw B’s. Note that the green PC board of the hard disk drive is
facing up.
8. Re-attach the HDD module to the HDD connector.
9. Put the HDD cover back and re-attach Screw A.
Congratulations! You have now completed the hard drive upgrade.
4-4
Summary of Contents for Area-51 m5500
Page 1: ...i 1...
Page 10: ......
Page 32: ......
Page 54: ......
Page 68: ......
Page 85: ...appendix A product specification A 1 A P P E N D I X A PRODUCT SPECIFICATION...
Page 92: ......
Page 93: ...appendix B agency regulatory notices B 1 A P P E N D I X B AGENCY REGULATORY NOTICES...

