background image

nF, µF

nF: Nanofarad;  µF: Microfarad

1F=10

6

µ

F=10

9

nF=10

12

pF

capacitance
unit

8

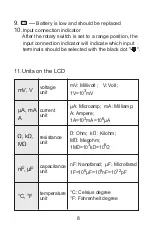
9. 

 --- 

Battery is low and should be replaced

10.

Input connection indicator

      After the rotary switch is set to a range position, the
      input connection indicator will indicate which input
      terminals should be selected with the black dot "   ".

11.

Units on the LCD

mV, V

mV: Millivolt ;   V: Volt;
1V=10

3

mV

µA, mA
A

µ

A: Microamp;  mA: Milliamp;

A: Ampere;
1A=10

3

mA=10

6

µ

A

voltage
unit

current
unit

resistance
unit

, k ,

M


: Ohm;  k  : Kilohm;

M  : Megohm;
1M =10

3

k =10

6

temperature
unit

°C, °F

°C

: Celsius degree

°F

: Fahrenheit degree

Summary of Contents for EM3672

Page 1: ...Read this manual thoroughly before use 3672 Digital Multimeter Users Manual...

Page 2: ......

Page 3: ...If the defect has been caused by a misuse or abnormal operating conditions the repair will be billed at a nominal cost WARRANTY SAFETY INFORMATION This meter has been designed according to IEC 61010 c...

Page 4: ...by measuring a known voltage g When measuring current turn off circuit power before connecting the meter in the circuit Remember to place the meter in series with the circuit h When servicing the met...

Page 5: ...le using the meter p When in Data Hold mode the symbol is displayed Caution must be used because hazardous voltage may be present q Remaining endangerment When an input terminal is connected to danger...

Page 6: ...old MAX Recording mode autorange mode and manual range mode It is easy to operate and is an ideal measurement tool 4 Symbols Alternating Current Direct Current DC or AC Caution risk of danger refer to...

Page 7: ...1 2 3 4 5 6 7 9 8 1 Display 3 1 2 digit LCD with a max reading of 1999 2 Range Button Used to switch between autorange mode and manual range mode or used to select desired manual range FRONT PANEL 5...

Page 8: ...6 COM Terminal Plug in connector for black negative test lead 7 V mA Terminal Plug in connector for the red test lead for all measurements except the current measurements 200mA 8 HOLD Button Used to e...

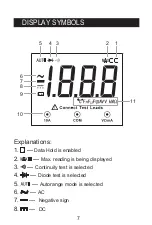
Page 9: ...1 6 7 8 9 10 7 DISPLAY SYMBOLS Explanations 1 Data Hold is enabled 2 Max reading is being displayed 3 Continuity test is selected 4 Diode test is selected 5 Autorange mode is selected 6 AC 7 Negative...

Page 10: ...to a range position the input connection indicator will indicate which input terminals should be selected with the black dot 11 Units on the LCD mV V mV Millivolt V Volt 1V 103 mV A mA A A Microamp m...

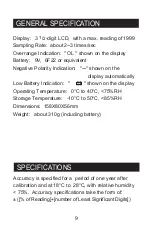
Page 11: ...ly Low Battery Indication shown on the display Operating Temperature 0 C to 40 C 75 RH Storage Temperature 10 C to 50 C 85 RH Dimensions 158X80X56mm Weight about 310g including battery GENERAL SPECIFI...

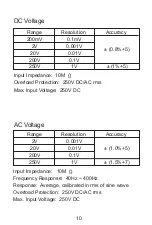
Page 12: ...10M Overload Protection 250V DC AC rms Max Input Voltage 250V DC Input Impedance 10M Frequency Response 40Hz 400Hz Response Average calibrated in rms of sine wave Overload Protection 250V DC AC rms Ma...

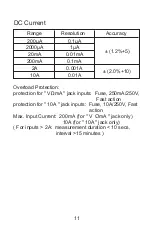
Page 13: ...01mA 0 1mA 0 001A 10A 0 01A Overload Protection protection for V mA jack inputs Fuse 250mA 250V Fast action protection for 10A jack inputs Fuse 10A 250V Fast action Max Input Current 200mA for V mA ja...

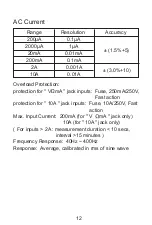
Page 14: ...ction Max Input Current 200mA for V mA jack only 10A for 10A jack only For inputs 2A measurement duration 10 secs interval 15 minutes Frequency Response 40Hz 400Hz Response Average calibrated in rms o...

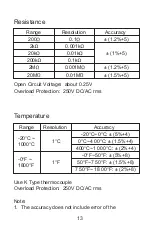
Page 15: ...01k 0 01k 0 1 1 2 5 1 5 1 2 5 Resolution Accuracy Range 13 20 C 1000 C 0 F 1800 F 1 C 1 F 20 C 0 C 5 4 0 C 400 C 1 5 4 400 C 1000 C 2 4 0 F 50 F 5 8 50 F 750 F 1 5 8 750 F 1800 F 2 8 Use K Type thermo...

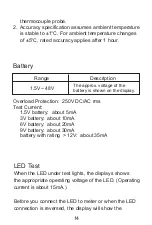
Page 16: ...he Overload Protection 250V DC AC rms Test Current 1 5V battery about 5mA 3V battery about 10mA 6V battery about 20mA 9V battery about 30mA battery with rating 12V about 35mA 14 Battery 1 5V 48V The a...

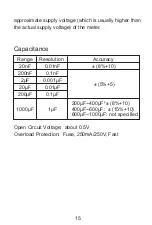
Page 17: ...y voltage of the meter 200 F 400 F 8 10 400 F 600 F 15 10 600 F 1000 F not specified Open Circuit Voltage about 0 5V Overload Protection Fuse 250mA 250V Fast Capacitance 20nF 200nF 2 F 20 F 200 F 1000...

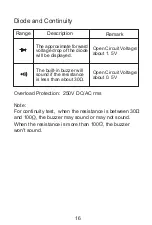
Page 18: ...or may not sound When the resistance is more than 100 the buzzer won t sound Diode and Continuity Open Circuit Voltage about 1 5V Range Description Remark Open Circuit Voltage about 0 5V The approxima...

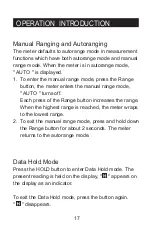
Page 19: ...the manual range mode AUTO turns off Each press of the Range button increases the range When the highest range is reached the meter wraps to the lowest range 2 To exit the manual range mode press and...

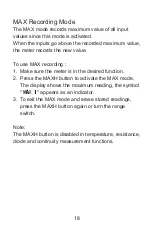
Page 20: ...MAX recording 1 Make sure the meter is in the desired function 2 Press the MAXH button to activate the MAX mode The display shows the maximum reading the symbol appears as an indicator 3 To exit the...

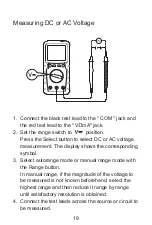
Page 21: ...AC voltage measurement The display shows the corresponding symbol 3 Select autorange mode or manual range mode with the Range button In manual range if the magnitude of the voltage to be measured is n...

Page 22: ...sured It is normal and will not affect the measurements 2 In manual range mode when the meter shows the overrange indicator OL a higher range has to be selected 3 To avoid electric shock to you or dam...

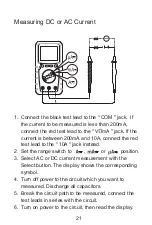
Page 23: ...ct the red test lead to the 10A jack instead 2 Set the range switch to or position 3 Select AC or DC current measurement with the Select button The display shows the corresponding symbol 4 Turn off po...

Page 24: ...well Note 1 If you don t know the magnitude of the current to be measured beforehand select the highest range and then reduce it range by range until satisfactory resolution is obtained 2 Never place...

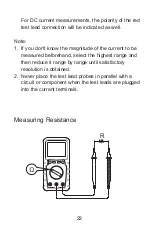
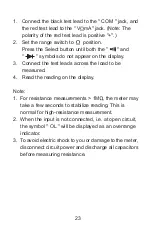
Page 25: ...e test leads across the load to be measured 4 Read the reading on the display Note 1 For resistance measurements 1M the meter may take a few seconds to stabilize reading This is normal for high resist...

Page 26: ...range switch to position 3 Press the Select button until the symbol appears on the display 4 Connect the test leads to the circuit to be measured 5 If the circuit resistance is less than about 30 the...

Page 27: ...switch to position 3 Press the Select button until the symbol appears on the display 4 Connect the red test lead to the anode of the diode to be tested and the black test lead to the cathode of the d...

Page 28: ...e the meter is rated for 20 C to 1000 C and 0 F to 1800 F the K Type Thermocouple provided with the meter is rated to 250 C For temperatures out of that range use a higher rated thermocouple The K Typ...

Page 29: ...uple to the COM jack and the red or plug of the thermocouple to the V mA jack 4 Carefully touch the sensing end of the thermocouple to the object to be measured 5 Wait a while read the reading on the...

Page 30: ...D position The display shows the present supply voltage of the meter 3 Connect the red test lead to the anode of the LED to LED Test 2 Set the range switch to BAT position 3 Connect the test leads to...

Page 31: ...s not light and the display will show the approximate supply voltage of the meter Measuring Capacitance 1 Connect the black test lead to the COM jack and the red test lead to the V mA jack Note The po...

Page 32: ...button If you press the HOLD button to arouse the mete from Sleep the automatic power off feature will be disabled 30 the meter It is normal because of the stray capacitance of the test leads and the...

Page 33: ...in dry place when not in use General Maintenance Periodically wipe the case with a damp cloth and mild detergent Do not use abrasives or solvents Dirt or moisture in the terminals can affect readings...

Page 34: ...e exhausted battery with a new one of the same type 9V 6F22 or equivalent Reinstall the battery cover and the screws This meter uses two fuses Fuse1 250mA 250V Fast action 5X20mm Fuse 2 10A 250V Fast...

Page 35: ...ent of this manual can not be used as the reason to use the meter for any special application DISPOSAL OF THIS ARTICLE Dear Customer If you at some point intend to dispose of this article then please...

Page 36: ......
Reviews: