background image


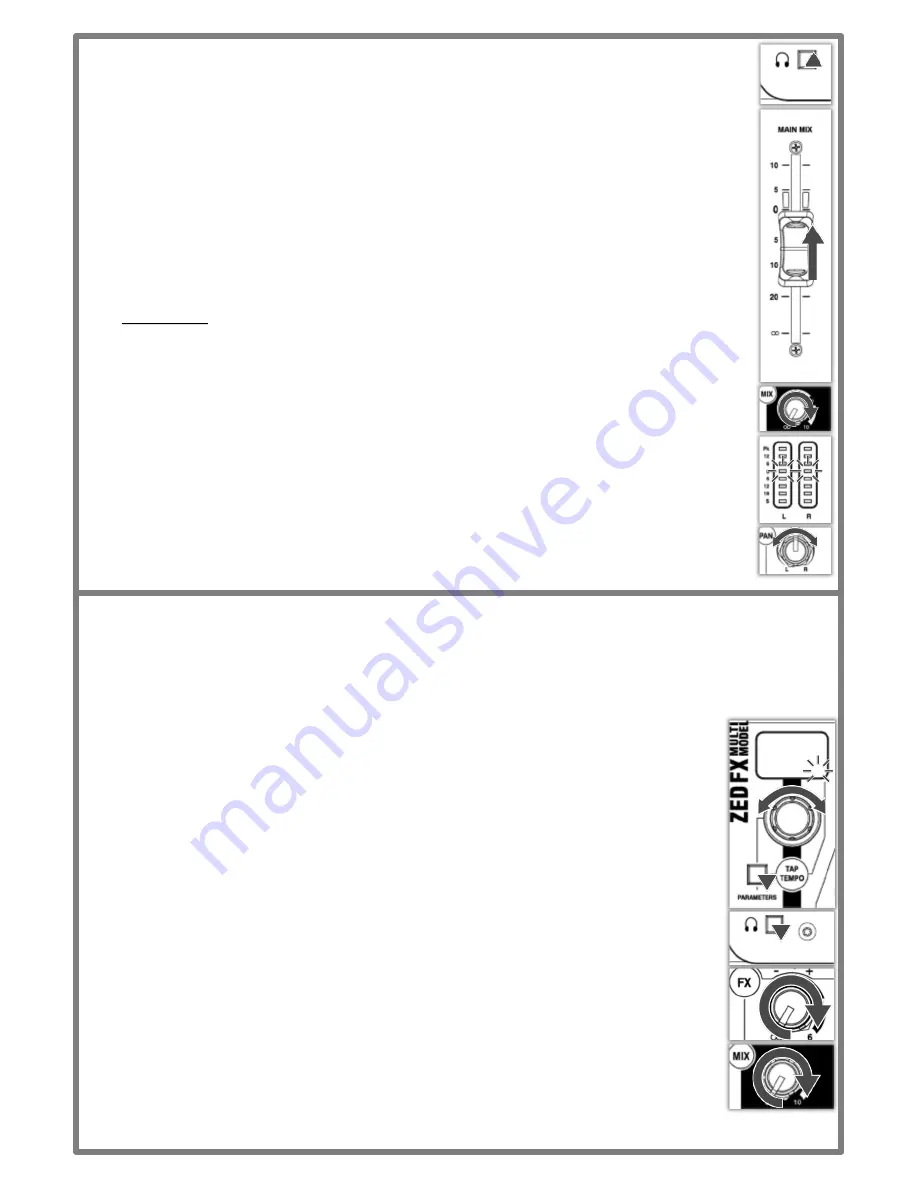
6.3 Balancing the Mix 

Once you have set input gain levels and applied EQ to source signals, you can start to mix all of your 
channels to the outputs. Consider the importance of each instrument and how they should be heard in 
the mix. 

1. 

Make sure all PFL switches on your mixer are disabled to show 

MAIN MIX 

metering in 

LR Meters

.


2. 

Slowly raise the 

MAIN MIX fader 

to around “

0

”.


3. 

Turn up channel 

MIX 

controls to send their signal to the main mix.


4. 

You will see the signal level displayed in the 

LR Meters

.


5. 

As you mix the signals together you will see the combined level getting higher in the meters.


6. 

Avoid clipping and leave headroom for any louder moments in the program material. 


Average 

peaks around “

0

” on the meters are a good indicator. 

Maintain a natural sounding balance and relationship between voices and instruments.


i.e. which instruments should be heard more clearly over others. 

If you find that 

MIX 

controls are turned up very high and signal is still low, or 

MIX 

control is very low 

but signal is too high, readjust channel 

Gain

 and 

EQ

 controls to improve gain structure and tone 

(see section 6.1)


8. 

Use 

PAN 

and balance to separate sounds and give instruments space in the mix or a realistic 

impression of where they might sit in the stereo image.


Ideally, high energy LF sounds such as kick drum should be kept centre to distribute them evenly 
and share the load between speakers.


6.4 Applying Effects to the Mix (ZEDi-10FX only) 


Before adding effects think about whether you want it to sound as though the voice or instruments are in a certain 
performance space, if you want to add repetition effects such as echo (delay) or if you want them to sound like they do 
on that classic album. 

Using too much of an effect may mean losing definition or intelligibility of the original sound! 

1. 

Select the desired effect preset and turn the 

FX Select / Parameter 

control to that number.


2. 

Press 

PFL 

on the channel and on the effects section to monitor (dry) channel signal and (wet) 

effect return via the 

PHONES


output

 before adding to the 

MAIN MIX

.


3. 

If you have selected a delay effect and there’s a flashing decimal point on the preset display, 

use the 

TAP TEMPO Button 

to bring the effect in time with program material.


4. 

Turn up the 

FX send

 on the channel until you hear the desired amount of effect.  


The channel 

MIX

 control must be turned up because the 

FX send 

is post-fader.


5. 

Repeat this for any additional channels.


6. 

Once you’re happy with the sound disable all 

PFL 

switches.


7. 

Slowly turn up the effects 

MIX 

control to “

0

” to add the effects signal to the 

MAIN MIX

.


8. 

Readjust channel FX send controls, if necessary!


Sending too much signal to a regenerative delay or using too much regeneration can cause sound 
to build up very quickly, caution is advised!  



!


Summary of Contents for ZEDi-10

Page 1: ...i 10FX We recommend that you read all of this user guide to get the best from your mixer and after reading please keep this safe for future reference Included in this package is ZEDi 10 ZEDi 10FX Mixer IEC C5 Mains Power Cable Please check correct mains plug is fitted for your country USB A B Cable 2M This User Guide ...

Page 2: ...definition or for reducing hiss and harshness 8 MF EQ Mid Frequency equaliser affects frequencies in the signal for adding presence or for removing boxiness 9 LF EQ Low Frequency equaliser affects bass frequencies in the signal to cover boom and sub bass frequencies 10 AUX send controls the amount of signal sent from the channel to the aux buss and AUX OUT The signal is sourced pre fader MIX so is...

Page 3: ...ount of signal sent from the channel to the aux buss and AUX OUT The signal is sourced pre fader MIX so is independent of the level being sent to the main L R Mix Unlike the FX bus there is a master level control for the Aux output 7 FX send controls the amount of signal sent from the channel to the FX buss and the FX OUT The signal is post fader MIX which means it s affected by the channel MIX co...

Page 4: ...for studio control room monitoring applications 6 48V switches industry standard 48V phantom power to all the microphone inputs for use with condenser microphones and active D I boxes requiring 48V 7 POWER LED indicates that the mixer is switched on 8 MONITORS level controls the volume of signal from the MONITOR OUT shown section 3 9 MONITOR SOURCE select switches the source signal to the MONITOR ...

Page 5: ...lect Parameter control The display will show a parameter value of P0 to P9 Reset the editable effects parameters to factory defaults by holding down FX Select Parameter control and TAP TEMPO Button at the same time whilst switching on the power Turn off the internal effects by setting the ZED FX Multi Model preset to 00 4 FX TO AUX controls the level of effects signal sent to the aux buss and AUX ...

Page 6: ...B Audio Interface 3 2 Troubleshooting USB Audio Interface problems Playback and recording problems when using the ZEDi USB Audio Interface can be avoided by following the steps below Minimum System Requirements Ensure that your PC exceeds the Minimum System Requirements of the Digital Audio Workstation software that you are using to guarantee reliable performance and recording without pops clicks ...

Page 7: ...o manufacturer guidelines 4 Good Practice 5 1 Connecting Microphones Dynamic or condenser microphones and DI boxes should be connected to the Mic Input Socket using a balanced XLR Microphone cable If you re using a condenser microphone it will require 48V Phantom Power to work Some active DI boxes may also require phantom power Avoid hot plugging when connecting any equipment and make sure AUX MAS...

Page 8: ...ity or remove unwanted frequencies and improve the tonal balance of the source sound so keep the channel PFL switch enabled for now 6 Get the best sound 6 2 Shaping Sound EQ filters audio passing through it and allows you to cut turn down or boost turn up selected frequencies Boosting a frequency too much may cause the signal to clip or distort Cutting a frequency will cause a reduction in signal ...

Page 9: ...rgy LF sounds such as kick drum should be kept centre to distribute them evenly and share the load between speakers 6 4 Applying Effects to the Mix ZEDi 10FX only Before adding effects think about whether you want it to sound as though the voice or instruments are in a certain performance space if you want to add repetition effects such as echo delay or if you want them to sound like they do on th...

Page 10: ...10 7 Application examples Live Microphone Electro Acoustic Guitar Electronic Piano Powered PA Speakers iPad Wedge Monitor Bass Guitar Microphone External FX Unit Phones IEM Monitoring ...

Page 11: ...itar Electronic Piano Active Studio Monitors Bass Guitar Dynamic or Condenser Microphone Drum Machine PC Phones Monitoring Reference Monitors Dynamic or Condenser Microphone External FX Unit Requires available stereo return channel ...

Page 12: ...follow the operating instructions printed in this User Guide Do not remove cover Never operate the mixer if the cover is not correctly fitted Power sources Only connect the console to mains power of the type described in this User Guide and marked on the rear panel Use a power cord with sealed mains plug appropriate for your local mains supply as provided with the mixer If the provided plug does n...

Reviews: