background image

3

U

X

Wrench

KEEP ALL FLAME AND HEAT AWAY FROM THIS TENT FABRIC.


A

M

O

O

N

U    

N

U

Please read and understand this entire manual before attempting to assemble or install the product.


Two to four people are need for assembly.

     Maximum load for the roof hook: 50 lbs.

.

.

.
.

.

SAFETY INFORMATION

WARNING:

CAUTION

PREPARTION 

INSTALLATION INSTRUCTIONS

Hardware Used

This tent meets the flammability requirements of CPAI-84. The fabric may burn if left in continuous 

contact with any flame source. The application of any foreign substance to the tent fabric may 

render the flame-resistant properties ineffective.

Do not leave outside during high winds, heavy rains or snow. If high winds, heavy rains or snow 

occurs, remove canopy and mosquito net, clear snow load from roof tube, and check for damage 

before continued use.

Before beginning assembly of product, make sure all parts are present. Compare parts with package 

contents list and hardware contents list. If any part is missing or damaged, do not attempt to assemble 

the product.

Estimated Assembly Time:

 2-3 hours

Tools Required for Assembly (not included): Ladder

Tools Required for Assembly ( included): Wrench

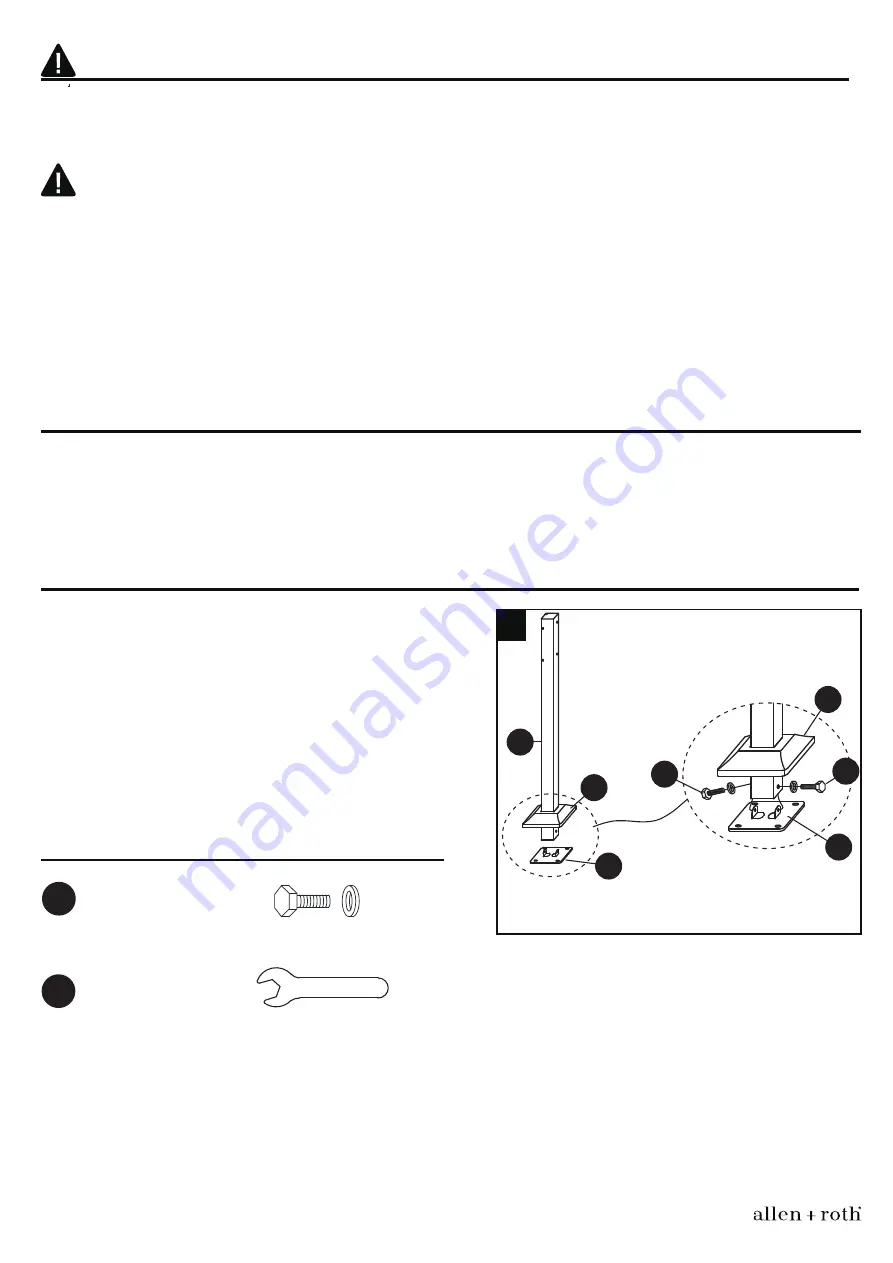
1. Insert the post plate cover (O) into the post (M). Fix

    the base plate (N) underneath the post (M). Insert two

    M6*15 mm bolts (U), supporting the post (M) and 

    secure to the base plate (N) using the wrench (X), but

    do not overtighten.

    Slide the post plate cover (O) down into place.

    Repeat this step for remaining supporting posts (M) 

    the base plate (N) and the post plate cuvers (O).


M6 x 15 mm Bolt

allenandroth.com

1

Summary of Contents for TPGAZ2009

Page 1: ...12 FT 12 FT STEEL BEAM GAZEBO MODEL TPGAZ2009...

Page 2: ...PART PART DESCRIPTION DESCRIPTION QUANTITY QUANTITY J1 J2 L M N O P P1 Q R1 R2 S1 S2 Decoration Ball Small Center Connector Large Center Connector Hook Small Top Bar Long Top Bar Connector Short Top...

Page 3: ...2 M6 15 mm Qty 48 M6 32 mm Qty 8 M6 15 mm Qty 4 Wrench Wrench Qty 2 M6 15 mm Qty 8 T U V W Y Z X II Stake Qty 16 Qty 1 HARDWARE CONTENTS shown actual size allenandroth com...

Page 4: ...s heavy rains or snow occurs remove canopy and mosquito net clear snow load from roof tube and check for damage before continued use Before beginning assembly of product make sure all parts are presen...

Page 5: ...y with the wrench X allenandroth com 2 2 J2 J2 J1 J1 M6 15 mm T X Wrench T T M6 15mm Bolt U F X Wrench Hardware Used 3 Secure the crossbar J1 J2 assemblies to the post M using M6 15 mm bolts U Tighten...

Page 6: ...are Used J2 J2 L L L 4 Fix the corner connector Q and the post M together by the screw M6 15mm W Fix the mosquito net pipe L and connector P to the bars J1 J2 by the screw M6 15mm U Tighten securely w...

Page 7: ...h the long top bar E then fix the connector pipe F and the corner connector Q together by the screw M6 32mm V Tighten securely with the wrench X M6 32mm Bolt V X Wrench Hardware Used V F E J1 P J1 J2...

Page 8: ...ndroth com 9 Insert each small top bar D into the small center connector B Attach the small roof R2 on the small top bar D then secure with the decoration ball A B D D O R2 A B R2 O O R2 D 9 10 O O R1...

Page 9: ...allenandroth com E D 11 11 Connect the small top bar D with the large top bar E 1 2 12 Hang the mosquito net S1 onto inside of the mosquito net pole hang the sidewall S2 onto outside of the mosquito n...

Page 10: ...Z X Hardware Used 9 INSTALLATION INSTRUCTIONS allenandroth com 13 Move the cover O upward fix the base plate N by the stake Z then move the cover O down Stake O N Z M 4 13...

Reviews: