HYDRAULIC OIL AND OIL FILTERS
Check the level of hydraulic oil in the oil reservoir on a daily basis.
Check the oil before starting the engine. Run the engine for a few
minutes to purge any air from the lines and then check the oil again.
Maintain the oil level within 2 inches of full but leave at least 1 inch
of air space for expansion. The reservoir level should be checked after
hose length has been added and after the machine is lengthened.
Approximately one gallon of hydraulic oil is required to fill 100 feet
of 1/2” hose. Use Dexron automatic transmission fluid or Hydraulic
Transmission Fluid Type C-2. Do not use engine oil. Use clean contain-
ers when adding hydraulic oil to the reservoir. Take every precaution,
to avoid contaminating the oil in the system. Thoroughly clean all
hydraulic components before loosening or removing for repairs.
The hydraulic oil filter element(s) should be replaced with a 10 micron
filter element after the first 50 hours of operation
and every 250 hours thereafter. Replace hydraulic filters each time the
hydraulic oil is replaced.
Before paving or transporting the machine, secure all hoses
to keep them away from sharp edges and moving parts. Before con-
necting hoses clean the quick disconnects and fittings.
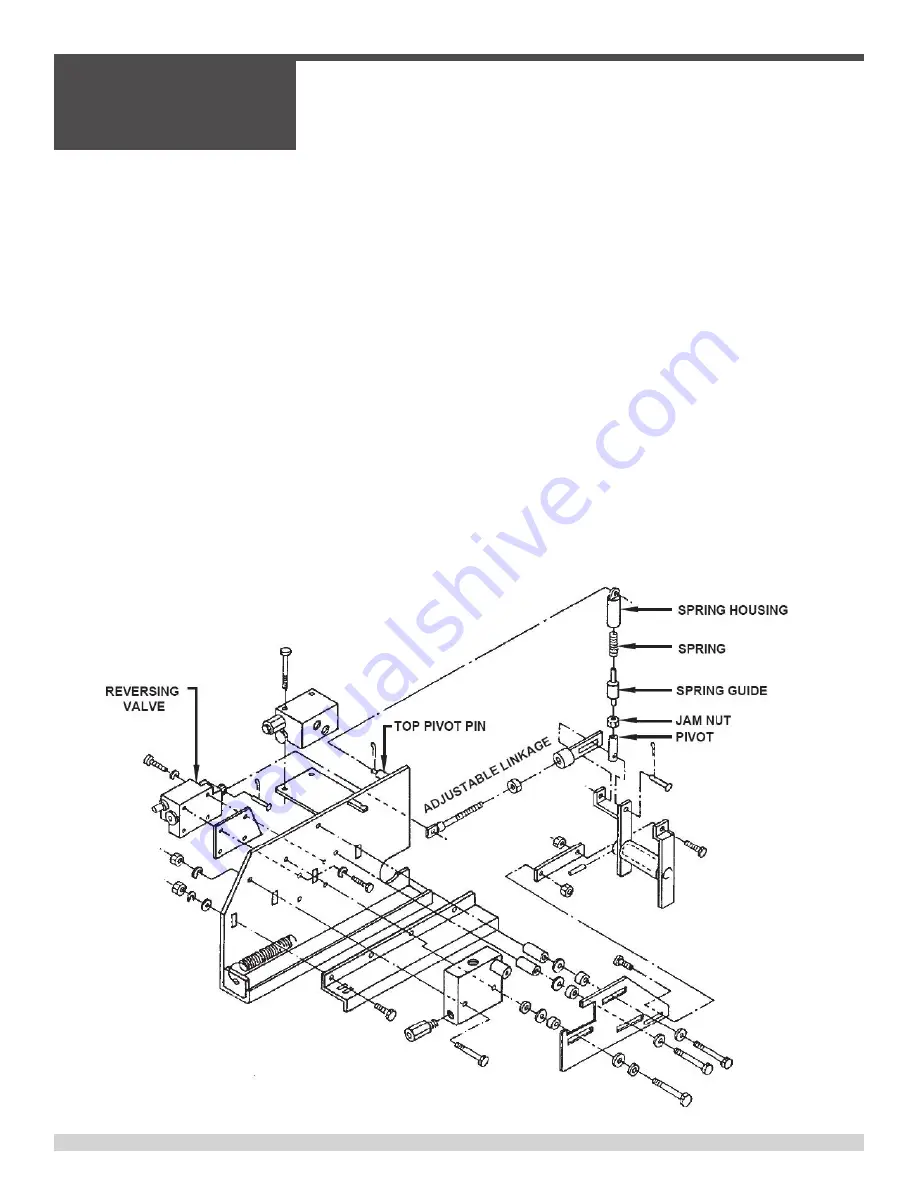
SHIFTING MECHANISM ADJUSTMENT
The shifting mechanism automatically decelerates, reverses and accel-
erates the carriage each time the carriage makes a pass and allows
the operator to manually start or reverse carriage travel. In addition, the
shifting mechanism can automatically advance the machine a manu-
ally selected distance. The over center assembly provides the spring
force to shift the hydraulic valve that reverses the carriage motor. To
replace the over center assembly or to adjust spring tension:
1. Remove the cotter pin from the top pivot pin.
2. Use a bar or hammer handle to compress the
spring slightly.
3. Remove the assembly from the pivot pin,
noting the position of the components.
4. If more spring force is required, adjust the pivot
and jam nut closer to the screw. You do not have
to disassemble.
5. Reassemble in reverse in order.
After assembly check the operation of the machine to insure
that the over center assembly shifts the valve spool a full 1/2 inch with
sufficient force.
SECTION 3
SERVICE
050362
Page 54
3.1 - General Maintenance, continued
Summary of Contents for BDF4836B
Page 5: ...050362 Page 5 Table of Contents continued ...
Page 14: ...050362 Page 14 Notes ...
Page 15: ...SECTION 1 SAFETY 050362 Page 15 SECTION 1 SAFETY ...
Page 21: ...SECTION 1 SAFETY 050362 Page 21 PAGE LEFT BLANK INTENTIONALLY ...
Page 22: ...Notes SECTION 1 SAFETY 050362 Page 22 ...
Page 23: ...SECTION 2 OPERATIONS 050362 Page 23 SECTION 2 OPERATIONS ...
Page 40: ...Power Crown Lever Nut A SECTION 2 OPERATIONS 050362 Page 40 2 6 Power Crown Option ...
Page 46: ...Skew Clamp Skew Cylinder SECTION 2 OPERATIONS 050362 Page 46 2 7 Paving Operations continued ...
Page 49: ...SECTION 2 OPERATIONS 050362 Page 49 PAGE LEFT BLANK INTENTIONALLY ...
Page 50: ...SECTION 2 OPERATIONS 050362 Page 50 Notes ...
Page 51: ...SECTION 3 SERVICE 050362 Page 51 SECTION 3 SERVICE ...


