background image

Para bajar una copia de estas instrucciones en español, visite www.comlaundry.com.

Keep these instructions for future reference.
(If this machine changes ownership, this manual must accompany machine.)

www.comlaundry.com

Installation Instructions

for Frontload Washers

Washer Dimensions...........................................................

2

Before You Start................................................................

2

Installation.........................................................................

3

Installer Checklist.............................................................. Back 

Cover

Date Purchased ________________
Model Number ________________
Serial Number _________________

Part No. 802749R2

April 2012

Inside.....................................

Summary of Contents for 802749R2

Page 1: ...ine changes ownership this manual must accompany machine www comlaundry com Installation Instructions for Frontload Washers Washer Dimensions 2 Before You Start 2 Installation 3 Installer Checklist Ba...

Page 2: ...asher is delivered on a cold day below freezing or is stored in an unheated room or area during the cold months do not attempt to operate it until the washer has had a chance to warm up NOTE Some mois...

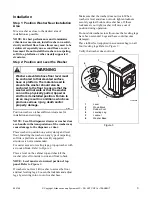
Page 3: ...if the washer is level from side to side and front to back NOTE Level must rest on raised portion of top panel Refer to Figure 3 If washer is not level tilt washer to access the front and rear leveli...

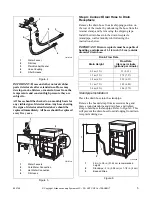
Page 4: ...outward Screw hose couplings with the filter screens onto the water faucets until they are finger tight Then using a pliers screw approximately 1 4 turn Screw hose couplings from other end of hoses o...

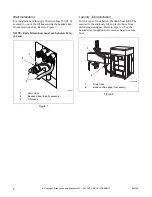
Page 5: ...ng the instructions below IMPORTANT Drain receptacle must be capable of handling a minimum of 1 1 4 inch 3 2 cm outside diameter drain hose Standpipe Installation Place the drain hose into the standpi...

Page 6: ...NOTE End of drain hose must not be below 24 in 61 cm Laundry Tub Installation For this type of installation the drain hose MUST be secured to the stationary tub to prevent hose from dislodging during...

Page 7: ...and MUST be reinstalled whenever the unit is moved more than four feet Do not lift or transport unit from front or without shipping materials installed Refer to the User s Guide for proper instruction...

Page 8: ...ose clamps obtain locally Refer to Figure 15 NOTE Hoses can be connected to either nozzle 4 Refer to supply injection system instructions and label inside washer junction box cover Figure 16 for elect...

Page 9: ...t voltage phase and cycles to be certain they are correct for the washer 2 Open manual shut off valves to the washer 3 Apply power to the washer Step 8 Plug in the Washer Washer requires 120 Volt 60 H...

Page 10: ...he qualified electrician should correct the problem NOTE The wiring diagram is located behind the control panel inside the control cabinet Step 9 Check Installation Refer to Installer Checklist on the...

Page 11: ......

Page 12: ...54N FLW2154N Connect Fill Hoses FLW2054N COLD HOT 3 CHECK Filter Screens Cold Valve Connection Plain Washers Hot Valve Connection FLW2054N Connect Drain Hose to Drain Receptacle 4 CHECK FLW1959N FLW19...

Reviews: