background image

© Copyright, Alliance Laundry Systems LLC – DO NOT COPY or TRANSMIT

3

802749

Installation

Step 1: Position Washer Near Installation 
Area

Move washer as close to the desired area of 

installation as possible.

NOTE: For best performance and to minimize 

vibration or movement, install washer on a solid, 

sturdy and level floor. Some floors may need to be 

reinforced, especially on a second floor or over a 

basement. Do not install the washer on carpeting, 

soft tile, a platform or other weakly supported 

structures.

Step 2: Position and Level the Washer

Position washer so it has sufficient clearance for 

installation and servicing.

NOTE: Use of the dispenser drawer or washer door 

as a handle in the transportation of the washer may 

cause damage to the dispenser or door.

Place washer in position on a solid, sturdy and level 

floor. Installing the washer on any type of carpeting, 

soft tile, a platform or other weakly supported 

structures is not recommended.
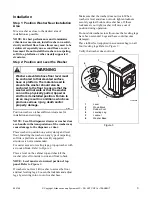
For easier access to leveling legs, prop up washer with 

a wooden block. Refer to 

Figure 3

.

Place a level on the cabinet top and check if the 

washer is level from side to side and front to back.

NOTE: Level must rest on raised portion of top 

panel. Refer to 

Figure 3

.

If washer is not level, tilt washer to access the front 

and rear leveling legs. Loosen the locknuts and adjust 

legs by screwing into or out of washer base.

Make sure that the washer does not rock. When 

washer is level and does not rock, tighten locknuts 

securely against bottom of washer base. If these 

locknuts are not tight, washer will move out of 

position during operation.
Do not slide washer across floor once the leveling legs 

have been extended. Legs and base could become 

damaged.
Place rubber feet (supplied in accessories bag) on all 

four leveling legs. Refer to 

Figure 3

Verify that washer does not rock.

Washers elevated above floor level must 

be anchored to that elevated surface, 

base or platform. The material used to 

elevate the washer should also be 

anchored to the floor to ensure that the 

washer will not walk or that the washer 

can not be physically pulled, tipped or 

slid from its installed position. Failure to 

do so may result in conditions which can 

produce serious injury, death and/or 

property damage.

W306

WARNING

FLW2290N

Level

2

Wood Block

3

Rubber Foot

4

Leveling Leg

5

Locknut

6

Washer Base

Figure 3 

FLW229

1

5

3

4

6

2

Summary of Contents for 802749R2

Page 1: ...ine changes ownership this manual must accompany machine www comlaundry com Installation Instructions for Frontload Washers Washer Dimensions 2 Before You Start 2 Installation 3 Installer Checklist Ba...

Page 2: ...asher is delivered on a cold day below freezing or is stored in an unheated room or area during the cold months do not attempt to operate it until the washer has had a chance to warm up NOTE Some mois...

Page 3: ...if the washer is level from side to side and front to back NOTE Level must rest on raised portion of top panel Refer to Figure 3 If washer is not level tilt washer to access the front and rear leveli...

Page 4: ...outward Screw hose couplings with the filter screens onto the water faucets until they are finger tight Then using a pliers screw approximately 1 4 turn Screw hose couplings from other end of hoses o...

Page 5: ...ng the instructions below IMPORTANT Drain receptacle must be capable of handling a minimum of 1 1 4 inch 3 2 cm outside diameter drain hose Standpipe Installation Place the drain hose into the standpi...

Page 6: ...NOTE End of drain hose must not be below 24 in 61 cm Laundry Tub Installation For this type of installation the drain hose MUST be secured to the stationary tub to prevent hose from dislodging during...

Page 7: ...and MUST be reinstalled whenever the unit is moved more than four feet Do not lift or transport unit from front or without shipping materials installed Refer to the User s Guide for proper instruction...

Page 8: ...ose clamps obtain locally Refer to Figure 15 NOTE Hoses can be connected to either nozzle 4 Refer to supply injection system instructions and label inside washer junction box cover Figure 16 for elect...

Page 9: ...t voltage phase and cycles to be certain they are correct for the washer 2 Open manual shut off valves to the washer 3 Apply power to the washer Step 8 Plug in the Washer Washer requires 120 Volt 60 H...

Page 10: ...he qualified electrician should correct the problem NOTE The wiring diagram is located behind the control panel inside the control cabinet Step 9 Check Installation Refer to Installer Checklist on the...

Page 11: ......

Page 12: ...54N FLW2154N Connect Fill Hoses FLW2054N COLD HOT 3 CHECK Filter Screens Cold Valve Connection Plain Washers Hot Valve Connection FLW2054N Connect Drain Hose to Drain Receptacle 4 CHECK FLW1959N FLW19...

Reviews: