33711
59
Section 5 Service Procedures
To reduce the risk of electric shock, fire, explosion, serious injury or death:
• Disconnect electric power to the washer before servicing.
• Never start the washer with any guards/panels removed.
• Whenever ground wires are removed during servicing, these ground wires must be
reconnected to ensure that the washer is properly grounded.
W003
WARNING
© Copyright, Alliance Laundry Systems LLC – DO NOT COPY or TRANSMIT
46. BALANCE RING
a. Remove transmission assembly, Paragraph 45,
steps “a” through “w”.
b. Lift balance ring off outer tub.
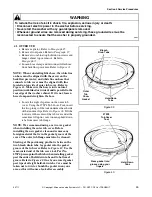
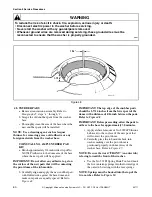
IMPORTANT: When reinstalling balance ring,
note, if there is a mark located on outer edge of
balance ring. This mark indicates the heavy side of
ring. This heavy side must be installed opposite the
rack of the transmission assembly. Refer to
Figure 45.
47. UPPER BEARING ASSEMBLY
a. Remove transmission assembly. Refer to
Paragraph 45, steps “a” through “r”.
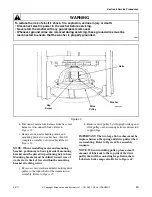
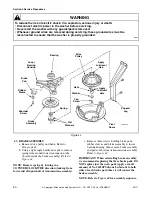
b. Remove screws and lockwashers holding each
support leg to outer tub. Refer to Figure 42.
c. Lift complete pivot dome (with drive pulley,
brake assembly, lower bearing housing,
transmission assembly, and balance ring
attached) off outer tub.
NOTE: To prevent porcelain damage, leg plates
must be installed on both sides of outer tub flange
when reinstalling support legs. (The thinner plate
must be installed between leg and tub flange and the
thicker plate must be installed on outside of tub
flange. Do not overtighten the screws as this could
cause stripping or porcelain damage.
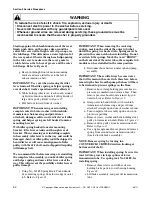
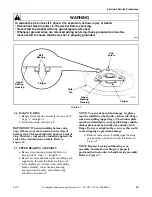
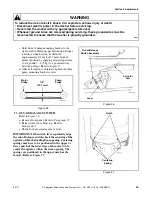
d. Remove three screws holding upper bearing
and housing to bottom of outer tub. Refer to
Figure 47.
NOTE: Replace bearing and housing as an
assembly, and make sure flinger is properly
positioned between outer tub and bearing assembly.
Refer to Figure 47.
Figure 47
Outer
Tub
Upper
Bearing
Housing
Flinger
Cap
Screw
Upper
Bearing
Housing
Flinger
Ball
Bearing

