60
33711
Section 5 Service Procedures
To reduce the risk of electric shock, fire, explosion, serious injury or death:
• Disconnect electric power to the washer before servicing.
• Never start the washer with any guards/panels removed.
• Whenever ground wires are removed during servicing, these ground wires must be
reconnected to ensure that the washer is properly grounded.
W003
WARNING
© Copyright, Alliance Laundry Systems LLC – DO NOT COPY or TRANSMIT
48. SNUBBER PADS
a. Remove transmission assembly. Refer to
Paragraph 45, steps “a” through “r”.
b. Scrape the old snubber pads from the washer
base.
c. Thoroughly clean the area of the base where the
new snubber pads will be installed.
NOTE: Use a cleaning agent, such as lacquer
thinner, for removing grease, old adhesive or any
foreign materials from the washer base.
TO INSTALL NO. 434P3 SNUBBER PAD
KIT
a. Brush approximately 3/4 inch wide strip of No.
510704P Adhesive to the dome area of the base
where the new pads will be applied.
IMPORTANT: Do not allow any adhesive to get on
the surface of the new pads that will be contacting
the pivot dome of the tub module.
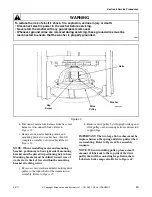
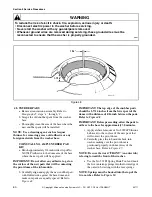
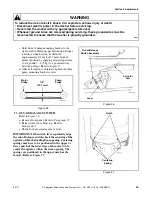
b. Carefully align and apply the new snubber pad
with fluffed side against the base dome and
make sure pads are equally spaced. Refer to
Figure 48.
IMPORTANT: The top edge of the snubber pads
should be 1-7/16 inches from the lower part of the
dome with a distance of 1/16 inch between the pads.
Refer to Figure 48.
IMPORTANT: Before proceeding, allow the pads to
adhere to the base for approximately 30 minutes.
c. Apply a liberal amount of No. 26594P Silicone
Lubricant to the surface of the new pads that
will contact the pivot dome.
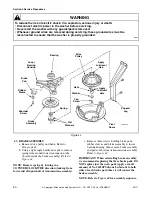
d. Carefully place the tub module back into
washer making sure the pivot dome is
positioned properly in dome recess of the
washer base. Refer to Figure 49.
NOTE: Be sure the word “FRONT” (on outer tub)
is facing toward the front of the washer.
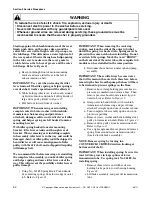
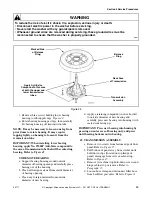
e. Use the No. 321P4 Spring Hook Tool and hook
the five centering springs into the lower edge of
the outer tub, starting with the rear springs.
NOTE: Springs must be hooked into the top of the
two notches. Refer to Figure 50.
Figure 48
1/16"
1-7/16"


