64
33711
Section 6 Adjustments
To reduce the risk of electric shock, fire, explosion, serious injury or death:
• Disconnect electric power to the washer before servicing.
• Never start the washer with any guards/panels removed.
• Whenever ground wires are removed during servicing, these ground wires must be
reconnected to ensure that the washer is properly grounded.
W003
WARNING
© Copyright, Alliance Laundry Systems LLC – DO NOT COPY or TRANSMIT
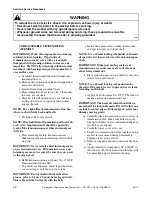
50. PRESSURE SWITCH
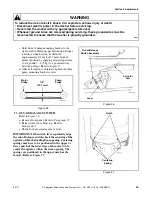
Refer to Figure 53.
NOTE: DO NOT ADJUST PRESSURE SWITCH
IF WASHER IS WITHIN THE WARRANTY
PERIOD.
The pressure switch on pressure-fill automatic washers
is set at the factory for proper water fill levels.
However, if there is a problem of overfilling or
underfilling, the pressure switch can be adjusted.
The maximum water fill level can be increased by
turning adjusting screw CLOCKWISE, and decreased
by turning screw COUNTERCLOCKWISE.
One quarter turn of the adjusting screw represents
approximately one inch (2.54 cm) increase or decrease
of water level in washtub.
IMPORTANT: DO NOT turn adjusting screw more
than 3/4 of a turn in either direction as the switch
may be damaged and flooding could result.
51. BELT (Agitate And Spin)
No belt adjustment is required.
NOTE: After placing the motor and mounting
bracket in the washer, start the four hold-down
screws, but do not tighten them at this time. Pivot
the left side of the mounting bracket as far back as
it will go, then tighten the four screws. This
mounting bracket adjustment is necessary to ensure
the proper belt drive action.
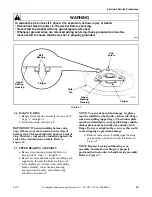
52. BELT (Pump)
NOTE: Adjustment must be made after motor has
been properly positioned. Refer to Paragraph 51.
a. Remove front panel. Refer to Paragraph 27.
b. Loosen the two front mounting screws, then
loosen the rear screw. Refer to Figure 54.
Figure 53
Adjusting
Screw
Adjusting
Screw
Rotary Pressure Switch
Slide Pressure Switch
Figure 54
Pump
Attaching
Screws
Pump
Belt

