background image

Scuka Enterprises Ltd
881 Highway 33 E
Kelowna, BC , V1X 6V1

Submittal

Submittal 45.2: PKHS SD # 45.2 Laundry Rooms Huebsch Machine Specs

APPROVERS (ASSIGNEES):

CREATED BY:

Brett Sichello (Philip Mac Donald Architect Inc.)

Lisa Duckworth

PROJECT:

ISSUE DATE:

Penticton Kiwanis
150 Van Horne Street
Penticton, BC, V2A 4K2
Canada

12/16/10

PROJECT NUMBER:

SUBMITTAL NO / REVISION:

SC-415

45.2 / 0

COST CODE:

STATUS:

Open

SUBMITTAL TYPE:

BALL IN COURT:

Brett Sichello

SPEC SECTION:

RECEIVED FROM:

RECEIVED DATE:

John Finch (Pacific Wholesale Appliance)

12/16/10

COPIES TO:

REQUESTED REPLY DATE:

Joe Dees
Ben Duckworth
Lisa Duckworth
John Finch
Ernie Schneider

12/24/10

DESCRIPTION:

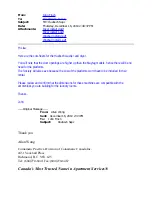
Hi Brett,
When we were onsite this morning with John Finch, he is interested in proposing some different machines that are higher and
will not need the pedestools as part of the package.
Ernie is really indifferent on the machine type because they will have to service them and maintain them but i wanted you both
to review this and we'll ask John Finch to get us some actual makes and models in the next day or so to add to this review as
well.

Please see if you have any questions or concerns and have a great night,
Lisa Duckworth

REFERENCES / ATTACHMENTS

415 2010-12-16 SD 45.2 Laundry Huebsch Specs.pdf

APPROVER RESPONSES

APPROVER NAME

DATE SENT

DATE
RETURNED

STATUS

ATTACHMENTS

COMMENTS

Brett Sichello

12/16/10

Pending

None

Summary of Contents for FLW1526C

Page 1: ...a Duckworth John Finch Ernie Schneider 12 24 10 DESCRIPTION Hi Brett When we were onsite this morning with John Finch he is interested in proposing some different machines that are higher and will not...

Page 2: ...the platforms The Society will also save because the cost of the platforms won t have to be included in their rental Please review and confirm that the dimensions for these machines are compatible wi...

Page 3: ......

Page 4: ......

Page 5: ......

Page 6: ......

Page 7: ...glais et en fran is La version fran aise figure ala suite de la version anglaise FLW1526C Keep These Instructions for Future Reference Ifthis machine changes ownership this manual must accompany machi...

Page 8: ...meant to cover all possible conditions and situations that may occur It must be understood that common sense caution and carefulness are factors which cannot be built into these washers These factors...

Page 9: ...2 Close Loading Door 14 Step 3 Add Laundry Supplies 15 Step 4 Set Fabric Selector 15 Step 5 Set Wash Temperature 15 Step 6 Set Soil Level 16 Step 7 Insert Coin s or Card 16 Step 8 Start Washer 16 Ind...

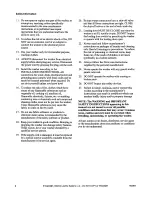
Page 10: ...washer 2 Refer to the GROUNDING INSTRUCTIONS in the INSTALLATION manual for the proper grounding ofthe washer 3 Do not wash articles that have been previously cleaned in washed in soaked in or spotte...

Page 11: ...curs have your washer checked by a qualified service person 19 Ifthe supply cord is damaged it must be replaced by a special cord or assembly available from the manufacturer or its service agent 20 Be...

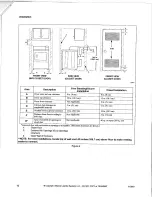
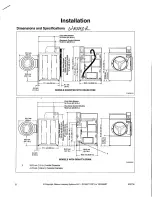
Page 12: ...n Dimensions and Specifications I t 56 03 em 22 06 in 33 3 em 13 1 I Ii o fl fl UU 71 1 em 28 in IJ5 1 em I I 2 in I 3 8 em 1 5 in FLW2209N 803363 Copyright Alliance Laundry Systems LLC DO NOT COPY or...

Page 13: ...old day below freezing or is stored in an unheated room or area during the cold months do not attempt to operate it until the washer has had a chance to warm up NOTE Install dryer before washer This a...

Page 14: ...l minutes This will release any accumulated hydrogen gas THE GAS IS FLAMMABLE DO NOT SMOKE OR USE AN OPEN FLAME DURING THIS TIME W029 Water Supply ater supply faucets must fit standard 19 1 mm 3 4 mch...

Page 15: ...eaks Ifleaks are found retighten the hose couplings Continue tightening and rechecking until no leaks are found 1 TLW1976N 1 Faucet 2 Fill Hoses 3 Plain Rubber Washer 4 Filter Screens Figure 3 IMPORTA...

Page 16: ...isers Air Cushions 2 Water Supply Faucets Figure 5 Installation Step 3 Connect Drain Hose to Drain Receptacle Remove the drain hose from its shipping position on the rear ofthe washer by removing the...

Page 17: ...asher so it has sufficient clearance for installation and servicing NOTE Use ofthe dispenser drawer or washer door as a handle in the transportation of the washer may cause damage to the dispenser or...

Page 18: ...panel and place on backside offront access panel for future reference Installation NOTE The shipping brace bolts washers and shock sleeves should be saved and MUST be reinstalled whenever the washer...

Page 19: ...ging in the washer DO NOT overload circuits DO NOT use an extension cord DO NOT use an adapter DO NOT operate other appliances on the same circuit The washer is designed to be operated on a separate b...

Page 20: ...ly Run washer through one complete cycle to make sure it is operating properly Installation Vending Meter Case The factory mounted coin meter case does not include the service door lock coin drawer co...

Page 21: ...sh drum NOTE Small items such as baby socks may get caught around the door Place these articles inside a mesh garment bag FLW2131N Figure 13 When washing bulky items such as blankets and comforters us...

Page 22: ...r Figure 15 Step 4 Set Fabric Selector Push touchpad for NORMAL PERM PRESS or DELICATESIBULKY cycle Light indicates selection NOTE Changes can be made to Fabric Selector setting np until the first fil...

Page 23: ...rt Coin s or Card To Insert Money Insert coin s in coin slot Check pricing as seen on ORY1927N digital display Figure 20 Step 8 Start Washer After vend price has been satisfied push the START pad DOOR...

Page 24: ...it when the MEDIUM soil level is selected HEAVY HEAVY is lit when the HEAVY soil level is selected Operation IMPORTANT Ifwasher falls to operate properly after installation make sure electrical servic...

Page 25: ...he door glass where the seal contacts the glass The front surface ofthe door seal lip Usually a mild soap solution will work Ifthere is an extreme build up ofminerals from a hard water supply the surf...

Page 26: ...Refer to Installation section step 6 for proper procedures whenever the washer is moved Maintenance Cleaning Foreign Object Trap The washer s pump has a trap that may collect foreign objects The trap...

Page 27: ...ng Cycle Pauses are part ofthe washer s normal operation Wash load may be unbalanced Washer will stop and then restart spin automatically Check the laundry room fuse or circuit breaker Won t Drain Mak...

Page 28: ...e vibration Some sounds may be a part ofnormal operation for a frontload washer Load is too Wet Wash load may be unbalanced The washer may have limited the spin speed to prevent damage to the machine...

Page 29: ...eplate will be in the location shown in Figure 23 Date Purchased Model Number Serial Number Please include a copy ofyour bill ofsale and any service receipts you have AI WARNING To reduce the risk of...

Page 30: ...ElOREI 0 HEAVY U 1 1 _I L MEDlUM 0 0 0 0 0 LIGHT t 7 EEl 6 i INSERT WASH RINSE SPIN ODOR COINSI ARD FLW16R Keep These Instructions for Future Reference Ifthis machine changes ownership this manual mus...

Page 31: ...nt to cover all possible conditions and situations that may occur It must be understood that common sense caution and carefulness are factors which cannot be built into these washers These factors MUS...

Page 32: ...ations Mode 10 Coin Drop 10 Start Pulse Operation 10 Service Door and Coin Vault Openings II Break In Alarm 11 Special Vend 11 OPL Mode 11 Drop OffMode 11 Low Power Auto Shutdown Option 11 Opening the...

Page 33: ...29 Low Power Auto Shutdown A Days Enable LPSA 78 30 Low Power Auto Shutdown B Days Enable LPSb 79 31 Low Power Auto Shutdown C Days Enable LPSC 79 32 Low Power Auto Shutdown D Days Enable LPSd 80 33 P...

Page 34: ...NLYFSGl11TWNA HFNLYRSPl11 A SFNLYFSPIII1NOl HTELXFSP281CWO1 SFNLYFSPIIITWOl HTELXFSP291CWO1 SFNLYFSPlllTWNA HTELYFSP281CWO1 SFNLYRSPII1TWOl HTELYFSP291CWO1 SFNLYRSPI11TWNA HTGLXFSP091CWOl STELCFSP171T...

Page 35: ...the power failure is greater than the POWER FAIL RESET time the control will end the cycle and the display will revert back to the ready mode On drain pump models ifthe wash basket is full ofwater the...

Page 36: ...irst fill step of the cycle The selected temperature is indicated by the light LED on the pad Both the SELECTWASH TEMP pads and the SELECT CYCLE pads are used in various combinations for programming c...

Page 37: ...satisfy the vend price Four digits show the vend price remaining to be satisfied The vend price displayed will decrease with each coin inserted Ifnew options are selected during the ftrSt fill step of...

Page 38: ...in OPL Mode The START pad LED will flash one I second on and one I second off If Start Mode is entered because the vend price is satisfied or the control is in OPL Mode the display will show PUSH for...

Page 39: ...removal 5 Signal for Start By default this signal is turned on and will sound one second on and one second offfor 10 seconds after vend price has been satisfied NOTE Refer to Programming Control to pr...

Page 40: ...esting Machine and Control Functions Rapid Advance Feature This feature allows the user to quickly advance through active cycles or advance into a cycle from the ready mode This feature is useful when...

Page 41: ...trol with an external device or network Special Vend This feature allows the owner to program the control to allow programmable vend prices for specific hours and dates For details on programming Spec...

Page 42: ...rt back to the Ready Mode Refer to Figure 2 1 r 1 Coin Card Stacked Washer and Dryers Coin Rear Control Washers 1 Service Door 2 Control Panel NOTE Ifthe Break In Alarm option is enabled it must be tu...

Page 43: ...r 4 25 minutes the control will return to the previous mode of operation 7 To exit press the WARM keypad The control will revert back to Ready Mode Manual Mode is broken into three groups Manual Progr...

Page 44: ...e AUdt START keypad Manual Read CyC 1 Press the START enter 1 Total machine cycles 1 keypad to read audit Audit Press the DELICATESI BULKY or the I CoW 1 IPress the START enter 1 COLD Total coins 1 1...

Page 45: ...bers in the Option Display column of the Programmable Options List are what will be shown in the display when that option is selected Option Option Description Number Display 1 AtS1 Vend Price 1 2 dEn...

Page 46: ...l Vend A Start Year 0 0 99 h SA08 Special Vend A End Month 0 0 12 i SA09 Special Vend A End Date 0 0 31 j SA10 Special Vend A End Year 0 0 99 k SA11 Special Vend A Price 1 0 0 65 535 I SA12 Special Ve...

Page 47: ...e 2 Time 34 0 255 d PCt3 Cycle 3 Time 1 32 0 255 28 droP Drop OffMode On Off oFF on oFF 29 LPSA Low Power Auto Shutdown A Days oFF on oFF Enable On Off 30 LPSb Low Power Auto Shutdown B Days oFF on oF...

Page 48: ...TES BULKY _ __ or the COLD keypad to scroll through the programmable options CArd Card Reader Display Control r J CErr Coin Error Parameters CEr3 Coin Drops Header Present Error Press the START keypad...

Page 49: ...in f 0 6 Minutes SSPd Lo Low Final Spin nEd Medium Speed HI High brAy 1 rEg RegUlarl Breakaway Lo Low Step Speed FLW48R AdUr Agitate f 1 25 Duration in minutes ASPd r _ J rEg Regula1 Agitate I Lo Low...

Page 50: ...e WARM keypad rtC1 1 101 Set RealTIme Clock Minutes rtC2 Set RealTIme Clock Hours rtC4 Set RealTIme Clock Date rtC5 Set RealTIme Clock Month rtC6 Set RealTIme Clock Year rtC7 Daylight Savings Option F...

Page 51: ...l vend option press the START keypad To exil press the WARM keypad SA01 Special Vend A Days Enable SA04 Special Vend A Length in Hours SA21 Special Vend A Subtracted Wash 4 Fill Agitate lime SA20 Spec...

Page 52: ...Price CnP3 Cycle Modifier Medium Option CnP4 Cycle Modifier Heavy Option CnPS Cycle Modifier Added Wash lime CnP6 To enter a programming option press the START enter keypad To exit press the WARM key...

Page 53: ...Enable On Off LPSC Low Power Auto Shutdown C Days Enable On Off ULPSd Low Power Auto Shutdown D Days Enable On Off PFrU Power Fail Reset IrAn IR Access On Off rAEn Manual Rapid Advance On Off dAEn Man...

Page 54: ...507R Figure 3 5 Press the DELICATESIBULKY 1 or the COLD v keypad to increase or decrease the value of the fifth digit NOTE The vend price can be set from 0 to 65 535 The factory default setting is 200...

Page 55: ...ure 4 NOTE Ifthe vend price is 100 00 or more the fifth digit is 1 6 Ifthe vend price is 99 99 or less the fifth digit is 0 B CHM507R Figure 4 5 Press the DELICATESIBULKY A or the COLD v keypad to inc...

Page 56: ...on and one second off Refer to Figure 5 NOTE Ifthe coin value is 100 00 or more the fifth digit is 1 6 Ifthe coin value is 99 99 or less the fifth digit is 0 B CHM507R Figure 5 5 Press the DELICATESIB...

Page 57: ...alue is 99 99 or less the fifth digit is 0 CHM507R Figure 6 5 Press the DELICATESIBULKY or the COLD v keypad to increase or decrease the value ofthe fifth digit NOTE The Start Pulse Value can be set f...

Page 58: ...appears in the display 4 When PLSn appears in the display press the START enter keypad oFF or a number will appear in the display This number corresponds to the current Start Pulse Mode Programming Va...

Page 59: ...ptions refer to the appropriate section How to Exit Programming Feature Press the WARM keypad until the control returns to Ready Mode 7 Default Cycle dCYC This option allows the owner to set the defau...

Page 60: ...g the Manual Mode 2 Press the DELICATESIBULKY or the COLD v keypad until Prog appears in the display Press the START enter keypad and AtS1 will appear in the display 3 Press the DELICATESIBULKY or the...

Page 61: ...he DELICATESIBULKY 1 or the COLD v keypad until Prog appears in the display Press the START enter keypad and AtS1 will appear in the display 3 Press the DELICATESIBULKY 1 or the COLD v keypad to scrol...

Page 62: ...oinl Card Value Mode Card Input 0 OFF OFF OFF 1 I OFF 0 OFF 2 OFF I OFF OFF 3 OFF OFF 4 OFF OFF ON OFF OFF ON 6 OFF OFF ON 7 I OFF OFF ON 8 OFF ON OFF 9 OFF ON OFF OFF ON OFF 11 OFF ON OFF 12 OFF ON O...

Page 63: ...roll through the programmable options until CArd appears in the display 4 When CArd appears in the display press the START enter keypad The current Card Reader Display Control Status will appear in th...

Page 64: ...sent Error If enabled and coin drop header is unplugged control ignores coin inputs on E FL Fill Error on E Ub Unbalance Error on Table 5 5 Press the DELICATESIBULKY J or the COLD v keypad to select e...

Page 65: ...or off Fill Agitate 1 25 I Regular or Low 3 Cold Spray on or off FilUAgitate 1 25 Regular or Low 4 Cold Spray on or off FilUAgitate 1 25 Regular or Low 5 Cold Spray on or off Fill Agitate 1 25 Regula...

Page 66: ...s until the desired stage appears in the display 2 When the desired stage appears in the display press the START enter keypad StEn Cycle Stage enable will appear in the display 3 Press the DELICATESIB...

Page 67: ...to next Cycle Stage option To program other options press the WARM keypad and refer to the appropriate section How to Exit Programming Feature Press the WARM keypad until the control returns to Ready...

Page 68: ...F Cold Spray is disabled factory default setting for all other stages 4 Press the START enter keypad when the desired status appears in the display NOTE To program the next Cycle Programming option FS...

Page 69: ...rns to Ready Mode How to Program Breakaway Step Speed brAy This option allows the owner to set the breakaway speed 1 Press the DELICATESIBULKY 1 or the COLD v keypad to scroll through the programmable...

Page 70: ...he fifth digit is 1 6 Ifthe vend price is 99 99 or less the fifth digit is 0 B CHM507R Figure 7 5 Press the DELICATESIBULKY 1 or the COLD v keypad to increase or decrease the value ofthe fifth digit N...

Page 71: ...6 Ifthe vend price is 99 99 or less the fifth digit is 0 a CHM507R Figure 8 5 Press the DELICATESIBULKY 1 or the COLD v keypad to increase or decrease the value of the fifth digit Programming Control...

Page 72: ...ore the fifth digit is 1 6 Ifthe vend price is 99 99 or less the fifth digit is 0 B CHMS07R Figure 9 5 Press the DELICATESIBULKY or the COLD v keypad to increase or decrease the value of the fifth dig...

Page 73: ...t is 1 6 Ifthe vend price is 99 99 or less the fifth digit is 0 CHM507R Figure 10 5 Press the DELICATESIBULKY 1 or the COLD v keypad to increase or decrease the value of the fifth digit Programming Co...

Page 74: ...more the fifth digit is 1 6 Ifthe vend price is 99 99 or less the fifth digit is 0 CHM507R Figure 11 5 Press the DELICATESIBULKY 1 or the COLD v keypad to increase or decrease the value of the fifth...

Page 75: ...igit is 1 6 Ifthe vend price is 99 99 or less the fifth digit is 0 B CHM507R Figure 12 5 Press the DELICATESIBULKY or the COLD v keypad to increase or decrease the value ofthe fifth digit Programming...

Page 76: ...0 or more the fifth digit is 1 6 If the vend price is 99 99 or less the fifth digit is 0 CHM507R Figure 13 5 Press the DELICATESIBULKY 1 or the COLD v keypad to increase or decrease the value ofthe fi...

Page 77: ...git is 1 6 Ifthe vend price is 99 99 or less the fifth digit is 0 0 B Programming Control NOTE The vend price can be set from 0 to 65 535 The factory default setting is 200 6 Press the START enter key...

Page 78: ...so on Ifprogramming Daylight Savings rtc7 on factory default setting enables Daylight Savings Time and oFF disables Daylight Savings Time 7 Press the START enter keypad when the correct time or date...

Page 79: ...ogrammable options until SPA appears in the display Press the START enter keypad and SA01 will appear in the display 4 When SAO1 appears in the display press the START enter keypad A number will appea...

Page 80: ...ON 13 OFF OFF OFF ON ON OFF 15 0 OFF ON ON ON ON 17 OFF ON OFF OFF OFF ON 19 OFF OFF ON OFF OFF ON ON 21 OFF OFF OFF ON OFF ON OFF ON 23 OFF OFF OFF ON OFF ON ON ON 25 OFF OFF OFF ON ON OFF OFF ON 27...

Page 81: ...OFF ON ON OFF ON OFF OFF ON 107 OFF ON ON OFF ON OFF ON ON 109 OFF ON ON OFF ON ON OFF ON 111 OFF ON ON OFF ON ON ON ON 113 OFF ON OFF OFF ON 115 OFF ON ON ON OFF OFF ON ON 117 OFF ON ON ON OFF ON OFF...

Page 82: ...FF OFF OFF ON ON ON ON ON ON ON ON OFF OFF OFF OFF OFF OFF OFF OFF ON ON ON ON ON ON ON ON OFF OFF OFF OFF OFF OFF OFF OFF ON ON TUE MON SUN ON ON OFF ON ON ON ON ON OFF OFF ON OFF ON ON OFF ON ON ON...

Page 83: ...R MON SUN ON OFF 245 ON ON ON ON OFF ON OFF ON 247 ON ON ON OFF ON ON ON 249 ON ON ON ON OFF OFF ON 251 ON ON ON ON ON OFF ON ON 253 ON ON ON ON ON ON OFF ON 255 ON ON ON ON ON ON ON ON Table 10 80295...

Page 84: ...n How to Exit Programming Feature Press the WARM keypad until the control returns to Ready Mode How to Program Special Vend A Start Minute SA03 This option allows the owner to set the minute that Spec...

Page 85: ...r to set the month that Special Vend A will begin NOTE IfSpecial Vend A Start Month Start Date End Month or End Date are programmed to zero default is zero the Special Vend A will be active every week...

Page 86: ...RM keypad until the control returns to Ready Mode How to Program Special Vend A Start Year SA07 This option allows the owner to set the year that Special Vend A will begin L Press the DELICATESIBULKY...

Page 87: ...ng Feature Press the WARM keypad until the control returns to Ready Mode How to Program Special Vend A End Date SA09 This option allows the owner to set the date that Special Vend A will end 1 Press t...

Page 88: ...ear to the desired year If 0 is selected and Special Vend A is on Special Vend A will occur at the time or days of week selected regardless of the year 1 is year 200I 2 is year 2002 and so on 4 Press...

Page 89: ...the value press the WARM keypad 5 Press the DELICATESIBULKY 1 or the COLD v keypad to increase or decrease the value of the active digit and the START keypad to enter the value of the digit and advanc...

Page 90: ...e the value of the fifth digit NOTE The vend price can be set from 0 to 65 535 4 Press the START enter keypad to enter the fifth digit and display remaining four digits The active digit will flash one...

Page 91: ...ifth digit NOTE The vend price can be set from 0 to 65 535 4 Press the START enter keypad to enter the fifth digit and display remaining four digits The active digit will flash one second on and one s...

Page 92: ...the value ofthe fifth digit NOTE The vend price can be set from 0 to 65 535 4 Press the START enter keypad to enter the fifth digit and display remaining four digits The active digit will flash one s...

Page 93: ...fifth digit NOTE The vend price can be set from 0 to 65 535 4 Press the START enter keypad to enter the fifth digit and display remaining four digits The active digit will flash one second on and one...

Page 94: ...changing the value press the WARM keypad 5 Press the DELICATESIBULKY 1 or the COLD v keypad to increase or decrease the value ofthe active digit and the START keypad to enter the value ofthe digit and...

Page 95: ...the value press the WARM keypad S Press the DELICATESIBULKY 1 or the COLD v keypad to increase or decrease the value ofthe active digit and the START keypad to enter the value ofthe digit and advance...

Page 96: ...g the value press the WARM keypad 5 Press the DELICATESIBULKY A or the COLD v keypad to increase or decrease the value ofthe active digit and the START keypad to enter the value ofthe digit and advanc...

Page 97: ...git NOTE The vend price can be set from 0 to 65 535 4 Press the START enter keypad to enter the fifth digit and display remaining four digits The active digit will flash one second on and one second o...

Page 98: ...ogramming Feature Press the WARM keypad until the control returns to Ready Mode How to Program Special Vend A Subtracted Wash 4 Fill Agitate Time SA21 This option allows the owner to subtract time fro...

Page 99: ...ARM keypad until the control returns to Ready Mode Programming Control 24 Special Vend C Days Enable SPC This option allows the owner to enable or disable third special vend Special Vend C can be prog...

Page 100: ...scroll through the programmable options until SPd appears in the display 4 When SPd appears in the display press the START enter keypad The current Special Vend D Days Enable status will appear in th...

Page 101: ...fth digit will appear in the display and will flash for one second on one second off Refer to Figure 24 NOTE Ifthe vend price is 100 00 or more the fifth digit is 1 6 Ifthe vend price is 99 99 or less...

Page 102: ...increase or decrease the value of the fifth digit NOTE The vend price can be set from 0 to 65 535 The factory default setting is 50 4 Press the START enter keypad to enter the fifth digit and display...

Page 103: ...M keypad until the control returns to Ready Mode Programming Control How to Read Table 11 To determine the correct number required to program the Cycle Modifier Option use the following chart The Cycl...

Page 104: ...ash time for the Medium and Heavy Cycle Modifier Options The Extra Wash option needs to be turned on refer to Cycle Modifier Medium and Heavy options for the Cycle Modifier Added Wash Time to take eff...

Page 105: ...Cycle Modifier 0 Light 1 Medium 2 Heavy Factory default setting Table 12 3 Press the DELICATESIBULKY 1 or the COLD v keypad to increase or decrease the current number to the desired number selected fr...

Page 106: ...TART enter keypad when the desired status appears in the display 7 Press the START enter keypad with the last active digit The next Cycle Time Display option PCt1 will appear in the display NOTE To pr...

Page 107: ...ypad until the control returns to Ready Mode Programming Control How to Program Cycle 3 Time PCt3 This option allows the owner to set the Cycle 3 Time display 1 Press the DELICATESIBULKY 1 or the COLD...

Page 108: ...section How to Exit Programming Feature Press the WARM keypad until the control returns to Ready Mode 29 Low Power Auto Shutdown A Days Enable LPSA This option allows the owner to set Low Power Auto...

Page 109: ...RM keypad until the control returns to Ready Mode Programming Control 31 Low Power Auto Shutdown C Days Enable LPSC This option allows the owner to set Low Power Auto Shutdown on certain day s ofthe w...

Page 110: ...e WARM keypad until the control returns to Ready Mode 33 Power Fail Reset PFr This option allows the owner to set the amount oftime the control will store active cycle information in the event ofa pow...

Page 111: ...r is not restored within five minutes the control will erase the cycle status The minimum power failure time is five minutes The maximum power fail reset time is 127 minutes PFr DISPLAY TO ENTER IN ST...

Page 112: ...il the control returns to Ready Mode 35 Manual Rapid Advance On Off rAEn This option allows the owner to enable or disable the rapid advance feature Refer to RapidAdvance Feature section for more info...

Page 113: ...e Press the WARM keypad until the control returns to Ready Mode Programming Control 37 Production Test Cycle On Off PtEn This option allows the owner to enable or disable access to the production test...

Page 114: ...he display press the START enter keypad once to start the audit count At this point the display will show the ftrst four digit segment of the audit value If the audit count is 10 000 or higher press t...

Page 115: ...ettings How to Enter Manual Reset 1 Control must be in Manual Mode to start Refer to Entering the Manual Mode 2 Press the DELICATESIBULKY 1 or the COLD v keypad until rSEt appears 3 Press the START en...

Page 116: ...e version number test 4 Press the DELICATESIBULKY 1 or the COLD v keypad to scroll through the diagnostic test options How to Start Tests To start a diagnostic test refer to the quick reference chart...

Page 117: ...UXX dOO4 Coin Drop 1 Input Test C1XX dOO5 Coin Drop 2 Input Test C2XX dOO6 Coin Drops Header Present CHoP or CHCL dOO Door Switch Input Test drCL or droP dOO8 Door Lock Switch Input Test drUL or drLO...

Page 118: ...07 Door Lock Switch Input Test dOOS Pump Gravity Drain Test dOO9 Show Fill lime Test d011 Start Pulse Test d012 Configuration Display 1 Test d013 Configuration Display 2 Test Software Version s 02 or...

Page 119: ...audit and save the time date for each opening To exit the Coin Vault Opening Test press the WARM keypad The control will return to the testing mode Testing Machine and Electronic Control Functions Co...

Page 120: ...lated by taking the average ofthe last I0 fill times To start test control must be in the Testing Mode Refer to How to Enter Testing Feature at the beginning ofthis section To enter press the START en...

Page 121: ...ON ON ON 24 OFF ON OFF OFF OFF 25 OFF ON OFF OFF ON 26 OFF ON OFF ON OFF 27 OFF ON OFF ON ON 28 OFF ON ON OFF OFF 29 OFF ON ON OFF ON 30 OFF ON ON ON OFF 31 OFF ON ON ON ON 80 ON OFF OFF OFF OFF 81 ON...

Page 122: ...d holding the DELICATESI BULKY keypad with one hand press the HOT keypad with the other hand 3 When the control enters the Production Test Cycle it will first display 8 XX with the XX showing the soft...

Page 123: ...L is displayed when coin vault switch is closed S oPorS CL Service Door Switch Test S oP is displayed when service door switch is open S CL is displayed when service door switch is closed CXCX Coin Dr...

Page 124: ...door unlocks the control will advance to the next step LoAd Load Weight The control will remain in this step until the loading door is closed and the START keypad is pressed LoAd Door Lock Door Lock i...

Page 125: ...ogramming option s value and try again EI09 CRC 16 Error Communication failure Re aim external device and again EIOA Fmming Error Communication error Re aim external device and try again EIOC Time out...

Page 126: ...h oftime in any fill agitate cycle ESP SPI Communications Error Master control cannot communicate with motor control Caused by transformer unplugged or wiring to motor control incorrect Power down the...

Page 127: ...with the other hand 3 Press the DELICATESIBULKY 1 or the COLD v keypad until rAPd appears in the display 4 Press START enter to activate rapid advance cycle Control may be in an active cycle or in th...

Page 128: ...et it back to the ready mode How to Clear Vend 1 Open the service door Refer to Opening the Service Door 2 While pressing and holding the PERM PRESS keypad with one hand press the HOT keypad with the...

Page 129: ...untd 1t 1S pressed and the cycle will restart from the point it left off If the power failure lasted longer than 30 seconds the Power Fail Reset option is turned OFF and the door is unlocked START ent...

Page 130: ...play will show EIXX XX represents the error code NOTE The Infra red Communications option must be turned on Refer to option 34 in Programming Control Card Reader Communications Card Models Only The Ca...

Page 131: ...se times All other times are not programmable Cycle Wash FilIIAgitate Wash DrainlDistribute Wash Spin Rinse FilIIAgitate Rinse DrainlDistribute Rinse Spin Final Rinse FilIIAgitate Final Rinse DrainlDi...

Page 132: ...may be produced in a hot water system that has not been used for two weeks or more HYDROGEN GAS IS EXPLOSIVE Ifthe hot water system has not been used for such a period before using a washing machine...

Page 133: ...2 Close Door laaaal D1 JiJ 0 0 0 0 art 1 II J 0 II WASffl lltoi lIOOA N HOT FLW16R FLW2212N 7 Set Soil Level 3 Add Supplies FLW2213N FLW16R 4 Stacked Washer Dryer Models 8 Insert Coins Card Determine...

Page 134: ...m Options 1 Make sure washer is in Manual Mode 2 Press DELICATES BULKY or COLD keypad until PrOg appears in the display 3 Press START keypad 4 Press DELICATES BULKY or COLD keypad to scroll through pr...

Page 135: ...hip This includes but is not limited to failure as a result ofabuse misuse improper installation transportation damage and chemical damage Alliance Laundry Systems will not pay labor and transportatio...

Page 136: ...ge en anglais et en fran ais La version fran ise figure ala suite de la version anglaise Keep These Instructions for Future Reference Ifthis machine changes ownership this manual must accompany machin...

Page 137: ...haser must consult the local gas supplier for suggested instructions to be followed ifthe dryer user smells gas The gas utility instructions plus the SAFETY and WARNING note directly above must be pos...

Page 138: ...25 Operation Instructions 25 Step 1 Clean Lint Filter 25 Step 2 Load Laundry 25 Step 3 Close Loading Door 25 Step 4 Set Fabric Selector 26 Step 5 Insert Coin s or Card 26 Step 6 Start Dryer 27 Indica...

Page 139: ...ave These Instructions AI WARNING To reduce the risk of fire electric shock or injury to persons when using your dryer follow these basic precautions W034 1 Read all instructions before using the drye...

Page 140: ...electrical power to the dryer before attempting service Disconnect the power cord by grasping the plug not the cord 21 Ifthe supply cord is damaged it must be replaced by a special cord or assembly av...

Page 141: ...Connection NOTE Side rear and bottom exhaust openings are 10 2 cm 4 inch ducting Gas models cannot be vented out left side of cabinet because of burner housing IMPORTANT The dryer should have sufficie...

Page 142: ...ectronic Control Diagnostic Harness Assembly unplugged To avoid unauthorized manual programming or vending perform the following steps 1 Open service door Refer to Figure 2 2 Locate diagnostic harness...

Page 143: ...er sides and rear clearance ocm 0 in Ocm 0 in CC Dryer top clearance 30 5 cm 12 in 30 5 cm 12 in C Dryer front clearance Not Applicable 5 1 cm 2 in D Exhaust duct clearance to combustible material 5 1...

Page 144: ...cumulation the dryer MUST be exhausted to the outdoors W604 To reduce the risk of fire and the accumUlation of combustion gases DO NOT exhaust dryer air into a window well gas vent chimney or enclosed...

Page 145: ...mobile home Dryer exhausts 220 cfm measured at back of dryer DO NOT install flexible duct in concealed spaces such as a wall or ceiling Static pressure in exhaust duct should not be greater than 1 5 e...

Page 146: ...hood with hinged dampers obtain locally NOTE Weather hood should be installed at least 30 5 cm 12 inches above the ground Larger clearances may be necessary for installations where heavy snowfall can...

Page 147: ...nted to the central exhaust duct 61 em 24 In MINIMUM CLEARANCE TO ROOF GROUND 1 METERED MODELS ILLUSTRATED DRY2358N 1 2 58786 Backdraft Damper Available through your local authorized parts source Clea...

Page 148: ...7 1 2 l 61 em 24 In MINIMUM CLEARANCE TO ROOFIGROUND CONNECT TO DRYER 4 VERTICAL EXHAUST INSTALLATION D7531 1 Roof 2 No Screen or Cap 3 Wall 4 5 em 2 in Minimum 5 NOTE Where the exhaust duct pierces...

Page 149: ...Any disassembly requiring the use of tools must be performed by a suitably qualified service person W316 Installation 1 Make certain your dryer is equipped for use with the type ofgas in your laundry...

Page 150: ...with a non corrosive leak detection fluid NOTE The dryer and its appliance main gas valve must be disconnected from the gas supply piping system during any pressure testing of that system at test pres...

Page 151: ...5 Remove door strike from door liner and reinstall on opposite side 06751 2 Remove all nine screws DRY1917N Figure 14 6 Insert liner under flange on bottom ofdoor then push top ofdoor liner into place...

Page 152: ...osite side ofdoor opening 03175 Figure 17 9 Reinstall four hinge attaching screws removed in Step 1 06061 Figure 18 Before using dryer for the first time use an all purpose cleaner or a detergent and...

Page 153: ...cordance with all local codes and ordinances AI WARNING Improper connection of the equipment grounding conductor can result in a risk of electric shock Check with a qualified electrician or service pe...

Page 154: ...to the equipment grounding terminal or lead on the dryer The dryer has its own terminal block that must be connected to a separate branch 60 Hertz single phase circuit AC alternating current circuit f...

Page 155: ...uge of wire must conform to local INTERMEDIATE FUSE BOX May be omitted If service entrance box Is fused POWER SUPPLY PIGTAIL CONNECTION DIRECT CONNECTION Longer than 4 5 m 15 use 8 A W G 08161 1 3 Wir...

Page 156: ...and the other end ofthe green ground wire to the terminal block as shown in Figure 25 NOTE Green ground wire must be connected to center neutral terminal of terminal block 0RY2015N 1 Ground to Neutral...

Page 157: ...e plugged directly into a polarized three slot effectively grounded receptacle rated 120 Volts AC alternating current 15 Amps Refer to Figure 26 to determine correct polarity ofthe wall receptacle AI...

Page 158: ...must be plugged into an appropriate outlet that is properly installed and grounded in accordance with all local codes and ordinances AI WARNING Improper connection of the equipment grounding conducto...

Page 159: ...d for approximately five minutes observe burner flame through lower front panel Adjust the air shutter to obtain a soft unifonn blue flame A lazy yellow tipped flame indicates lack ofair A harsh roari...

Page 160: ...ated on the service door ofthe dryer is a flat Phillips head screw During shipment this screw is used to attach the service door to the meter case For additional security this screw can be reinstalled...

Page 161: ...ide of dryer drum IMPORTANT Remove all sharp objects from laundry to avoid tears and rips to items during normal machine operation Step 1 Clean Lint Filter Clean lint filter before each use 06081 Figu...

Page 162: ...Card To Insert Money Insert coin s in coin slot Check pricing as seen on digital display o 0 0 U 0 U W3881 Figure 34 INSERT CARD HERE I I J DRY1927N Figure 35 IfAdditional Time Feature is turned on a...

Page 163: ...vend price remaining to be satisfied START START is lit whenever the dryer is not in a cycle the full vend price has been satisfied and the dryer door is closed When the START pad is pressed the cycle...

Page 164: ...ing diagram is located inside the control panel Exhaust System AI WARNING To reduce the risk of electric shock disconnect the electrical service to the dryer before cleaning W043 The exhaust duct shou...

Page 165: ...s Remove items to be ironed while still damp Large loads of similar fabrics dry the most efficiently However dry permanent press in smaller loads to prevent wrinkling Use the correct temperature FABRI...

Page 166: ...s freely has not been pushed in or has not been blocked Check exhaust duct to outside to see if it is kinked blocked or needs cleaning Dryer doesn t dry clothes satisfactorily Check weather hood to ma...

Page 167: ...cated on the nameplate The nameplate will be in the location shown in the illustration below Please include a copy ofyour bill ofsale and any service receipts you have 1 D063K 1 Nameplate Figure 38 To...

Page 168: ...Model Numbers CI CI CI CI Ll Ll Ll Ll D INSERT DRYING COOL COINS CARD DOWN DRY576F Keep These Instructions for Future Reference Ifthis machine changes ownership this manual must accompany machine Part...

Page 169: ...eant to cover all possible conditions and situations that may occur It must be understood that common sense caution and carefulness are factors which cannot be built into these dryers These factors MU...

Page 170: ...10 Clearing the Vend Feature 10 Communications Mode 10 Coin Drop 10 Start Pulse Operation 11 Service Door and Coin Vault Openings 11 Special Vend 11 OPL Mode 11 Drop OffMode 11 Low PowerlAuto Shutdown...

Page 171: ...8 24 Low Power Auto Shutdown A Days Enable LPSA 58 25 Low Power Auto Shutdown B Days Enable LPSb 59 26 Low Power Auto Shutdown C Days Enable LPSC 59 27 Low Power Auto Shutdown D Days Enable LPSd 60 28...

Page 172: ...SDELCFSW171lNOI SSGLCFGW111TWOI BT3LLFSP40lUWOI HSELXFGW29ICWOI SDELCRGS15ITWOI SSGLCFGWl11TWNA BT3LXFSG401UN01 HSELYFGW28ICWOI SDELCRGSI71TWO1 SSGLXFGW111TWO1 BT3LXFSG40IUW01 HSELYFGW291CWO I SDELCRG...

Page 173: ...s feature refer to Programming Control option 28 If the length ofthe power failure is greater than the POWER FAIL RESET time the control will end the cycle and the display will revert back to the Read...

Page 174: ...n satisfied and the dryer door is closed Both the START pad and the SELECT CYCLE pads are used in various combinations for programming cycles retrieving audit information running diagnostic tests and...

Page 175: ...ED will also flash any time a card is inserted to add time to the current cycle DRYING LED The DRYING LED is lit to indicate that one ofthe heated cycles HIGH TEMP MED TEMP LOW TEMP DELICATES is curre...

Page 176: ...re used the remaining vend price will decrease with each received pulse Once the vend is satisfied the START LED will begin to flash and signal will sound for ten seconds Ifa third party card reader i...

Page 177: ...e dryer door is closed the START pad LED flashes at one second intervals until the START pad is pushed Pressing the START pad will start or resume the active cycle Signals There are six instances when...

Page 178: ...e Test A Configuration Display Tests A Coin Header Present Status For detailed information on running diagnostic tests refer to Testing Machine andElectronic Control Functions Rapid Advance Feature Th...

Page 179: ...s For details on programming Special Vend refer to Programming Control OPL Mode This feature allows the user to start a cycle without satisfying the vend price Press the START keypad to add time to th...

Page 180: ...rear control dryers the service door is located on the top ofthe meter case Refer to Figure 2 After opening and closing the service door the programmer has 4 25 minutes to begin programming Ifa SELECT...

Page 181: ...il the desired option appears in the display 6 Press the START enter keypad to enter the displayed mode 7 To exit press the MED TEMP keypad The control will revert back to Ready Mode Manual Programmin...

Page 182: ...ss the lOW TEMP or the DELICATES keypad to scroll through the Audit options PLSP 1 Total start pulses I C1to Total coin 1 top ofts 1 C2to I Total coin 2 top offs IPress the Manual Reset rSEt 1 START k...

Page 183: ...ption Option Description Number Display 1 AtSH Heat Vend Price 2 dEn1 Coin 1 Value 3 dEn2 Coin 2 Value 4 PLSE Start Pulse Value 5 PLSn Start Pulse Mode 6 AtyP Available Type 7 dCyC Default Cycle 8 oPL...

Page 184: ...C 100o 160 F 38 71 C 16 t FC Temperature Fahrenheit Celsius 0 O Fahrenheit l Ceisius 17 AtSn No Heat Vend Price 200 0 65535 18 rtC Real Time Clock a rtC1 nutes 0 59 b rtC2 ours 0 23 c rtC3 Day 1 7 d...

Page 185: ...n A Days Enable oFF owoFF 25 LPSb Low Power Auto Shutdown B Days Enable oFF owoFF 26 LPSC Low Power Auto Shutdown C Days Enable oFF on oFF I 27 LPSd Low Power Auto Shutdown D Days Enable oFF owoFF 28...

Page 186: ...T keypad To exit press the MED TEMP keypad r Audit or AUd I Audio Signal i depending on control software version CArd Card Reader Display Control toP2 CEr Coin Error Coin 1 Top Off Time Minutes toP3 C...

Page 187: ...yC3 I No Heat Cycle Time Minutes I CyC4 I No Heat Cycle Time Seconds J Cdt1 I Cdt Cool Down Time tEP I Temperature I tFC Temperature i FahrenheiUCelsius Icontinued I I High Temp Cooldown Time I Cdt2 M...

Page 188: ...Vend Price rtC Set Real Time Clock i To enter a programming option press the START keypad To exit press the MED TEMP keypad rtC4 Programs Date of Month rtCS Programs Month rtC6 Programs Year I rtCr I...

Page 189: ...DO NOT COPY or TRANSMIT 21 Press the LOW TEMP or the DELICATES keypad i to scroll through the Special Vend options SA03 the MED TEMP i Special Vend A Start Minute I keypad l SA04 Special Vend A Lengt...

Page 190: ...ff I I LPSb Low Power Auto Shutdown 8 Days Enable On Off i LPSC I i Low Power Auto Shutdown C Days Enable On Off I I LPSd Low Power Auto Shutdown D Days Enable On Off i PFr I Power Fail Reset I I IrA...

Page 191: ...r decrease the value ofthe fifth digit NOTE The vend price can be set from 0 to 65 535 The default value is 200 6 Press the START enter keypad to enter the fifth digit and display remaining four digit...

Page 192: ...nd off Refer to Figure 4 NOTE Ifthe coin value is 100 00 or more the fifth digit is 1 6 Ifthe vend price is 99 99 or less the fifth digit is 0 CHM507R Figure 4 5 Press the LOW TEMP or the DELICATES v...

Page 193: ...er to Figure 5 NOTE Ifthe coin value is 100 00 or more the fifth digit is 1 6 Ifthe coin value is 99 99 or less the fifth digit is 0 B CHM507R Figure 5 5 Press the LOW TEMP or the DELICATES v keypad t...

Page 194: ...Pulse Value is 99 99 or less the fifth digit is 0 CHM507R Figure 6 5 Press the LOW TEMP 1 or the DELICATES v keypad to increase or decrease the value ofthe fifth digit NOTE The Start Pulse Value can b...

Page 195: ...ars in the display press the START enter keypad A number or oFF will appear in the display The number corresponds to the current Start Pulse Mode Programming Value Programming Control 5 Locate the des...

Page 196: ...onds to the current Available Type Value 5 Press the LOW TEMP 1 or the DELICATES v keypad to increase or decrease the current number to the desired number selected from Table 2 Available Type Value Mo...

Page 197: ...e the current number to the desired number selected from Table 3 6 Press the START enter keypad when the correct number appears in the display The new value is saved and the next option oPL will appea...

Page 198: ...n the display press the START enter keypad The current OPL Mode EnablelDisable status will appear in the display on Option Enabled oFF Option Disabled NOTE The default value is oFF 5 Press theLOW TEMP...

Page 199: ...econds before starting the extended tumble How to Program the Audio Signal 1 Control must be in Manual Mode Refer to Entering the Manual Mode 2 Press the WW TEMP 1 or the DELICATES v keypad until Prog...

Page 200: ...ove Card Coinl Card Input End of Cycle Key Pressed 0 OFF OFF OFF OFF OFF 1 OFF OFF OFF OFF ON 2 OFF OFF OFF ON OFF 3 OFF OFF OFF ON ON 4 I OFF OFF ON OFF OFF 5 I OFF OFF ON OFF ON 6 OFF OFF ON ON OFF...

Page 201: ...programmable options until CArd appears in the display 4 When CArd appears in the display press the START enter keypad The current Card Reader Display Control status will appear in the display on Car...

Page 202: ...n drop header is unplugged control ignores coin inputs Table 5 5 Press the LOW TEMP 1 or the DELICATES v keypad to select error code 6 Press the START enter keypad when the correct code appears in the...

Page 203: ...the START enter keypad when the correct option appears in the display 7 Press the LOW TEMP or the DELICATES v keypad to increase or decrease the number ofminutes or seconds displayed to the desired nu...

Page 204: ...is O 6 Press the START enter keypad when the correct option appears in the display 7 Press the LOW TEMP 1 or the DELICATES v keypad to increase or decrease the number of minutes or seconds displayed...

Page 205: ...W TEMP or the DELICATES v keypad to select the desired cooldown time option NOTE Cooldown time can be set from one 1 to 15 minutes The default value for each option is 3 6 Press the START enter keypad...

Page 206: ...ues Temperature Options lOO F 38 e lO5 F 41 C HO F 43 C 115 F 46 C 120 F 49 C 125 F 52 C 130 F 54 C 135 F 57 C 140 F 60 C 145 F 62 C 150 F 66 C 155 F 68 C 160 F 71 C Table 10 NOTE The devault values a...

Page 207: ...ress the START enter keypad A number will appear in the display This number found below corresponds to the current Temperature FahrenheitiCelsius setting One 1 Celsius Zero 0 Fahrenheit NOTE The defau...

Page 208: ...e fifth digit is 0 6 Press the START enter keypad to enter the fifth digit and display remaining four digits The active digit will flash one second on and one second off NOTE To go back to the current...

Page 209: ...will appear in the display 6 Press the LOW TEMP 1 or the DELICATES v keypad to increase or decrease the minutes hours day ofweek date of the month month year to the correct time or date Programming C...

Page 210: ...he START enter keypad and SA01 will appear in the display 4 When SA01 appears in the display press the START enter keypad A number will appear in the display that corresponds to the current Special Ve...

Page 211: ...OFF OFF ON OFF ON ON 13 OFF OFF OFF OFF ON ON OFF ON 15 OFF OFF OFF OFF ON ON ON ON 17 OFF I OFF OFF ON OFF OFF OFF ON 19 OFF OFF OFF ON OFF OFF ON ON 21 OFF OFF OFF ON OFF ON OFF ON 23 OFF 1 uFF ON...

Page 212: ...5 OFF ON ON OFF ON OFF OFF ON 107 OFF ON ON OFF ON OFF ON ON 109 OFF ON ON OFF ON ON OFF ON 111 OFF ON ON OFF ON ON ON ON 113 OFF ON ON ON OFF OFF OFF ON 115 OFF ON ON ON 01 J OFF ON ON 117 OFF ON ON...

Page 213: ...OFF ON OFF ON OFF ON OFF ON OFF ON OFF ON OFF ON OFF ON OFF ON OFF ON OFF ON OFF ON OFF ON ON ON ON ON ON ON ON ON ON ON ON ON ON ON ON ON ON ON ON ON ON ON ON i I i I I I I I i 203 205 207 209 211 ON...

Page 214: ...F 243 ON ON ON ON OFF OFF ON ON 245 ON ON ON ON OFF ON OFF ON 247 ON ON ON ON OFF ON ON ON 249 ON ON ON ON ON OFF OFF ON 251 ON ON ON ON ON OFF ON ON 253 ON ON ON ON ON ON OFF ON 255 ON ON ON ON ON ON...

Page 215: ...ature Press the MED TEMP keypad until the control returns to Ready Mode Programming Control How to Program Special Vend A Start Minute SA03 This option allows the owner to set the minute that Special...

Page 216: ...t the month that Special Vend A will begin NOTE IfSpecial Vend A Start Month Start Date End Month or End Date are programmed to zero default is zero the Special Vend A will be active every week on the...

Page 217: ...it Programming Feature Press the MED TEMP keypad until the control returns to Ready Mode How to Program Special Vend A Start Year SA07 This option allows the owner to set the year that Special Vend A...

Page 218: ...riate section How to Exit Programming Feature Press the MED TEMP keypad until the control returns to Ready Mode SA09 This option allows the owner to set the date that Special Vend A will end 1 Press t...

Page 219: ...year Ifthe start end date or month are set to 0 the year is ignored 01 is year 2001 02 is year 2002 and so on NOTE The value can be set from 0 99 The default value is O 4 Press the START enter keypad...

Page 220: ...0 to 65 535 The default value is O 4 Press the START enter keypad to enter the fifth digit and display remaining four digits The active digit will flash one second on and one second off NOTE To go ba...

Page 221: ...efault value is O 4 Press the START enter keypad to enter the fifth digit and display remaining four digits The active digit will flash one second on and one second off Programming Control NOTE To go...

Page 222: ...n How to Exit Programming Feature Press the MED TEMP keypad until the control returns to Ready Mode Time Minutes SA14 This option allows the owner to set the amount oftime in minutes for a no heat cyc...

Page 223: ...e Press the MED TEMP keypad until the control returns to Ready Mode Programming Control How to Program Special Vend A Coin 2 Top Off Time Minutes SA16 This option allows the owner to set the amount of...

Page 224: ...ure Press the MED TEMP keypad until the control returns to Ready Mode 21 Special Vend C Days Enable SPC This option allows the owner to enable or disable a third special vend Special Vend C can be pro...

Page 225: ...DELICATES v keypad to scroll through the programmable options until SPd appears in the display 4 When SPd appears in the display press the START enter keypad The control displays on or oFF for this p...

Page 226: ...section How to Exit Programming Feature Press the MED TEMP keypad until the control returns to Ready Mode 24 Low Power Auto Shutdown A Days Enable LPSA This option allows the owner to enable or disabl...

Page 227: ...ure Press the MED TEMP keypad until the control returns to Ready Mode 26 Low Power Auto Shutdown C Days Enable LPSC This option allows the owner to enable or disable Low Power Auto Shutdown Low Power...

Page 228: ...TEMP keypad until the control returns to Ready Mode 28 Power Fail Reset PFr This option allows the owner to set the amount oftime the control will store active cycle information in the event ofa power...

Page 229: ...s not restored within five minutes the control will erase the cycle status The minimum power failure time is five minutes The maximum power fail reset time is 127 minutes NOTE The default value is oFF...

Page 230: ...til the control returns to Ready Mode 30 Manual Rapid Advance On Off rAE This option allows the owner to enable or disable the rapid advance feature Refer to RapidAdvance Feature section for more info...

Page 231: ...ss the MED TEMP keypad until the control returns to Ready Mode Programming Control 32 Production Test Cycle On Off PtEn This option allows the owner to enable or disable access to the production test...

Page 232: ...will show the frrst four digit segment of the audit value If the audit count is 10 000 or higher press the START enter keypad again to view the last four digits ofthe number NOTE The display can show...

Page 233: ...ings How to Enter Manual Reset 1 Control must be in Manual Mode to start Refer to Entering the Manual Mode 2 Press the LOW TEMP 1 or the DELICATES v keypad until rSEt appears 3 Press the START enter k...

Page 234: ...keypad Display will change to d001 indicating the control software version number test 5 Press the LOW TEMP 1 or the DELICATES v keypad to scroll through the diagnostic test options How to Start Test...

Page 235: ...are Version Number Test theMEDTEMP keypad d002 Service Door Opening Test d004 Coin Drop 1 Input Test d007 Dryer on Temperature Test dOOa Thermistor Temperature Test dOOS Machine Configuration 1 Displa...

Page 236: ...l add counts to the coin vault opening counter for the audit and save the time date for each opening ofthe test To exit the Coin Vault Opening Test press the MED TEMP keypad The control will return to...

Page 237: ...ng Mode Refer to How to Enter Testing Feature at the beginning ofthis section To enter press the START enter keypad The display will show F for degrees in Fahrenheit or C for degrees in Celsius The wi...

Page 238: ...1 Test This option shows the machine configuration values To start test control must be in the Testing Mode Refer to How to Enter Testing Feature at the beginning ofthis section To enter press the STA...

Page 239: ...the beginning ofthis section To enter press the START enter keypad The display will show dxxx with xxx representing the machine capacity Refer to Table 17 To exit Machine Configuration Display 3 Test...

Page 240: ...right ofthe display Ifa single coin drop is used only one coin count will increment Uxx Coin Vault Switch Test XX is either oP to signify coin vault switch is open or CL to signify coin vault switch i...

Page 241: ...Error Communication error Re aim external device and try again EIOC out Exceeded Communication error Re aim external device and try again EIOE Encryption Error Incorrect machine type Before downloadin...

Page 242: ...Check all network connections Iferror persists replace control or network board ALrn Break in Alarm Error Service the service door or coin vault switches oFF Break in Alarm Shutdown Error Service the...

Page 243: ...will advance the cycle time by one minute Pressing and holding the START enter keypad will advance the cycle four minutes for every second the START enter keypad is held down How to Enter Rapid Advanc...

Page 244: ...not work with Additional Vend Mode or Additional Cycle Top Off How to Clear Vend 1 Open the service door Refer to Opening the Service Door The coin vault must remain closed 2 While pressing and holdin...

Page 245: ...program this feature refer to Programming Control Power Fail Reset Disabled If the Power Fail feature is disabled the control will resume the cycle from the point it left offafter the START pad is pre...

Page 246: ...r occurs that terminates communication the display will show Elxx xx represents the error code NOTE The Infra red Communications option must be turned on Refer to option 29 in Programming Control Card...

Page 247: ...dryer Close supervision ofchildren is necessary when the dryer is used near children This is a safety rule for all appliances 5 Before the dryer is removed from service or discarded remove the door t...

Page 248: ...lector DRY2323N DRY2320N 2 Load Laundry 6 Insert Coins Card DRY2322N DRY2317N 3 Close Loading Door 7 Press Start DRY2324N 4 Stacked Models Determine Proper Control DRY2321N DRY2315N 513178 Copyright A...

Page 249: ...1 Control must be in Manual Mode 2 Press the LOW TEMP J or the DELICATES V keypad until Prog appears in the display 3 Press the START enter keypad 4 Press the LOW TEMP J or the DELICATES v keypad to s...

Page 250: ...cludes but is not limited to failure as a result ofabuse misuse improper installation transportation damage and chemical damage Alliance Laundry Systems will not pay labor and transportation charges i...

Page 251: ...the platforms The Society will also save because the cost of the platforms won t have to be included in their rental Please review and confirm that the dimensions for these machines are compatible wi...

Page 252: ......

Page 253: ......

Page 254: ......

Page 255: ......

Reviews: