background image

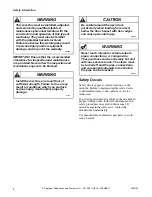
Safety Information

3

F232134

© Copyright, Alliance Laundry Systems LLC – DO NOT COPY or TRANSMIT

7. Before the washer is removed from service or 

discarded, remove the door to the washing 
compartment.

8. Do not reach into the washer if the wash drum is 

moving.

9. Do not install or store the washer where it will be 

exposed to water and/or weather.

10. Do not tamper with the controls.

11. Do not repair or replace any part of the washer, or 

attempt any servicing unless specifically 
recommended in the user-maintenance 
instructions or in published user-repair 
instructions that the user understands and has the 
skills to carry out.

12. To reduce the risk of an electric shock or fire, DO 

NOT use an extension cord or an adapter to 
connect the washer to the electrical power source.

13. Use washer only for its intended purpose, 

washing textiles.

14. Never wash machine parts or automotive parts in 

the machine. This could result in serious damage 
to the basket.

15. ALWAYS disconnect the washer from electrical 

supply before attempting any service. Disconnect 
the power cord by grasping the plug, not the cord.

16. Install the washer according to the 

INSTALLATION INSTRUCTIONS. All 
connections for water, drain, electrical power and 
grounding must comply with local codes and be 
made by licensed personnel when required.

17. To reduce the risk of fire, textiles which have 

traces of any flammable substances such as 
vegetable oil, cooking oil, machine oil, 
flammable chemicals, thinner, etc. or anything 
containing wax or chemicals such as in mops and 
cleaning cloths, must not be put into the washer. 
These flammable substances may cause the 
fabric to catch on fire by itself.

18. Do not use fabric softeners or products to 

eliminate static unless recommended by the 
manufacturer of the fabric softener or product.

19. Keep washer in good condition. Bumping or 

dropping the washer can damage safety features. 
If this occurs, have washer checked by a qualified 
service person.

20. If the supply cord is damaged, it must be replaced 

by a special cord or assembly available from the 
manufacturer or its service agent.

21. Be sure water connections have a shut-off valve 

and that fill hose connections are tight. CLOSE 
the shut-off valves at the end of each wash day.

22. Loading door MUST BE CLOSED any time the 

washer is to fill, tumble or spin. DO NOT bypass 
the loading door switch by permitting the washer 
to operate with the loading door open. 

23. Always read and follow manufacturer’s 

instructions on packages of laundry and cleaning 
aids. Heed all warnings or precautions. To reduce 
the risk of poisoning or chemical burns, keep 
them out of the reach of children at all times 
(preferably in a locked cabinet).

24. Always follow the fabric care instructions 

supplied by the textile manufacturer.

25. Never operate the washer with any guards and/or 

panels removed.

26. DO NOT operate the washer with missing or 

broken parts.

27. DO NOT bypass any safety devices.

28. Failure to install, maintain and/or operate this 

washer according to the manufacturer’s 
instructions may result in conditions which can 
produce bodily injury and/or property damage.

NOTE: The WARNINGS and IMPORTANT 
SAFETY INSTRUCTIONS appearing in this 
manual are not meant to cover all possible 
conditions and situations that may occur. Common 
sense, caution and care must be exercised when 
installing, maintaining or operating the washer.

Any problems or conditions not understood should be 
reported to the dealer, distributor, service agent or the 
manufacturer.

Summary of Contents for Hardmount Coin and OPL

Page 1: ...2134R5 June 2008 Washer Extractors Cabinet Hardmount Mechanical Timer Coin and OPL Models Refer to page 6 for Model Identification CHM166C Keep These Instructions for Future Reference If this machine...

Page 2: ......

Page 3: ...ble of Contents 1 Safety Information 2 Explaination of Safety Messages 2 Important Safety Instructions 2 Safety Decals 4 Operator Safety 5 Introduction 6 Model Identification 6 Nameplate Location 7 Re...

Page 4: ...4 Do not add gasoline dry cleaning solvents or other flammable or explosive substances to the wash water These substances give off vapors that could ignite or explode 5 Under certain conditions hydrog...

Page 5: ...y itself 18 Do not use fabric softeners or products to eliminate static unless recommended by the manufacturer of the fabric softener or product 19 Keep washer in good condition Bumping or dropping th...

Page 6: ...talled adjusted and serviced by qualified electrical maintenance personnel familiar with the construction and operation of this type of machinery They must also be familiar with the potential hazards...

Page 7: ...door unlocked c Close and lock the door and start a cycle Attempt to open the door while the cycle is in progress The door should not open If the door lock and interlock are not functioning properly c...

Page 8: ...18MC2 UC35MN3 HC25MDX HC50MN2 SC18MH3 SC35MH3 UC18MC3 UC35MV2 HC25MH2 HC50MV2 SC18MN2 SC35MN2 UC18MD2 UC35MV3 HC25ML2 HC50MX2 SC18MN3 SC35MN3 UC18MD3 UC35MX2 HC25MN2 HC50MY2 SC18MV2 SC35MV2 UC18MH2 UC...

Page 9: ...del number when ordering parts or when seeking technical assistance Replacement Parts If literature or replacement parts are required contact the source from whom the machine was purchased or contact...

Page 10: ...mber Prefix 60 Washer Extractor Capacity pounds dry weight of laundry M Type of Electrical Control X Actuation X Prep for coin 2 Washer Extractor Speed Capability 2 2 speed O Electrical Characteristic...

Page 11: ...ns to pay for cycles For detailed information on the Central Pay System Communications refer to the manufacturer Card Reader Card Reader Models Only The models are usually designated by the Prep for C...

Page 12: ...Turn on the main power source circuit breaker For non coin models Turn on the On Off switch on the front panel to the On position Refer to Figure 4 2 Push button and turn handle clockwise to open Ref...

Page 13: ...quid and or powder supplies to supply dispenser Refer to Figure 8 a Add detergent to container 1 b Add softener to container 3 For non coin models Liquid supplies may be injected directly into the sup...

Page 14: ...ess the Start button Refer to Figure 9 Figure 9 10 Add bleach to container 2 when ADD BLEACH WHEN LIT is illuminated Refer to Figure 10 Figure 10 Supply Dispenser A terminal strip in the input power j...

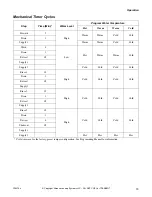
Page 15: ...Warm Cold Cold Wash 4 Low Hot Warm Warm Cold Drain 1 Extract 0 5 Supply 1 Supply 2 Cold Cold Cold Cold Rinse 1 1 5 High Cold Cold Cold Cold Drain 1 Extract 0 5 Supply1 Rinse 2 1 5 High Cold Cold Cold...

Page 16: ...nd attempt to start the machine The machine should not start with the door unlocked c Close and lock the door and start a cycle Attempt to open the door while the cycle is in progress The door should...

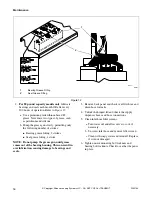
Page 17: ...ocedures 1 Use the following procedures to determine if V belt s require replacement or adjustment Call a qualified service technician in either case a Check V belt s for uneven wear and frayed edges...

Page 18: ...oke NOTE Do not pump the grease gun until grease comes out of the bearing housing This can result in overlubrication causing damage to bearings and seals 3 Remove back panel and check overflow hose an...

Page 19: ...lock pin while turning the door handle 3 Tighten anchor bolts if necessary 4 Verify that the drain motor shield is in place and secure if so equipped 5 Check all painted surfaces for exposed metal Mat...

Page 20: ...om overheating by scouring with a powder or by employing special chemical solutions Do not leave sanitizers or sterilizing solutions on stainless steel equipment for prolonged periods of time When an...

Reviews: