background image

into the bottle measuring cap (refer to bottle directions). Pour into
dispenser.

The large fabric softener dispenser allows for the fabric softener to
be diluted with water. We recommend adding water up to the fill lev-
el. Do not exceed tip of arrow which indicates correct fill level. Over-
filling can allow fabric softener to spill onto the clothes, causing
stains on clothes if the softener comes into contact with deter-
gent suds.

Setting the water level to medium or higher will result in better per-
formance from the fabric softener.

The fabric softener will remain in the dispenser during the wash fill,
agitation and spin. At the end of the wash spin, the liquid fabric
softener will be dispensed into the washtub through the slots in
the agitator and will be mixed with the incoming rinse water.

 To Clean the Dispenser

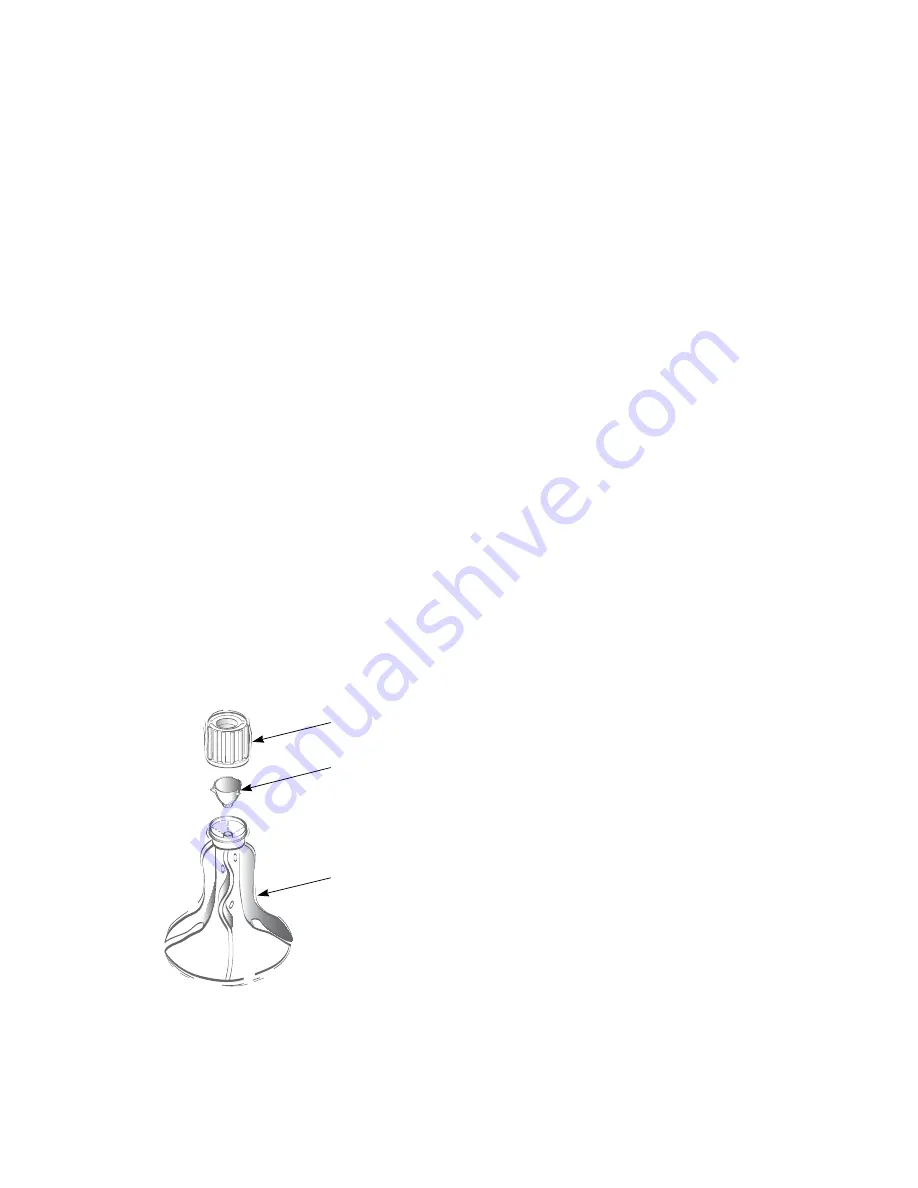
1.   Remove the dispenser housing from agitator by squeezing the

lower part of the dispenser, pulling directly upward and at the
same time tilting slightly. This will expose the dispenser cup,
which is also removable for cleaning. Refer to illustration.

2.   Soak both housing and cup in hot soapy water.
3.   Rinse housing and cup clean.
4.   Clean funnel shape in top of agitator by using a small brush.
5.   After cleaning, install dispenser cup, then push dispenser hous-

ing directly downward onto top of agitator until firmly snapped
together.

IMPORTANT: When adding detergent to the wash load,

DO NOT allow any detergent to enter the softener dis-

penser cup. If this happens, refer to the cleaning instruc-

tions.

TLW2001N_SVG

1

2

3

1.   Dispenser Housing
2.   Dispenser Cup
3.   Agitator

 Use Tips

• Fabric softener spilled onto garments may cause staining. To

remove, dampen stain and rub with bar soap. Wash as usual.

• Liquid fabric softeners will be dispensed during the first rinse

and should not be combined with bleach, bluing, starch, deter-
gents, soaps or packaged water conditioners.

• Fabric softener is not to be used in dispenser when using Pre-

wash cycle, if available.

• When adding detergent to wash water, do not allow any to enter

into softener dispenser cup, as softener will become gummy.

To prevent softener buildup, the dispenser can be filled with clean
water for automatic cleaning. This can be done in washing cycles
other than when softener is used.

 Agitator Cap

IMPORTANT: If your washer comes with an agitator cap,

the cap must be on at all times.

Operating Your Washer

©

 Copyright, Alliance Laundry Systems LLC -

 DO NOT COPY or TRANSMIT

  13

  Part No. 203963ENR2

Summary of Contents for Speed Queen LWN311SP101NW22

Page 1: ...Topload Washers TLW22C_SVG Original Instructions Keep These Instructions for Future Reference If this machine changes ownership this manual must accompany machine www alliancelaundry com Part No 2039...

Page 2: ......

Page 3: ...e manufacturer about any problems or conditions you do not understand Read all instructions before using washer Capacity Specifications These units are sold in various countries worldwide many with di...

Page 4: ...accordance with the provisions of SJ T 11364 O Indicates that the content of said hazardous substance in all of the homogenous materials in the component is within the limits required by GB T 26572 X...

Page 5: ...14 Clothing Concerns 14 Maintenance 16 Cold Weather Care 16 Care of Your Washer 16 Replacing Hoses 16 Filter Screens 16 Vacations and Extended Non Use 16 Preventative Maintenance 16 Reinstallation of...

Page 6: ...yourself Do not install or store the washer where it will be exposed to water and or weather Do not add the following substances or textiles containing traces of the following substances to the wash...

Page 7: ...es If this occurs have your washer checked by a qualified service person Do not repair or replace any part of the washer or attempt any servicing unless specifically recommended in the user mainte nan...

Page 8: ...easy if you follow a few guidelines 1 Sort by Color Separate items into loads of whites darks lights and non colorfast 2 Sort by Fabric and Construction Separate items into loads of cottons linens pe...

Page 9: ...will increase the inci dence of excessive lint Load Sizes Mini 1 2 permanent press dress shirts or 2 pillow cases or 1 lightweight dress or similar size load Small 3 4 permanent press dress shirts or...

Page 10: ...fab rics Less fading Reduces shrink ing in knits COLD Non colorfast fabrics Extra delicate clothing Saves energy Reduces color fading Reduces wrin kling Reduces shrink ing Energy You can save energy w...

Page 11: ...ation during the wash portion of the cycle is not constant The wash will alternate between a period of agitation and a period of pausing This continues until advancing to the spin portion of the cycle...

Page 12: ...Manual Soaking 1 Set the timer knob in the center of the word RINSE this pre vents the washer from spinning without first filling with water 2 Place the soaking product and clothes load in the washtu...

Page 13: ...using and cup clean 4 Clean funnel shape in top of agitator by using a small brush 5 After cleaning install dispenser cup then push dispenser hous ing directly downward onto top of agitator until firm...

Page 14: ...or best results Yellowed Clothes Unremoved Soil Skin soil is hard to remove Check hem edge of sheets and pillowcases bottom end of t shirts etc If this portion is white and center is yellow the fabric...

Page 15: ...lint Wash these only with similar items Use fabric softener in rinse water Wrinkling Improper Sorting Heavy items like towels should not be washed with light items like nightgowns Improper Cycle Make...

Page 16: ...ced every five years Filter Screens Check the filter screens in the fill hoses for debris or damage every six months Clean or replace them if necessary If the washer is filling with water slower than...

Page 17: ...as been installed in the lid opening tilt washer back enough to access base opening Insert shipping plug into base opening and using the palm of your hand push shipping plug into washer until it snaps...

Page 18: ...r to the Installation instructions to make sure that the drain hose has been properly installed Won t Start Make sure lid is closed Pull timer knob out to start washer Make sure power cord is plugged...

Page 19: ...instructions to make sure that the drain hose has been properly installed Water Leaks Check that fill hoses are properly installed on the faucets and the washer s water mixing valve Check the conditio...

Page 20: ...hot faucet hose is connected to hot mixing valve indicated with H on the valve bracket and cold faucet is connected to cold mixing valve indicated with C on the valve bracket Make sure laundry room w...

Page 21: ...located on the serial plate The serial plate will be in the location shown Please include a copy of your bill of sale and any service receipts you have If replacement parts are required contact the s...

Reviews: