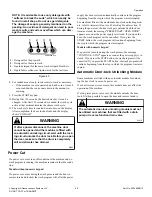
1.
Bracket
2.
Steam hose
3.
Cable
4.
Steam coil
Figure 39
3. Connect steam hose to steam valve.
4. Connect the cable to the steam coil.
5. Fit rear cover back to its original place.
Supply Dispensing
WARNING
Dangerous Chemicals. May damage eyes and skin.
Wear eye and hand protection when handling chemi-
cals; always avoid direct contact with raw chemicals.
Read the manufacturer’s directions for accidental
contact before handling chemicals. Ensure an eye-
rinse facility and an emergency shower are within
easy reach. Check at regular intervals for chemical
leaks.
W363
Supply Dispensing
Number of external liquid supply connections
8
Liquid supply connection size, in. [mm]
5/16 [8]
Number of diluted liquid soap supply connec-
tions
3
Diluted liquid soap supply connection size, in.
[mm]
1/2 [12]
Table 36
IMPORTANT: Always use liquid soap pumps with a
flow that bring the requested quantity in less than 30
sec.
IMPORTANT: Start pumping immediately after water
valves are open. The incoming water dilutes the liquid
soap and brings it into the tub assembly.
Secure the location of the wiring and hoses so they can not be
pinched, damaged or rubbed. Before you start to use liquid soap,
check with your liquid soap supplier whether the liquid soap is
harmless and inert to PP and PVC material in order to avoid dam-
age to machine.
IMPORTANT: Failure to follow these instructions could
damage the machine and void the warranty.
Connection of External Liquid Supplies
1. Facing the rear of the machine, locate the eight (8) 5/16 inch
[8 mm] supply hose connections found on the left-hand side
of the valve panel. Refer to
.
NOTE: Recommended setting of the pump's flow
rate is 60 to 100 liters per hour.
Installation
©
Copyright, Alliance Laundry Systems LLC -
DO NOT COPY or TRANSMIT
60
Part No. D1598ENR10
Summary of Contents for UY105 PRO
Page 2: ......


