Section 4
4 - 19
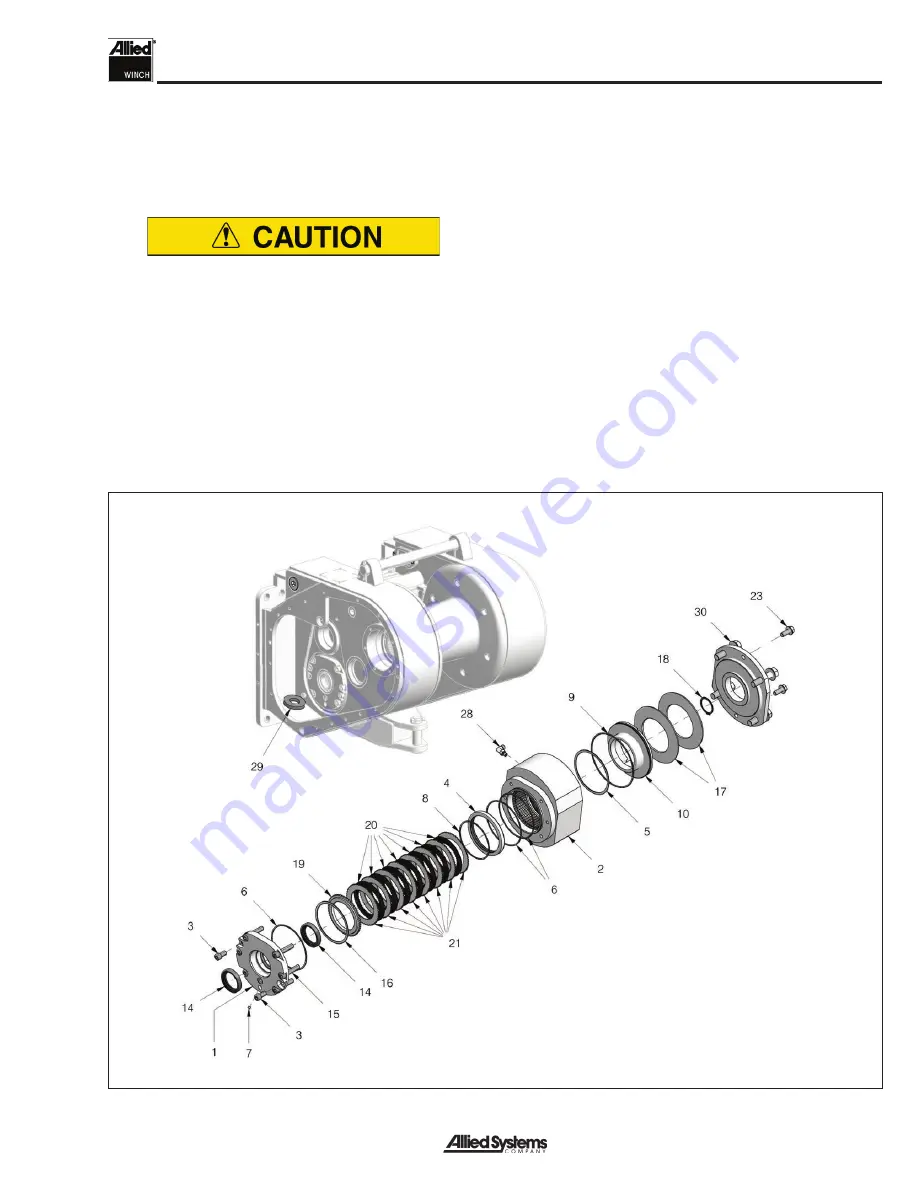
Figure 4-5 Brake Assembly
Brake Assembly
1.
Clean all parts thoroughly.
2.
Install brake discs starting with a separator disc, and
then alternate with a friction disc. You should start and
end with a separator disc.
The brake is a dry multi-disc design. Do not
get any oil on the friction discs. If the friction
discs are contaminated with oil, the brake will
greatly reduce holding power, and the brake
discs must be replaced.
3.
Install new o-rings on the piston and lightly coat with
hydraulic oil. Do not get any oil on brake discs, see
Caution above.
4.
Install brake springs. Make sure that they are stacked
together like dinner plates with the outer rim towards
you.
5.
Install mounting plate. Hand tighten all four cap-
screws evenly. Then tighten one turn at a time in
rotation until mounting plate is fl at against the brake
housing. Torque capscrews to 285 lbs ft.
6.
Reinstall the motor, replace o-rings on motor pilot.
Torque 1/2” capscrews to 80 lbs ft. (3/4” capscrews
to 285 lbs ft.).
7.
Connect hydraulic hard lines and hose. Replace any
o-rings that were disturbed with new.
8.
Install side cover. Once winch is reinstalled on the
tractor, check for leaks, pressure settings, and proper
operation.
1.
Brake Mounting Plate
2. Brake
Housing
3. Capscrew
4. Sleeve
5. Snap
Ring
6. O-Ring
7. Pipe
Plug
8. O-Ring
9. O-Ring
10. Brake
Piston
11. Ball
Bearing
14. Rotary
Seal
15. Capscrew
16. Snap
Ring
17. Belleville
Spring
18. Snap Ring, External
19. Pressure
Plate
20. Friction
Disc
21. Separator
Plate
23. Flangescrew
28. Fitting
29. Magnet
30. Capscrew
Note:
Minimum pack height of
service items #20 and #21
is 1.397”.
- ID Towards
Piston (#10)
Summary of Contents for H5C Series
Page 8: ...vi Notes...
Page 48: ...General 1 40 Notes...
Page 59: ...Troubleshooting 2 6 Notes...
Page 77: ...Service 3 18 Notes...
Page 86: ...Section 4 4 9 Intentionally Blank...
Page 104: ...Section 4 4 27 Intentionally Blank...
Page 108: ......


