background image

AT-8000/8POE Layer 2 Fast Ethernet Switch Installation Guide

47

The Login Menu is shown in Figure 16. 

Figure 16.  Login Menu

4. Enter “manager” for the login name and press Return.

You are prompted for a password.

5. Enter “friend” as the password. 

The Main Menu is shown in Figure 17.

Figure 17.  Main Menu

For detailed information about configuring the AT-8000/8POE Fast 
Ethernet Switch, refer to the 

AT-S81 Management Software User’s Guide

.

==============================================================
AT-8000/8POE Management System Version
Local - Console
Allied Telesyn International Corp.
Copyright 2007
==============================================================

Login Menu

Login: 

AT-8000/8POE Local Management System
Enter the character in square brackets to select option

Main Menu 

[G]eneral Information
[B]asic Switch Configuration...
[A]dvanced Switch Configuration...
Switch [T]ools...
[S]tatistics
[C]ommand Line Interface
[Q]uit

Command>

Summary of Contents for AT 8000/8POE

Page 1: ...613 000238 Rev C Layer 2 Fast Ethernet Switch AT 8000 8POE Installation Guide ...

Page 2: ...arks or registered trademarks of their respective owners Allied Telesis Inc reserves the right to make changes in specifications and other information contained in this document without prior written notice The information provided herein is subject to change without notice In no event shall Allied Telesis Inc be liable for any incidental special indirect or consequential damages whatsoever includ...

Page 3: ...erence in which case the user will be required to correct the interference at his own expense Note Modifications or changes not expressly approved of by the manufacturer or the FCC can void your right to operate this equipment Industry Canada This Class A digital apparatus complies with Canadian ICES 003 Cet appareil numérique de la classe A est conforme à la norme NMB 003 du Canada European Union...

Page 4: ...y Statements Important The indicates that a translation of the safety statement is available in a PDF document titled Translated Safety Statements 613 000405 posted on the Allied Telesis website at www alliedtelesis com ...

Page 5: ...dress Table 26 Duplex Mode 27 Store and Forward 27 Back Pressure and Flow Control 28 Network Topologies 29 Power Workgroup Topology 29 Collapsed Backbone 30 Chapter 2 Installation 31 Reviewing Safety Precautions 32 Selecting a Site for the Switch 34 Cabling 35 Unpacking the Switch 36 Installing the Switch on a Desktop 37 Installing the Switch in a Rack 38 Installing an Optional SFP Transceiver 41 ...

Page 6: ... 6 Appendix A Technical Specifications 53 Physical Specifications 53 Environmental Specifications 53 Power Specifications 53 Safety and Electromagnetic Emissions Certifications 54 Connectors and Port Pinouts 55 ...

Page 7: ...SFP Slot 41 Figure 10 Inserting the SFP 42 Figure 11 Connecting the Twisted Pair Data Cables 43 Figure 12 Removing the Dust Cover from the SFP 44 Figure 13 Connecting the Fiber Optic Cable 44 Figure 14 Plugging in the AC Power Cord 45 Figure 15 Connecting the Console Cable 46 Figure 16 Login Menu 47 Figure 17 Main Menu 47 Figure 18 Entering a Switch s IP Address in the URL Field 48 Figure 19 AT S8...

Page 8: ...Figures 8 ...

Page 9: ... Power LED 21 Table 4 Uplink Port LEDs 21 Table 5 IEEE 802 3af Class vs Power Levels 24 Table 6 Twisted Pair Cabling and Distances 35 Table 7 MDI Pin Signals 10Base T or 100Base TX 55 Table 8 MDI X Pin Signals 10Base T or 100Base TX 55 Table 9 RJ 45 1000Base T Connector Pinouts 56 ...

Page 10: ...Tables 10 ...

Page 11: ...ructions on how to install the AT 8000 8POE Fast Ethernet Switch This preface contains the following sections Safety Symbols Used in this Document on page 12 Where to Find Web based Guides on page 13 Contacting Allied Telesis on page 14 ...

Page 12: ...es the safety symbols defined in Table 1 Table 1 Safety Symbols Symbol Meaning Description Caution Performing or omitting a specific action may result in equipment damage or loss of data Warning Performing or omitting a specific action may result in electrical shock ...

Page 13: ...here to Find Web based Guides The installation and user guides for all Allied Telesis products are available in portable document format PDF on our web site at www alliedtelesis com You can view the documents online or download them onto a local workstation or server ...

Page 14: ...r contact the Allied Telesis Technical Support group at our web site www alliedtelesis com support rma Select your country from the list displayed on the website Then select the appropriate menu tab For Sales or Corporate Information You can contact Allied Telesis for sales or corporate information at our web site www alliedtelesis com Select your country from the list displayed on the website The...

Page 15: ...ast Ethernet or Gigabit Ethernet network with the power of Power over Ethernet PoE This chapter contains the follows sections Features on page 16 Front and Back Panels on page 17 Ports on page 18 LEDs on page 20 Power Supply on page 22 Power over Ethernet on page 23 Ethernet Switching Basics on page 26 Network Topologies on page 29 ...

Page 16: ...45 connectors One combo small form factor pluggable SFP port Auto MDI MDI X on the twisted pair ports IEEE 802 3 and IEEE 802 3u compliant IEEE 802 3x flow control in full duplex operation back pressure in half duplex operation Store and forward switching mode MAC address table capacity of up to 8K addresses with automatic aging Menus web based and limited CLI configuration using the AT S81 manage...

Page 17: ...et Switch Figure 2 AT 8000 8POE Back Panel 10 100Base Twisted Pair Ports Port LEDs AT 8000 8POE 8 Port POE Fast Ethernet Switch PoE 9 9R 1 3 5 7 2 4 6 8 TERMINAL PORT 1 3 5 7 2 4 6 8 9 9R POWER 10 100 1000 Base T SFP UPLINK PORT RS 232 DET ON ON 100 LINK ACT 10 LINK ACT PD ON MAX CURRENT PD ERR 10 100 LINK 1000 LINK ACT ACT CLASS 1 LASER PRODUCT MAIN PORT ACTIVITY UPLINK PORT ACTIVITY 820 Uplink P...

Page 18: ... or full duplex mode The twisted pair ports are IEEE 802 3u compliant and Auto Negotiate the duplex mode setting Note In order for the switch to set the duplex mode for each port correctly the end nodes that you connect to the switch ports should also use Auto Negotiation Otherwise a duplex mode mismatch can occur affecting network performance For further information refer to Duplex Mode on page 2...

Page 19: ...Port The SFP port port 9 can operate in place of its twisted pair port equivalent to provide fiber optic uplink connectivity When an SFP is inserted in the SFP port and a fiber optic cable is connected the corresponding twisted pair port is disabled RS 232 Console Port The RS 232 console port uses the management cable supplied with the switch Through the console port you can connect to the switch ...

Page 20: ...t Blinking amber The overall power budget for the switch was exceeded when powered device was connected to this port Off The port is not connected to a valid powered device and power is not being supplied on the port LINK ACT Off The port has not established a link with an end node Solid green A valid link has been established on the port and the port is operating in 100Base T mode Blinking green ...

Page 21: ... Description Power Green The switch is powered on and is operating normally Table 4 Uplink Port LEDs LED State Description LINK ACT Off The port has not established a link with an end node Green A valid link has been established on the port at 1000 Mbps Blinking Green The port is transmitting or receiving data at 1000 Mbps Amber A valid link has been established on the port at 10 or 100 Mbps Blink...

Page 22: ...gle AC power supply socket on the back panel which features autoswitch AC inputs To power the switch on or off connect or disconnect the power cord provided with the switch A power cord is supplied with the switch Note For the power requirements refer to Power Specifications on page 53 ...

Page 23: ...also to all of the powered devices connected to it This can increase the reliability of your network by minimizing the impact to network operations from a power failure PoE can also simplify the installation of your network A frequent issue in selecting a location for a network device is whether there is a power source nearby This often limits equipment placement or requires the added cost and tim...

Page 24: ...ns as a regular Ethernet port without PoE The PoE feature remains enabled on the port but no power is delivered to the device Implementation A standard Ethernet twisted pair cable contains four pairs of strands for a total of eight strands 10 100 Mbps network traffic requires only four strands 1 2 3 and 6 leaving four strands in the cable unused 4 5 7 and 8 The PoE standard IEEE 802 3af describes ...

Page 25: ...de 25 should be able to receive its power from the switch while using either a straight or cross over cable The PoE feature on the AT 8000 8POE Fast Ethernet Switch should also work with most legacy PD s as long as the device can be powered on pins 4 5 7 and 8 ...

Page 26: ...the switch s ports and the port number where each address was learned When the switch receives a packet it also examines the destination address and by referring to its MAC address table determines the port on which the destination end node is connected It then forwards the packet to the appropriate port and on to the end node This increases network bandwidth by limiting each frame to the appropri...

Page 27: ...erformance problems If you encounter this situation you must configure the port on the end node to use Auto Negotiation or if it lacks that feature to half duplex Note Because the ports on the AT 8000 8POE Fast Ethernet Switch operate in Auto Negotiate mode only the end nodes connected to the switch must also be configured to operate in the Auto Negotiate mode If an end node is configured to a spe...

Page 28: ... forcing a collision A collision on an Ethernet network occurs when two end nodes attempt to transmit data using the same data link at the same time A collision causes end nodes to stop sending data When the switch needs to stop a 100 Mbps half duplex end node from transmitting data it forces a collision on the data link which stops the end node When the switch is ready to receive data again the s...

Page 29: ...23R 2 4 6 8 10 12 14 16 18 20 22R 24R TERMINAL PORT FAULT MASTER POWER STATUS SFP 21 22 23 24 L A D C D C L A D C L A 1000 LINK ACT HDX COL FDX 10 100 LINK ACT PORT ACTIVITY 21 22 23 24 SFP L A Gigabit Ethernet Switch 1282 Legend 100 Mbps 1000 Mbps 10 Mbps AT 8000 8POE 8 Port POE Fast Ethernet Switch PoE 9 9R 1 3 5 7 2 4 6 8 TERMINAL PORT 1 3 5 7 2 4 6 8 9 9R POWER 10 100 1000 Base T SFP UPLINK PO...

Page 30: ...1 LASER PRODUCT AT 9424T 1 3 5 7 9 11 13 15 17 19 21R 23R 2 4 6 8 10 12 14 16 18 20 22R 24R TERMINAL PORT FAULT MASTER POWER STATUS SFP 21 22 23 24 L A D C D C L A D C L A 1000 LINK ACT HDX COL FDX 10 100 LINK ACT PORT ACTIVITY 21 22 23 24 SFP L A Gigabit Ethernet Switch 1282 Legend 100 Mbps 1000 Mbps 10 Mbps AT 9424T AT 8000 8POE 8 Port POE Fast Ethernet Switch PoE 9 9R 1 3 5 7 2 4 6 8 TERMINAL P...

Page 31: ...e 32 Selecting a Site for the Switch on page 34 Cabling on page 35 Unpacking the Switch on page 36 Installing the Switch on a Desktop on page 37 Installing the Switch in a Rack on page 38 Cabling and Powering On the Switch on page 43 Starting a Management Session on page 46 Warranty Registration on page 50 ...

Page 32: ...disconnecting the LAN cables E1 Warning Do not work on equipment or cables during periods of lightning activity E2 Warning Power cord is used as a disconnection device To de energize equipment disconnect the power cord E3 Warning Class I Equipment This equipment must be earthed The power plug must be connected to a properly wired earth ground socket outlet An improperly wired socket outlet could p...

Page 33: ...temperature of the rack environment may be greater than the room ambient temperature Therefore consideration should be given to installing the equipment in an environment compatible with the manufacturer s maximum rated ambient temperature Tmra E35 Caution Installation of the equipment in a rack should be such that the amount of air flow required for safe operation of the equipment is not compromi...

Page 34: ... power outlet for the switch should be located near the unit and should be easily accessible The site should provide for easy access to the ports on the front of the switch This will make it easy for you to connect and disconnect cables as well as view the switch s LEDs To allow proper cooling of the switch air flow around the unit and through its vents on the side and rear should not be restricte...

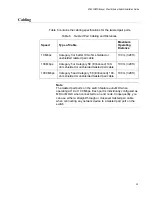
Page 35: ... can use either a straight through or crossover twisted pair cable when connecting any network device to a twisted pair port on the switch Table 6 Twisted Pair Cabling and Distances Speed Type of Cable Maximum Operating Distance 10 Mbps Category 3 or better 100 ohm shielded or unshielded twisted pair cable 100 m 328 ft 100 Mbps Category 5 or Category 5E Enhanced 100 ohm shielded or unshielded twis...

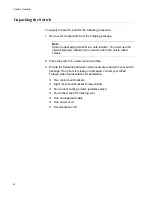
Page 36: ... need to return the unit to Allied Telesis 2 Place the switch on a level secure surface 3 Ensure the following hardware components are included in your switch package If any item is missing or damaged contact your Allied Telesyn sales representative for assistance Two rack mount brackets Eight rack mount bracket screws black Four rack mounting screws stainless steel Four rubber feet for desktop us...

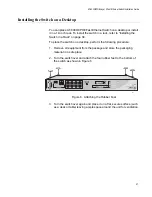
Page 37: ...rial in a safe place 2 Turn the switch over and attach the four rubber feet to the bottom of the switch as shown in Figure 6 Figure 6 Attaching the Rubber Feet 3 Turn the switch over again and place it on a flat secure surface such as a desk or table leaving ample space around the unit for ventilation 823 AT 8000 8POE 8 Port POE Fast Ethernet Switch PoE 9 9R 1 3 5 7 2 4 6 8 TERMINAL PORT 1 3 5 7 2...

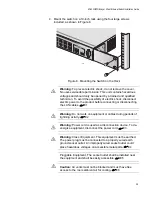
Page 38: ...using a flat head screwdriver 2 Install a bracket on one side of the switch using a Phillips screwdriver and four of the rack mount screws included with the switch as shown in Figure 7 Figure 7 Attaching the Rack Mount Bracket 3 Repeat step 2 to attach the remaining bracket to the other side of the switch 9 9R 1 3 5 7 2 4 6 8 TERMINAL PORT 10 100 1000 Base T SFP UPLINK PORT RS 232 831 ...

Page 39: ...onnect electric power to the product before connecting or disconnecting the LAN cables E1 Warning Do not work on equipment or cables during periods of lightning activity E2 Warning Power cord is used as a disconnection device To de energize equipment disconnect the power cord E3 Warning Class I Equipment This equipment must be earthed The power plug must be connected to a properly wired earth grou...

Page 40: ... created due to uneven mechanical loading E25 If installed in a closed or multi unit rack assembly the operating ambient temperature of the rack environment may be greater than the room ambient temperature Therefore consideration should be given to installing the equipment in an environment compatible with the manufacturer s maximum rated ambient temperature Tmra E35 Caution Installation of the eq...

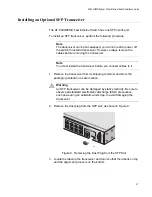
Page 41: ...onnect cables to it 1 Remove the transceiver from its shipping container and store the packaging material in a safe location Warning An SFP transceiver can be damaged by static electricity Be sure to observe all standard electrostatic discharge ESD precautions such as wearing an antistatic wrist strap to avoid damaging the transceiver 2 Remove the dust plug from the SFP slot as shown in Figure 9 F...

Page 42: ... dust sensitive When a fiber optic cable is not installed or when you store the SFP always keep the plug in the optical bores When you do remove the plug keep it for future use Note Unnecessary removal and insertion of an SFP can lead to premature failure For information about cabling for the SFP consult the documentation that was shipped with the SFP 9 9R 1 3 5 7 2 4 6 8 TERMINAL PORT 10 100 1000...

Page 43: ... the connector should lock the connector into place The ports on the switch are auto MDI MDI X You can use either a straight through or crossover twisted pair cable to connect any type of network device to a port on the switch The network should not contain data loops which can adversely affect network performance A data loop exists when two or more network devices can communicate with each other ...

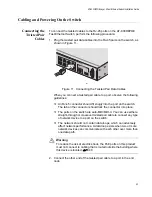
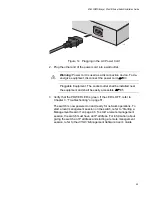
Page 44: ...fiber optic cable to the SFP port as shown in Figure 13 Figure 13 Connecting the Fiber Optic Cable Powering On the Switch To power on the switch perform the following procedure 1 Plug the power cord into the AC power connector on the back of the switch as shown in Figure 14 9 9R 1 3 5 7 2 4 6 8 TERMINAL PORT 10 100 1000 Base T SFP UPLINK PORT RS 232 826 Warning Class 1 laser product L1 Do not star...

Page 45: ...anagement session on the switch refer to Starting a Management Session on page 46 To start a remote management session the switch must have an IP address For information about giving the switch an IP address and starting a remote management session refer to the AT S81 Management Software User s Guide Warning Power cord is used as a disconnection device To de energize equipment disconnect the power...

Page 46: ...ent session on an AT 8000 8POE Fast Ethernet Switch perform the following procedure 1 Connect one end of the management cable to the console port on the switch as shown in Figure 15 Figure 15 Connecting the Console Cable 2 Connect the other end of the cable to the RS 232 port on a terminal or PC with a terminal emulator program 3 Configure the terminal or terminal emulator program as follows Baud ...

Page 47: ...r detailed information about configuring the AT 8000 8POE Fast Ethernet Switch refer to the AT S81 Management Software User s Guide AT 8000 8POE Management System Version Local Console Allied Telesyn International Corp Copyright 2007 Login Menu Login AT 8000 8POE Local Management System Enter the character in square brackets to select option Main Menu G eneral Information B asic Switch Configurati...

Page 48: ...er management session perform the following procedure 1 Start your web browser Note If your PC with the web browser is connected directly to the switch to be managed or is on the same side of a firewall as the switch you must configure your browser s network options not to use proxies Consult your web browser s documentation on how to configure the switch s web browser to not use proxies 2 In the ...

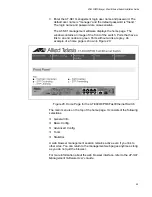
Page 49: ...end node are green Ports without a link are grey An example of a home page is shown in Figure 20 Figure 20 Home Page for the AT 8000 8POE Fast Ethernet Switch The main menu is on the top of the home page It consists of the following selections General Info Basic Config Advanced Config Tools Statistics A web browser management session remains active even if you link to other sites You can return to...

Page 50: ...r more appropriate coverage the others The AT 8000 8POE Fast Ethernet switch has a limited warranty of Lifetime 24 months Fan PSU All Allied Telesis warranties are subject to and provided only on the terms and conditions set out in the Allied Telesis Limited Warranties listed on the Allied Telesis website at http alliedtelesis com support warranty ...

Page 51: ... cord Verify that the voltage from the power source is within the required levels for your region Verify that the LINK ACT LED for each port is ON If a LINK ACT LED is OFF do the following Verify that the end node connected to the port is powered on and is operating properly Verify that the twisted pair cable is securely connected to the port on the switch and to the port on the end node Ensure th...

Page 52: ...e evaluate the overall power requirements of all the powered devices connected to the switch to assure that the overall power budge is not exceeded This may mean that more than one switch is required to supply the PoE power required by the PoE powered devices on the network If the PoE LED is off then do the following Verify that the twisted pair cable is securely connected to the port on the switc...

Page 53: ... Temperature 20 C to 70 C 4 F to 158 F Operating Humidity 10 to 90 non condensing Storage Humidity 5 to 95 non condensing Operating Altitude Range Up to 3 000 m 9 843 ft Power Specifications AC Voltage Frequency Requirements 100 240 VAC 50 60 Hz AC Input Power Consumption 135 W maximum Available Power over Ethernet 95 W 48 VDC IEEE 802 3af Class 3 15 4 W Max 6 ports IEEE 802 3af Class 2 7 3 W Max ...

Page 54: ...dix A Technical Specifications 54 Safety and Electromagnetic Emissions Certifications EMI RFI FCC Class A EN55022 Class A CISPR Class A Immunity EN55024 Electrical Safety EN60950 TUV UL60950 cULus C TICK CE ...

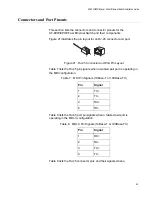
Page 55: ... Figure 21 RJ 45 Connector and Port Pin Layout Table 7 lists the RJ 45 pin signals when a twisted pair port is operating in the MDI configuration Table 8 lists the RJ 45 port pin signals when a twisted pair port is operating in the MDI X configuration Table 9 lists the RJ 45 connector pins and their signals when a Table 7 MDI Pin Signals 10Base T or 100Base TX Pin Signal 1 TX 2 TX 3 RX 6 RX Table ...

Page 56: ...ifications 56 1000Base T port is operating at 1000 Mbps Table 9 RJ 45 1000Base T Connector Pinouts Pin Pair Signal 1 1 TX and RX 2 1 TX and RX 3 2 TX and RX 4 3 TX and RX 5 3 TX and RX 6 2 TX and RX 7 4 TX and RX 8 4 TX and RX ...

Reviews: