Chapter 2: Installation
36
Installing a Switch in a Rack
To install the AT-9000/24 Gigabit Ethernet Switch in a rack, perform the
following procedure:
1. If attached, remove the rubber feet using a flat-head screwdriver.
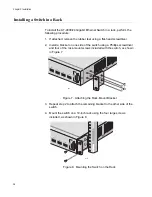
2. Install a bracket on one side of the switch using a Phillips screwdriver
and four of the rack-mount screws included with the switch, as shown
in Figure 7.
Figure 7. Attaching the Rack-Mount Bracket
3. Repeat step 2 to attach the remaining bracket to the other side of the
switch.
4. Mount the switch on a 19-inch rack using the four large screws
included, as shown in Figure 8
Figure 8. Mounting the Switch on the Rack
804
805
Summary of Contents for AT-9000/24
Page 1: ...613 000239 Rev A Layer 2 Gigabit Ethernet Switch AT 9000 24 Installation Guide...
Page 6: ...Contents 6 Appendix B Translated Safety Statements 53...
Page 8: ...Figures 8...
Page 10: ...Tables 10...
Page 28: ...Chapter 1 Overview 28...
Page 46: ...Chapter 2 Installation 46...
Page 48: ...Chapter 3 Troubleshooting 48...
Page 52: ...Appendix A Technical Specifications 52...
Page 74: ...Appendix B Translated Safety Statements 74 1 1 2 3 LAN 4 5 6 I 7 8 9 40 C 10 11 15 LAN OFF 12...


