AT-S63 Management Software Menus User’s Guide
Section II: Advanced Operations
233
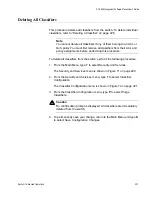
The Create ACL menu is shown in Figure 79.
Figure 79. Create ACL Menu
4. Type
1
to select ACL ID and, when prompted, enter an ID number for
the ACL. Every ACL on the switch must have a unique ID number. The
range is 0 to 255. The default is the lowest unused number. This
parameter is required.
5. Type
2
to select Description and enter a description for the ACL. A
description can be up to 31 alphanumeric characters. Spaces are
allowed. This parameter is optional, though recommended. Assigning
the ACLs different names will make it easier for you to identify them.
6. Type
3
to select Action.
The following prompt is displayed:
Enter Value [0 - Deny, 1 - Permit] : [0 to 1] -> 0
7. Type
0
if you want the ACL to discard ingress packets that meet the
criteria in the classifiers to be assigned to the ACL or
1
if the packets
are to be accepted. The default setting is Deny.
8. Type
4
to select Classifier List from the Create ACL menu and, when
prompted, enter the classifiers to be assigned to the ACL. The prompt
includes the ID numbers of the classifiers on the switch. You can
assign more than one classifier to an ACL. Separate multiple
classifiers with a comma (for example, 4,7,2). The order in which you
specify the classifiers is not important.
When entering classifiers, keep in mind the action that you specified
for this ACL in step 7. The action and the traffic flows defined by the
classifiers should correspond. For instance, an ACL with an action of
permit should be assigned those classifiers that define the traffic flow
you want the ports to accept.
Allied Telesis AT-9424T/SP - AT-S63
Marketing
User: Manager
11:20:02 02-Mar-2005
Create ACL
1 - ACL ID ........... 0
2 - Description .......
3 - Action ............ Deny
4 - Classifier List ...
5 - Port List .........
C - Create ACL
R - Return to Previous Menu
Enter your selection?
Summary of Contents for AT-9400
Page 16: ...Figures 16 ...
Page 18: ...Tables 18 ...
Page 28: ...Preface 28 ...
Page 30: ...30 Section I Basic Operations ...
Page 60: ...Chapter 1 Basic Switch Parameters 60 Section I Basic Operations ...
Page 64: ...Chapter 2 Port Parameters 64 Section I Basic Operations Port Type The port type ...
Page 84: ...Chapter 2 Port Parameters 84 Section I Basic Operations ...
Page 124: ...Chapter 6 Static Port Trunks 124 Section I Basic Operations ...
Page 144: ...144 Section II Advanced Operations ...
Page 196: ...Chapter 10 File Downloads and Uploads 196 Section II Advanced Operations ...
Page 218: ...Chapter 11 Event Logs and the Syslog Client 218 Section II Advanced Operations ...
Page 242: ...Chapter 13 Access Control Lists 242 Section II Advanced Operations ...
Page 294: ...294 Section III IGMP Snooping MLD Snooping and RRP Snooping ...
Page 314: ...Chapter 19 MLD Snooping 314 Section III IGMP Snooping MLD Snooping and RRP Snooping ...
Page 318: ...318 Section IV SNMPv3 ...
Page 416: ...Chapter 21 SNMPv3 416 Section IV SNMPv3 ...
Page 418: ...418 Section V Spanning Tree Protocols ...
Page 470: ...470 Section VI Virtual LANs ...
Page 520: ...Chapter 26 Multiple VLAN Modes 520 Section VI Virtual LANs ...
Page 532: ...Chapter 27 Protected Ports VLANs 532 Section VI Virtual LANs ...
Page 546: ...546 Section VII Internet Protocol Routing ...
Page 560: ...560 Section VIII Port Security ...
Page 568: ...Chapter 30 MAC Address based Port Security 568 Section VIII Port Security ...
Page 586: ...Chapter 31 802 1x Port based Network Access Control 586 Section VIII Port Security ...
Page 588: ...588 Section IX Management Security ...
Page 610: ...Chapter 33 Encryption Keys 610 Section IX Management Security ...
Page 650: ...Chapter 36 TACACS and RADIUS Protocols 650 Section IX Management Security ...
Page 660: ...Chapter 37 Management Access Control List 660 Section IX Management Security ...
Page 668: ...Index 668 ...


