Chapter 4: Installing the Chassis
92
Figure 44. On/Off Switch on the AT-SBxPWRSYS1-80 DC Power Supply
4. With a #2 Phillips-head screwdriver, loosen the handle locking screw
on the power supply, as shown in Figure 45.
Figure 45. Loosening the Handle locking Screw on the AT-
SBxPWRSYS1-80 DC Power Supply
5. Lift the handle on the AT-SBxPWRSYS1-80 DC Power Supply. Refer
On/Off
Switch
Summary of Contents for AT-FAN08
Page 10: ...Figures 10...
Page 12: ...Tables 12...
Page 16: ...Preface 16...
Page 38: ...Chapter 1 Overview 38...
Page 60: ...Chapter 2 Virtual Chassis Stacking 60...
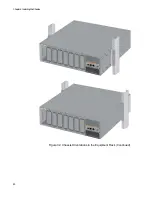
Page 82: ...Chapter 4 Installing the Chassis 82 Figure 34 Example of Adjusting the Equipment Rack Brackets...
Page 104: ...Chapter 4 Installing the Chassis 104...
Page 140: ...Chapter 5 Powering On the Chassis 140...
Page 166: ...Chapter 7 Cabling the AT XEM2 Line Card Ports 166...


