AT-SBx908 GEN2 Installation Guide for Virtual Chassis Stacking
175
3. Do one of the following:
If you want to change the priority values of the switches, go to
“Setting the Priority Numbers” on page 175. The procedure is
optional.
Otherwise, the installation is complete. For further instructions,
refer to Software Reference for SwitchBlade x908 GEN2 Series
Switches.
Setting the
Priority Numbers
This procedure is optional. It explains how to configure the priority settings
of the switches. The switches use the priority settings to select the master
switch when you reset or powered the stack. For background information,
refer to “Master and Member Switches” on page 55.
This procedure assumes you are continuing directly on from the previous
procedure. To set the priority values of the switches, perform the following
procedure:
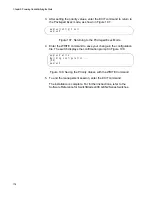
1. Use the CONFIGURE TERMINAL command to move from the
Privileged Exec mode to the Global Configuration mode. Refer to
Figure 106.
Figure 106. Moving to the Global Configuration Mode with the
CONFIGURE TERMINAL Command
2. Use the STACK PRIORITY command to set the priority numbers. The
command has this format:
stack
ID_number
priority
priority
The ID_NUMBER parameter is the ID number of the switch whose
priority value you are setting. The range is 1 to 4. The PRIORITY
parameter is the new priority value for the switch. The range is 0 to
255. The default is 128.
Here are a couple examples. To assign the priority value 1 to the
switch with the ID number 1, you enter this command:
awplus(config)# stack 1 priority 1
To set the priority value to 2 on the switch with the ID number 2, you
enter:
awplus(config)# stack 2 priority 2
awplus# configure terminal
Enter configuration commands, one per line. End with CNTL/Z.
awplus(config)#
Summary of Contents for AT-FAN08
Page 10: ...Figures 10...
Page 12: ...Tables 12...
Page 16: ...Preface 16...
Page 38: ...Chapter 1 Overview 38...
Page 60: ...Chapter 2 Virtual Chassis Stacking 60...
Page 82: ...Chapter 4 Installing the Chassis 82 Figure 34 Example of Adjusting the Equipment Rack Brackets...
Page 104: ...Chapter 4 Installing the Chassis 104...
Page 140: ...Chapter 5 Powering On the Chassis 140...
Page 166: ...Chapter 7 Cabling the AT XEM2 Line Card Ports 166...


