AT-x230L-17GT and AT-x230L-26GT Switch Installation Guide
49
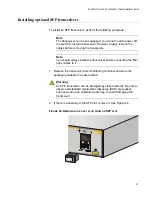
6. Eject SFP transceivers, as shown in Figure 27. First lower the SFP
transceiver handle, then gently remove the SFP transceiver.
F
IGURE
27. E
JECTING
AN
SFP
TRANSCEIVER
AFTER
LOWERING
THE
SFP
HANDLE
TO
THE
DOWNWARDS
POSITION
SFP
7. Repeat steps 2 through 6 to install an additional SFP transceiver.
Note
SFP transceivers are dust sensitive. Always keep the plug in the
optical bores when a fiber optic cable is not installed, or when storing
the SFP. When you do remove the plug, keep it for future use.
Note
Unnecessary removal and insertion of an SFP transceiver can lead
to premature failure.
For information on the cable specifications of the SFP, consult the
documentation shipped with the SFP.
8. Go to “Cabling the switch” on page 39.
Summary of Contents for AT-x230L-17GT
Page 8: ...vi ...
Page 10: ...viii ...
Page 60: ...Chapter 2 Installation 50 ...
Page 64: ...Chapter 3 Troubleshooting 54 ...


