Chapter 9: Installing the Switch in the RKMT-SL01 Sliding Rack
178
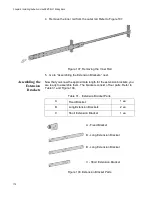
4. Remove the inner rail from the outer rail. Refer to Figure 107.
Figure 107. Removing the Inner Rail
5. Go to “Assembling the Extension Brackets,” next.
Assembling the
Extension
Brackets
Now that you know the approximate length for the extension brackets, you
are ready to assemble them. The brackets consist of four parts. Refer to
Table 31 and Figure 108.
Figure 108. Extension Bracket Parts
Table 31. Extension Bracket Parts
A
Fixed Bracket
1 ea
B
Long Extension Brackets
2 ea
C
Short Extension Bracket
1 ea
A - Fixed Bracket
B - Long Extension Bracket
B - Long Extension Bracket
C - Short Extension Bracket
Summary of Contents for x950 Series
Page 12: ...Figures 12 ...
Page 18: ...Preface 18 ...
Page 50: ...Chapter 1 Overview 50 ...
Page 70: ...Chapter 2 XEM2 Ethernet Line Cards 70 ...
Page 134: ...Chapter 5 Installing Power Supplies and Optional XEM2 Line Card 134 ...
Page 146: ...Chapter 7 Installing the Switch in an Equipment Rack 146 ...
Page 162: ...Chapter 8 Installing the Switch on a Wall 162 ...
Page 224: ...Chapter 12 Powering On and Verifying the Stack 224 ...
Page 256: ...Chapter 14 Replacing Modules 256 ...


