x950 Series Installation Guide for VCStack
213
5
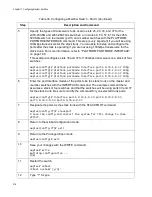
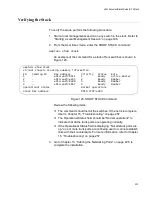
Display the version number of the AlliedWare Plus operating software on the switch
by entering the SHOW VERSION command. Write down the version number in the
worksheet in “Stacking Worksheet” on page 93. After viewing the version numbers on
all the switches, you will compare them to confirm they all have the same version.
Switches with different versions will have to be updated.
awplus# show version
6
Move to the Global Configuration mode with the CONFIGURE TERMINAL command.
awplus# configure terminal
Enter configuration commands, one per line. End with CNTL/Z.
7
Activate VCStack on the switch with the STACK ENABLE command.
awplus(config)# stack enable
% Automatically enabling ‘stack virtual-mac’ to minimize disruption
form failovers.
% Please check that the new MAC 0000.cd37.0431 is unique within the
network.
% Save the config and restart the system for this change to take
effect.
8
Assign a unique ID number in the range of 2 to 4 to the member switch with the
STACK RENUMBER command. This example assigns the ID number 2 to the switch.
awplus(config)# stack 1 renumber 2
% Warning: Stacking is currently disabled.
% Warning: the new ID will not become effective until the stack-
member reboots.
% Warning: the boot configuration may now be invalid.
9
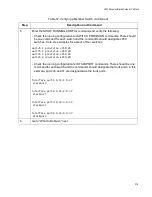
Add the other member switches as provisioned switches to the member switch, with
the SWITCH PROVISION command, assigning them their unique IDs in the range of
2 to 4. This example adds two provisioned switches, with the IDs 3 and 4:
awplus(config)# switch 3 provision x950-28
awplus(config)# switch 4 provision x950-28
10
Return to the Privileged Exec mode.
awplus(config)# exit
11
Enter the WRITE command to save your change. If this is the first management
session, the switch adds the configuration file DEFAULT.CFG to flash memory, for
storing your configuration changes.
awplus# write
Building configuration ...
[OK]
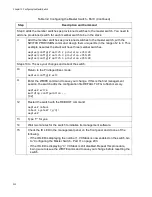
Table 35. Configuring a Member Switch - Part I (Continued)
Step
Description and Command
Summary of Contents for x950 Series
Page 12: ...Figures 12 ...
Page 18: ...Preface 18 ...
Page 50: ...Chapter 1 Overview 50 ...
Page 70: ...Chapter 2 XEM2 Ethernet Line Cards 70 ...
Page 134: ...Chapter 5 Installing Power Supplies and Optional XEM2 Line Card 134 ...
Page 146: ...Chapter 7 Installing the Switch in an Equipment Rack 146 ...
Page 162: ...Chapter 8 Installing the Switch on a Wall 162 ...
Page 224: ...Chapter 12 Powering On and Verifying the Stack 224 ...
Page 256: ...Chapter 14 Replacing Modules 256 ...


