Chapter 10: Configuring the Master Switch
198
General Steps for the Master Switch
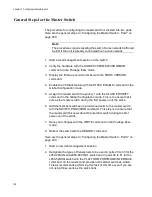
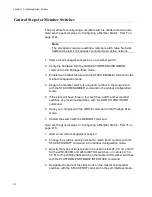
The procedure for configuring the master switch is divided into two parts.
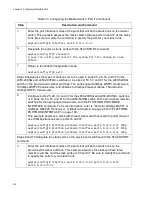
Here are the general steps to “Configuring the Master Switch - Part I” on
Note
The procedures require reseting the switch. Some network traffic will
be lost if the unit is already connected to an active network.
1. Start a local management session on the switch.
2. Verify the hardware with the SHOW SYSTEM ENVIRONMENT
command in the Privilege Exec mode.
3. Display the firmware version number with the SHOW VERSION
command.
4. Enable the VCStack feature with the STACK ENABLE command in the
Global Configuration mode.
5. Assign the master switch the priority 1 with the STACK PRIORITY
command in the Global Configuration mode. This is to ensure that it
acts as the master switch during the first power-on of the stack.
6. Add the member switches as provisioned units to the master switch,
with the SWITCH PROVISION command. This step is to ensure that
the master switch knows about the member switch during the first
power-on of the stack.
7. Save your changes with the WRITE command in the Privilege Exec
mode.
8. Reboot the switch with the REBOOT command.
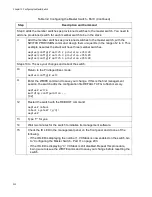
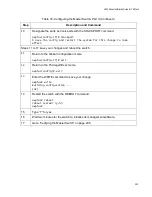
Here are the general steps to “Configuring the Master Switch - Part II” on
1. Start a new local management session.
2. Designate the types of transceivers to be used in ports 25 to 37 for the
x950-28XSQ and x950-28XTQm switch and in ports 49 to 61 for the
x950-52XSQ switch with the PLATFORM PORTMODE INTERFACE
command, on the master and provisioned member switches. Allied
Telesis recommends performing this task at this time even if you are
not using those ports as the stack trunk.
Summary of Contents for x950 Series
Page 12: ...Figures 12 ...
Page 18: ...Preface 18 ...
Page 50: ...Chapter 1 Overview 50 ...
Page 70: ...Chapter 2 XEM2 Ethernet Line Cards 70 ...
Page 134: ...Chapter 5 Installing Power Supplies and Optional XEM2 Line Card 134 ...
Page 146: ...Chapter 7 Installing the Switch in an Equipment Rack 146 ...
Page 162: ...Chapter 8 Installing the Switch on a Wall 162 ...
Page 224: ...Chapter 12 Powering On and Verifying the Stack 224 ...
Page 256: ...Chapter 14 Replacing Modules 256 ...


