Chapter 10: Configuring the Master Switch
200
Configuring the Master Switch - Part I
This section contains Part I for configuring the master switch for stacking.
In this procedure you do the following:
Verify the hardware status with the SHOW SYSTEM
ENVIRONMENT command.
Display the firmware version number with the SHOW VERSION
command.
Enable VCStack with the STACK ENABLE command.
Assign the master switch the priority 1 with the STACK PRIORITY
command in the Global Configuration mode.
Add the member switches as provisioned switches with the
SWITCH PROVISION command.
Save the configuration and reboot the switch with the WRITE and
REBOOT commands.
Allied Telesis recommends filling out the worksheet in “Stacking
Worksheet” on page 93 before performing this procedure.
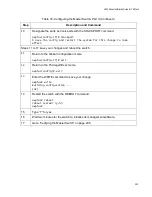
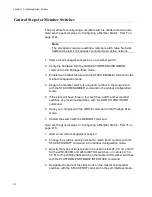
To configure the master switch, perform the procedure in Table 32.
Table 32. Configuring the Master Switch - Part I
Step
Description and Command
Steps 1 to 4 power on the switch, start a local management session, and verify the hardware
operations of the unit.
1
Power on the master switch and wait two minutes for it to initialize the management
software. Refer to “Powering On a Switch” on page 192.
2
Start a local management session. Refer to “Starting a Local Management Session”
3
Move to the Privileged Exec mode with the ENABLE command.
awplus> enable
Summary of Contents for x950 Series
Page 12: ...Figures 12 ...
Page 18: ...Preface 18 ...
Page 50: ...Chapter 1 Overview 50 ...
Page 70: ...Chapter 2 XEM2 Ethernet Line Cards 70 ...
Page 134: ...Chapter 5 Installing Power Supplies and Optional XEM2 Line Card 134 ...
Page 146: ...Chapter 7 Installing the Switch in an Equipment Rack 146 ...
Page 162: ...Chapter 8 Installing the Switch on a Wall 162 ...
Page 224: ...Chapter 12 Powering On and Verifying the Stack 224 ...
Page 256: ...Chapter 14 Replacing Modules 256 ...


