x950 Series Installation Guide for VCStack
215
Configuring a Member Switch - Part II
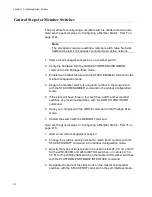
This section contains the second part to configuring member switches.
The steps show how to configure the following parameters:
Set the priority number of the switch to match its ID number, with
the STACK PRIORITY command.
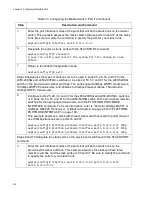
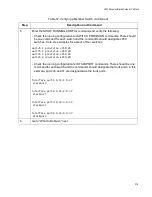
Specify the types of transceivers to be used in slots 25, 29, 33, and
37 for the x950-28XSQ and x950-28XTQm switches, or in slots 49,
53, 57, 61 for the x950-52XSQ switch on the master and member
switches with the PLATFORM PORTMODE INTERFACE
command.
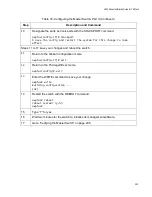
Designate the ports of the stack trunk with the STACKPORT
command. Refer to “Stack Trunks” on page 74.
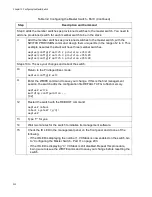
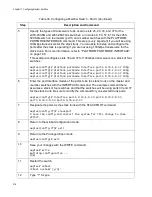
To configure a member switch, perform the procedure in Table 36.
Table 36. Configuring a Member Switch - Part II
Step
Description and Command
1
Start a new local management session on the member switch. Refer to “Starting a
Local Management Session” on page 196.
2
Enter the ENABLE command to move from the User Exec mode to the Privileged
Exec mode.
awplus> enable
3
Move to the Global Configuration mode with the CONFIGURE TERMINAL command.
awplus# configure terminal
Enter configuration commands, one per line. End with CNTL/Z.
4
Change the switch’s priority to match its ID number, with the STACK PRIORITY
command. This example sets priority to 2 on a member switch with the ID 2:
awplus(config)# stack 2 priority 2
Summary of Contents for x950 Series
Page 12: ...Figures 12 ...
Page 18: ...Preface 18 ...
Page 50: ...Chapter 1 Overview 50 ...
Page 70: ...Chapter 2 XEM2 Ethernet Line Cards 70 ...
Page 134: ...Chapter 5 Installing Power Supplies and Optional XEM2 Line Card 134 ...
Page 146: ...Chapter 7 Installing the Switch in an Equipment Rack 146 ...
Page 162: ...Chapter 8 Installing the Switch on a Wall 162 ...
Page 224: ...Chapter 12 Powering On and Verifying the Stack 224 ...
Page 256: ...Chapter 14 Replacing Modules 256 ...


