background image

Not for 

Reproduction

 5


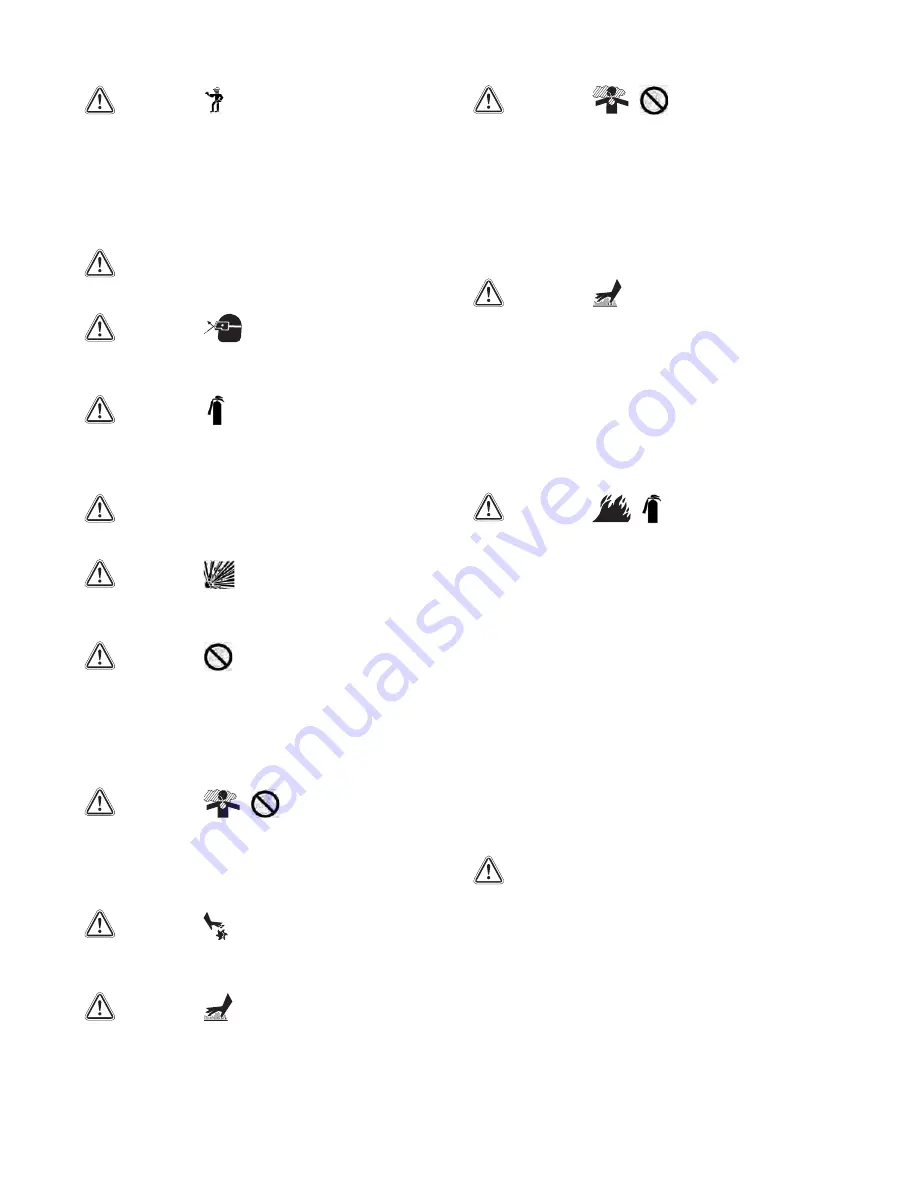
WARNING  


When operating machine, do 

not wear:

•  Loose clothes

•  Clothes with unbuttoned sleeves

•  Hanging tie or scarf

•  Accessories such as dangling jewelry

•  Such items could be caught in rotating parts of 

machine, and could result in death or serious injury.


WARNING  

Do not operate machine when 

tired or under influence of drugs or alcohol. Careless 

operation could result in death or serious injury.


WARNING  


Wear appropriate personal 

protective equipment (PPE), such as a helmet, safety 

glasses, earplugs, safety shoes, gloves, and a dust 

mask.


WARNING  


Have first-aid boxes and fire 

extinguishers near machine in case of emergency 

such as injury and fires. It is also advisable to have a 

list of phone numbers of doctors, ambulance and fire 

department available in case of emergency.


WARNING 

 To prevent injury, tools, cables, 

hoods, covers and other unnecessary items should be 

cleaned and removed from machine before operation.


WARNING  


Do not open oil filler cap of 

separator receiver tank during or immediately after 

operation.  Explosive pressure could cause death or 

serious injury.


WARNING  


Do not open fluid drain valves 

or plugs during operation.  this includes:

•  Separator receiver tank drain valve

•  Coolant drain valve and plug

•  Engine oil drain valve

•  Oil cooler drain valve

•  Fuel tank drain valve and plug


WARNING  


Never direct 

compressed air at people, pets or foods:

•  Never blow compressed air directly at people. Dirt, 

dust, oil or foreign objects in compressed air could 

cause serious injury to eyes and skin. 

•  Do not blow compressed air on food.


WARNING  


Contact with rotating parts 

or belts could cause death or serious injury. Keep 

hands from rotating parts and belts while machine is in 

operation.


WARNING  


Do not open radiator cap 

during or immediately after operation. Explosive 

pressure of hot liquid could cause severe burns, 

resulting in death or serious injury.


WARNING  


 Operation with 

compressed air supply port opened is prohibited:

•  Do not operate machine with service valves and/

or relief valve open, unless piping and/or hose is 

connected. Uncontrolled pressurized air could cause 

death or serious injury.

•  If machine must be temporarily operated with port 

open, be sure to mount a silencer to reduce noise, 

and wear personal protective equipment such as 

earplugs to protect hearing.


WARNING  


Do not touch hot parts.

•  Never work nearby hot portions of the machine while 

it is running.

•  Parts such as engine, exhaust manifold, exhaust 

pipe, muffler, radiator, oil cooler, air-end, pipe, 

separator receiver tank, and discharging pipe are 

especially hot. Never touch these parts, as it could 

result in serious burns.

•  Compressor oil, coolant water, and engine oil are also 

very hot and dangerous to touch. Do not check or 

add while machine is running.


WARNING  


Fire prevention.

•  Fuel and oils are extremely flammable. Do not 

bring lit cigarettes or matches near machine when 

checking or adding fuel and oils.

•  Adding fuel and oils should be done outdoors or in a 

well-ventilated location.

•  Refuel after stopping engine, and never leave 

fuel near machine. Do not spill. If spilled, wipe up 

completely.

•  Do not fill fuel oil up to cap level. Fuel oil will overflow 

due to volume expansion caused by rise of ambient 

temperature. Fuel can also spill during machine 

movement or transporting.

•  Parts such as muffler and exhaust pipe can be 

extremely hot. Remove twigs, dried leaves, dried 

grass, waste paper, etc. from around muffler and 

exhaust pipe.

•  Keep a fire extinguisher available by machine in case 

of fire.


WARNING  

Hang a “Now Checking and under 

Maintenance” tag:

•  Remove starter key from starter switch before 

starting inspection, and hang up a “Now Checking 

and under Maintenance” tag where it can be easily 

seen. Inspector must keep key during checking and 

maintenance.

•  Remove black negative (–) cable from battery.

•  Neglecting above procedure could result in death or 

serious injury.

Summary of Contents for 185 CFM

Page 1: ...N o t f o r R e p r o d u c t i o n Copyright 2016 Allmand Bros Inc Holdrege NE USA All rights reserved 111075USCN Rev A 185 CFM Towable Compressor Operator s Manual ...

Page 2: ...ns thoroughly before attempting to start or operate this equipment Save these original instructions for future reference Where to Find Us If you have any questions about the machine contact your authorized dealer You can also contact Allmand Customer Service by phone at 800 562 1373 or on the Internet at allmand com Knowing the model number of your Allmand Air Compressor will make it easy to order...

Page 3: ... 3 Table of Contents Operator Safety 4 Features and Controls 9 Transporting and Set Up 12 Operation 13 Maintenance 23 Storage 31 Troubleshooting 32 Specifications 36 Wiring Diagram 39 Piping Diagram 40 Operation Log 42 Noise Emission 44 ...

Page 4: ...from this machine contains poisonous materials Never use compressed air for human respiration Breathing compressed air could result in death or serious injury This machine is not designed to provide air for working inside wells or tunnels Doing so could result in death or serious injury WARNING VENTILATION Exhaust gas from the engine is poisonous and could cause death when inhaled Avoid using the ...

Page 5: ...cause severe burns resulting in death or serious injury WARNING Operation with compressed air supply port opened is prohibited Do not operate machine with service valves and or relief valve open unless piping and or hose is connected Uncontrolled pressurized air could cause death or serious injury If machine must be temporarily operated with port open be sure to mount a silencer to reduce noise an...

Page 6: ...ate work area Working without illumination could result in death or serious injury Work lighting should be fitted with safety guard to protect against breakage Do not allow work light to contact fuel or oils as they could ignite causing death or serious injury WARNING Opening coolant water drain valve cap Stop engine and let coolant water sufficiently cool down before draining If drain valve is op...

Page 7: ...ual pressure still left can cause serious injury 800xxx CAUTION Prevent Burning Accident Do not open radiator cap while it is still hot 800xxx CAUTION Prevent Burning Accident When work is required near hot parts wait for the parts to cool down fully before starting work 800xxx WARNING Beware of High Pressure Air Blow Out Oil supply and or maintenance jobs with residual pressure left in tank are v...

Page 8: ...N o t f o r R e p r o d u c t i o n 8 ALLMAND COM L B C F A K G E D J H I N M ...

Page 9: ...ter from fuel G Engine Air Filter Filters engine air H Engine Oil Filler Port Location for adding engine oil to engine I Fuel Filter Filters impurities from fuel J Air bleeding electromagnetic pump Filters impurities from fuel K Bypass Valve Maintains compressor oil temperature L Oil Cooler Cools compressor oil circulating in system M Oil Cooler Drain Valve Drains compressor oil from oil cooler an...

Page 10: ...t up F Compressor Oil Filter Filters impurities from compressor oil G Separator receiver tank Filters impurities in fuel oil and separates water from fuel H Safety Valve Releases compressed air to atmosphere when rated pressure is exceeded I Compressor air end Compresses air J Battery Supplies power to start engine K Radiator Drain Valve Drains engine coolant L DPF Diesel Particulate Filter Remove...

Page 11: ...s pushed while lamp is blinking it displays error code When starter switch is turned to STOP display screen resets See Troubleshooting for details of the blinking state warning and the illumination state trouble of failure codes B Auto Idle Switch The switch is used for minimizing fuel consumption at no load operation It functions when the lamp goes on C Digital Monitor When power is supplied revo...

Page 12: ...nt rolling Do not park on a slope exceeding 15 Be sure to place wheel chocks A against the front and back of each wheel Transporting WARNING When loading and unloading the unit be sure to use the lifting bail B located at the top center of the unit Never get under the unit when lifted Never lift the unit while in operation If the unit is transferred by truck fasten it by ropes at the front eye and...

Page 13: ... use of CJ 4 class engine oil or superior class for best performance Using poor quality engine oil may shorten the life of the engine Outdoor temperatures determine the proper oil viscosity for the engine Use the chart to select the best viscosity for the outdoor temperature range expected Note When two ore more different brands of oil are mixed its performance can be deteriorated When it is expec...

Page 14: ...pressure in it and then gradually loosen the oil filler cap for refilling oil Should any residual pressure be left in the separator receiver tank hot compressed air and hot compressor oil jetting out could cause burning or serious injury to persons nearby 1 Place compressor on a flat level surface 2 After checking and confirming that the residual pressure in separator receiver tank is 0 psi 0 bar ...

Page 15: ...TICE Before starting operation make sure to check the level of residual fuel so that fuel shortage during operation can be avoided Drain condensate accumulated at the bottom of the fuel tank whenever necessary WARNING Fire Prevention Do not allow lit cigarettes or matches near fuel Fuel is extremely flammable and dangerous Handle with extreme care Refuel only after stopping engine and never leave ...

Page 16: ...it 5 Check piping of each part for any loose connections tears and leaks 6 Check each hose for tear and leaks 7 Clean debris from interior of unit Periodically check the inside of the unit for debris Any flammables such as chips of wood dead leaves and waste paper especially near the muffler and exhaust pipe should be removed WARNING Operation with compressed air supply port opened is prohibited D...

Page 17: ...an 2 minutes before starting next operation Failure to wait the designated time could cause the starter motor to overheat and could damage it If residual pressure is present in the separator receiver tank the residual pressure lamp C will illuminate and the starter will not rotate Make sure the residual pressure remains 0 psi 0 bar According to engine cooling water temperature the times in the tab...

Page 18: ...1034 and ASTEM D3306 Battery should always be fully charged Follow the designated regulations to dispose of LLC Antifreeze When it is difficult to start engine in cold weather complete the following steps 1 Fully close the service valves 2 Start engine by following steps 1 6 in Starting the Compressor CAUTION When operating the unit in a low temperature change engine oil compressor oil LLC and die...

Page 19: ... pressure rise and it closes unloader valve at the same time When compressor air end becomes vacuum during unload operation vacuum noise is caused To prevent this noise it opens vacuum relief valve by detection of secondary pressure of pressure regulator Thus high vacuum condition of compressor air end is prevented Purge Control Unload Opertion When the certain set time it can be changed has passe...

Page 20: ...n of air consumption Later the air consumption is reduced further the unloader valve gradually closes and intake negative pressure increases In this stage the pressure sensor detects the intake negative pressure Then when the intake negative pressure becomes higher than the set pressure the AUTO IDLE lamp flickers at short intervals Lamp flickers at short intervals When this condition continues fo...

Page 21: ...nfirm that there are no persons or flammables near by Exhaust gases could cause severe burns and could result in a fire During regeneration operation in closed spaces carefully monitor carbon monoxide levels to avoid carbon monoxide poisoning When regeneration control is begun and finished noise of engine air intake throttle and EGR opening width adjustment is sometimes caused This is normal The s...

Page 22: ...2 220 min 1 5 Manual regeneration operation is performed in about 30 minutes Note Time of regeneration varies upon the ambient temperature 6 When manual regeneration is completed all lamps turn off and both normal engine speed and normal operation resume If continuing operation for approximately ten hours without conducting manual regeneration once REGENERATION REQUIRED lamp A is lit machine will ...

Page 23: ...grease to trailer hub bearing Check drawbar hardware for proper tightness Every 1 000 Hours Check undercarriage bracket hardware for proper tightness Check wheel lug nuts for proper tightness Daily Check compressor oil level Drain separator receiver tank Check looseness in pipe connecting part and wear and tear of pipe Check oil water fuel and air leak Check functions of all instruments and device...

Page 24: ...nmar 129A00 55730 1 O Ring Element Side Yanmar 129A00 55740 1 Drain Plug With O Ring Yanmar 129242 53740 1 Oil Separator Element 34224 03000 1 O Ring 03502 15145 1 Pressure Regulator 36400 19000 1 Auto Relief Valve and Vacuum Relief Valve O Ring 1 21221 02100 2 O Ring 2 03402 25021 2 O Ring 3 03402 25008 2 Unloader Valve O Ring 1 03402 10125 2 O Ring 2 03402 10070 1 O Ring 3 21221 04800 1 O Ring 4...

Page 25: ... Adding Engine Oil in Operation Oil capacity approx 0 9 gal 3 4L 5 Check oil level Remove dipstick D wipe clean replace then remove Oil level should read between marks on lower end of dipstick E Add as needed A B C D E D Change Engine Oil Filter For part number see Replacement Parts 1 Remove old oil filter F using a filter wrench 2 Apply a light coating of oil on oil filter seal G 3 Install new oi...

Page 26: ...top surface of battery 2 If indicator shows that charge is needed recharge battery Charge Battery 1 Disconnect cables between battery and unit black negative cable first and charge battery A with a 12 volt battery charger B Do not charge two batteries at the same time 2 Be sure not to connect and terminals backwards 3 Read operation manual of battery charger before use B A Booster Cables To use bo...

Page 27: ...ange the oil completely at every scheduled interval Follow the designated regulations to dispose of compressor oil 1 After residual pressure is completely relieved from separator receiver tank remove oil filler cap F and open drain valve G to drain oil Then open drain valve of oil cooler to drain oil accumulated in bottom of oil cooler NOTE Warm oil drains more quickly 2 After compressor oil is co...

Page 28: ...with new 3 Clean interior of case J 4 Install filter element into case then install cap securing with latch H I J G F Clean Change Fuel Pre Filter Element For filter element part number see Replacement Parts Turn fuel selector valve A to OFF position Loosen drain valve B and drain out condensed water Turn cup C counterclockwise to remove Wipe out split fuel Remove float D inside cup Wash element E...

Page 29: ...fficiently cooled and the inner pressure is released take the cap off If this procedure is neglected the inner pressure can blow off the cap Steam jetting out of the radiator could result in causing scalding Follow this procedure under all circumstances LLC Antifreeze is a toxic material If swallowed seek immediate medical attention Do not induce vomiting If in eyes wash eyes with clean running wa...

Page 30: ... and sliding surface Use CALTEX MULTIFAK EP1 grease or equivalent Grease of poor quality will deteriorate the material Supply grease to O ring A B C D after replacement A B D C A Check Rubber Hose Contact your authorized dealer Change Radiator Hoses Contact your authorized dealer Check Replace Auto Relief Valve Vacuum Relief Valve Parts For part numbers see Replacement Parts When reassembling appl...

Page 31: ...heel Lug Nuts Tire Pressure Check tightness of wheel lug nuts B Tighten to 80 lb ft 108 Nm Also check tire pressure Adjust to 65 psi 4 5 bar B Storage Preparation for Long term Storage If the machine is left unused or not operated longer than six months Store in a clean dry place Avoid leaving machine outside Remove battery from machine if possible and store in a dry place Charge battery at least ...

Page 32: ... A3 Lamp comes on when air filter gets clogged and suction resistance increases above 6 2 kPa Clean or replace Eng Air Filter A4 Charge A5 Alternator not charging See Troubleshooting Chart Emergency Display Item Failure Code Indication Remedy Discharge Temp H E1 Lamp displays when air temperature at outlet of air end reaches 248 F 120 C See Troubleshooting Chart Water Temp H E2 Lamp displays when ...

Page 33: ...rain 6 Clean replace Revolution drops before discharge air pressure reaches 100 psi 6 9 bar 1 Pressure regulator needs adjustment 2 Pressure regulator issue 3 Unloader orifice clogged 1 Adjust 2 Contact authorized dealer 3 Check clean Engine does not reach minimum revolution at unload 1 Failure of engine controller 2 Failure of accelerator controller 1 Contact authorized dealer 2 Contact authorize...

Page 34: ...ed dealer Discharge temperature high engine stops 1 Oil cooler clogged 2 Oil filter clogged 3 Faulty discharge air temp switch 4 Belt slipping 5 Compressor oil level low 6 Loose or broken wire 7 Discharge air temp sensor disconnected 1 Change coolant 2 Replace 3 Contact authorized dealer 4 Contact authorized dealer 5 Add compressor oil 6 Connect contact authorized dealer 7 Contact authorized deale...

Page 35: ...N o t f o r R e p r o d u c t i o n 35 Data Adjustment Procedure ...

Page 36: ... Engine Model Yanmar 4TNV88C DHKS Type Water cooled 4 cycle direct injection No Cylinders Bore Stroke in mm 4 3 46 x 3 54 in 4 88 mm x 90 mm Total Displacement cu in L 133 6 2 189 Rated Output Gross kW min 1 35 5 3 000 Rated Output Net 34 0 3 000 Lubricating Oil Capacity gal L 0 9 3 1 Coolant Capacity including Radiator gal L 1 80 6 8 Battery 95D31 12V Fuel Tank Capacity gal L 24 90 General Specif...

Page 37: ...N o t f o r R e p r o d u c t i o n 37 ...

Page 38: ...N o t f o r R e p r o d u c t i o n 38 ALLMAND COM ...

Page 39: ...N o t f o r R e p r o d u c t i o n 39 Wiring Diagram ...

Page 40: ...N o t f o r R e p r o d u c t i o n 40 ALLMAND COM Piping Diagram Air Piping Compressor Oil Piping ...

Page 41: ...N o t f o r R e p r o d u c t i o n 41 Air Piping Compressor Oil Piping ...

Page 42: ...START TIME REMARKS INSPECTION PART CHANGE HISTORY ETC RATED RPM rpm min 1 DISCHARGE AIR PRESS PSI OPERATION LOG OPERATION DATE OPERATION TIME AMBIENT TEMP F ENG OIL REPLACEMENT HOUR h TOTAL OPERATION HOURS h COOLANT TEMP F DISCHARGE AIR TEMP F COMP OIL SUPPLY gal ...

Page 43: ...ART TIME OPERATION LOG OPERATION DATE OPERATION TIME AMBIENT TEMP ENG OIL REPLACEMENT HOUR h TOTAL OPERATION HOURS h COOLANT TEMP DISCHARGE AIR TEMP COMP OIL SUPPLY L REMARKS INSPECTION PART CHANGE HISTORY ETC RATED RPM rpm min 1 DISCHARGE AIR PRESS MPa ...

Page 44: ...rts thereof b the air intake system or parts thereof c enclosure or parts thereof 4 Removal of any of the following a fan shroud b vibration mounts c sound absorption material 5 Operation of the compressor with any of the enclosure doors open Compressor Noise Emission Control Information A The removal or rendering inoperative other than for the purpose of maintenance repair or replacement of any n...

Page 45: ... or system of the air compressor Defects in the design assembly or in any part component or system of the compressor which at the time of sale to the first retail purchaser caused noise emissions to exceed Federal Standards are covered by this warranty for the life of the air compressor Introduction The unit for which this Maintenance Log is provided conforms to U S E P A Regulations for Noise Emi...

Page 46: ...ecked and adjusted at this time to insure continuous seating between gasket or acoustic material and the mating frame F Air Intake and Engine Exhaust Engine and compressor air intake and engine exhaust systems should be inspected after each 100 hours of operation for loose damaged or deteriorated components Repairs or replacements should be made before the next period of use G Cooling Systems All ...

Page 47: ...N o t f o r R e p r o d u c t i o n 47 Maintenance Record For Noise Emission Control Item No Description Of Work Hourmeter Reading Maint Inspect Date Location City State Work Done By Name ...

Page 48: ...N o t f o r R e p r o d u c t i o n ...

Reviews: