


Español - 13 / 36
6-1622396 - rev. 3 - 21/09/2021
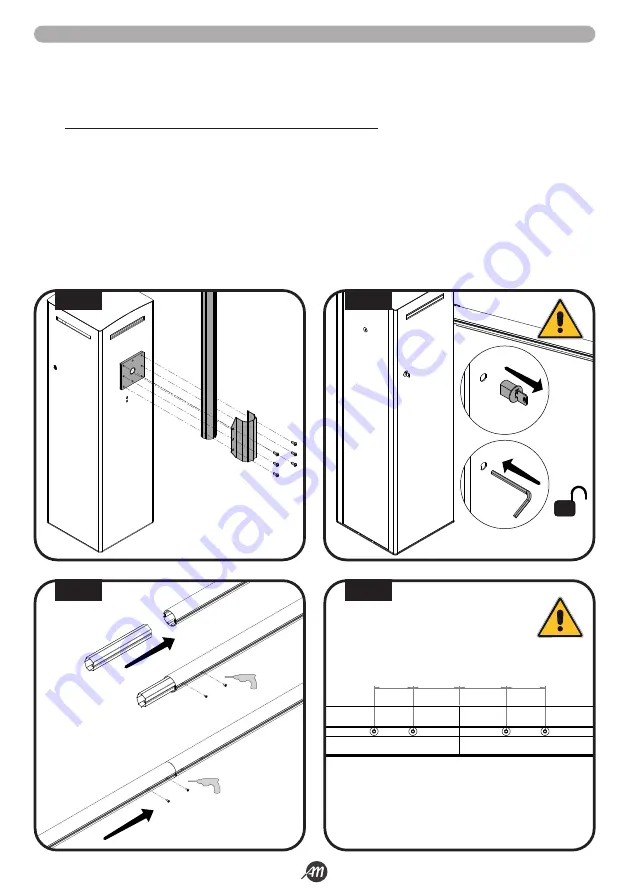
5.5 MONTAJE E INSTALACIÓN DE LA VARA
1.
Tome un trozo de vara de 2 (o 3) metros y colocar sobre un extremo la chapa modelada.
2.
Ajustar la chapa de fijación con la vara al cubo utilizando los tornillos suministrados, de modo que la vara resulte en posición
vertical y con los asientos para el caucho de protección dirigidos hacia la dirección del movimiento de la vara (Fig.21).
3.
Coloque la tapa (con las tiras LED pasantes, en caso de utilizar el KIT LUCES) en la parte inferior de la vara.
4.
Desbloquear el motor con la llave hexagonal incluida y colocar manualmente la vara en posición horizontal (Fig.22).
ATENCIÓN!
Esta operación trae el muelle vivo y podría ser muy peligroso.
5.
Cuando la vara esté en posición horizontal, bloquear el motor con la llave y, a continuación, soltar suavemente la vara. De-
pendiendo de la posición interna del motor, la vara puede levantarse ligeramente cuando se suelta.
6.
Insertar la mitad de la camisa de conexiones en la vara, si es necesario ayudarse con un martillo de goma (Fig.23-A).
7.
En la vara dos orificios de ø 5mm con el taladro en la ranura presente en la junta, como mínimo 50mm de distancia entre
ellos a partir de la cabeza de la vara (Fig.23-B).
8.
Hacer un agujero de ø 10mm en los agujeros recién hechos y fijar con dos tornillos en dotación la junta a la barra.
9.
Insertar en la junta el segundo trozo de vara de 2 (o 3) metros, si es necesario ayudarse con un martillo de goma.
10. Perforar en el segundo troquel dos orificios de ø 5mm con el taladro en la ranura de la junta, a una distancia mínima de 50
mm desde el comienzo de la vara (Fig.23-C).
11. Hacer un agujero de ø 10mm en los agujeros recién hechos y fijar con dos tornillos en dotación la junta a la barra.
A
B
C
2 x Ø 5mm
2 x Ø 5mm
60
50
60
50
FIG. 21
FIG. 22
FIG. 23
FIG. 24
Summary of Contents for 12007336
Page 15: ...Italiano 15 36 6 1622396 rev 3 21 09 2021 45 45 1 2 3 1 2 3 FIG 27 FIG 28...
Page 51: ...English 15 36 6 1622396 rev 3 21 09 2021 45 45 1 2 3 1 2 3 FIG 27 FIG 28...
Page 87: ...Fran ais 15 36 6 1622396 rev 3 21 09 2021 45 45 1 2 3 1 2 3 FIG 27 FIG 28...
Page 123: ...Espa ol 15 36 6 1622396 rev 3 21 09 2021 45 45 1 2 3 1 2 3 FIG 27 FIG 28...
Page 159: ...Nederlandse 15 36 6 1622396 rev 3 21 09 2021 45 45 1 2 3 1 2 3 FIG 27 FIG 28...


