background image

The All Pond Solutions AquaEco pump range can be used to circulate water or 
to pump to and from a separate filtration system or water features using 
suitable flexible hose (flexible hosing sold separately). It can only be used with 
freshwater and tropical set ups.

Please read the below instructions carefully before beginning to set up your 
pump. 

DO NOT CONNECT THE UNIT TO THE MAINS UNTIL SET UP IS 

COMPLETE AND UNIT IS FILLED WITH WATER.

1.


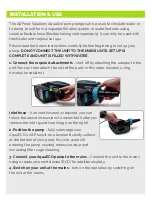
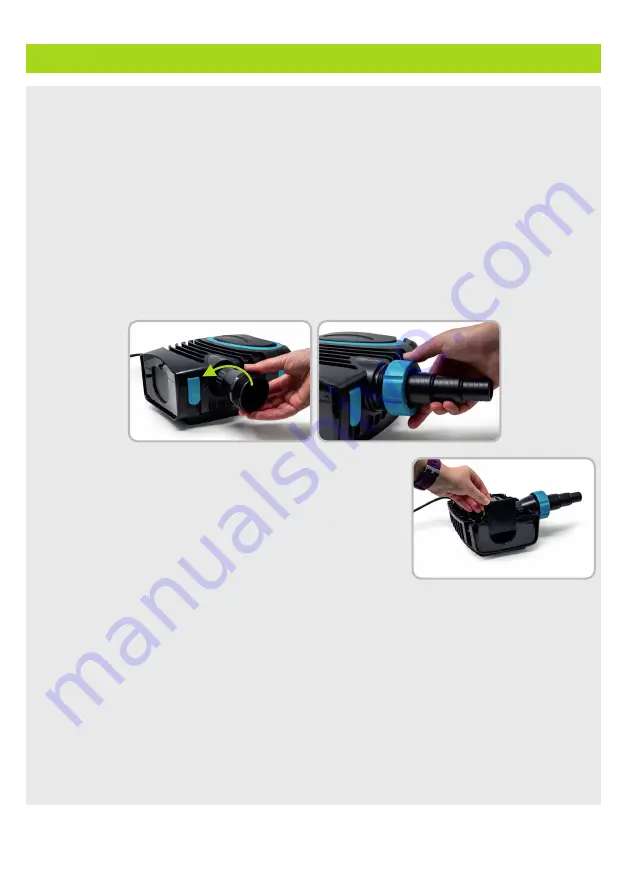
Connect the required attachments

 - start off by attaching the adaptor to the 

unit. You can then attach the rest of the parts in this order: hosetail o-ring, 
hosetail, hosetail nut.

INSTALLATION & USE

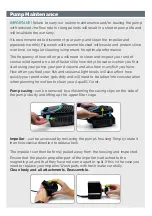
Inlet hose

 - if an inlet hosetail is required, you can 

follow the above instructions to assemble it after you 
remove the inlet guard (see image on the right). 

2. Position the pump

 - fully submerge your 

AquaECO unit. Place it on a level and sturdy surface 
at the bottom of your pond, this is to avoid silt 
entering the pump causing excessive wear and 
increasing filter cage cleaning.

3. Connect your AquaECO pump to the mains

 - Connect the unit to the mains 

using a residual current device (RCD) for additional safety.

4. Switch on your unit at the mains 

- turn on the operation by switching on 

the unit at the mains.

Summary of Contents for AqueECO 10000

Page 1: ...AqueECO POND PUMP 3000 4500 6000 8000 10000 12000 14000 16000 MULTI DIRECTIONAL OUTLET EASY MAINTENANCE CLIP RELEASE FILTER CAGE ENERGY SAVING...

Page 2: ...arded Never cut the cord Do not connect to any voltage other than that stated Do not place in liquids other than water Do not use with water above 90 F or 30 C Do not carry or pull the unit by its ele...

Page 3: ...unit Ensure it does not cause a trip hazard or it at risk from damage from lawn mowers strimmers or other garden equipment This is a submersible product do not operate the product if not fully submerg...

Page 4: ...regularly inspect the cable for damage and deterioration Do not connect to any voltage other than that stated You consult a quali ed electrician if in doubt about any aspects of wiring A residential...

Page 5: ...it You can then attach the rest of the parts in this order hosetail o ring hosetail hosetail nut INSTALLATION USE Inlet hose if an inlet hosetail is required you can follow the above instructions to a...

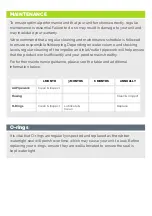
Page 6: ...r and inlet outlet pipework will help ensure that the product works e ciently and your pond remains healthy For further maintenance guidance please see the table and additional information below 1 MON...

Page 7: ...also how many sh you have How often you feed your sh and seasonal light levels will also a ect how quickly your pond water gets dirty and will need to be taken into consideration when planning how oft...

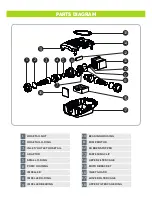
Page 8: ...O RING 5 PUMP HOUSING IMPELLER 6 7 IMPELLER O RING 8 IMPELLER BEARING 9 RUBBER STOPPER BEARING HOUSING PUMP MOTOR 10 11 12 FASTENING CLIP 13 UPPER FILTER CAGE MOTOR BRACKET 14 15 INLET GUARD 16 LOWER...

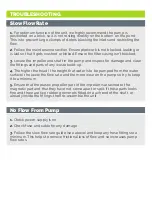
Page 9: ...on the bottom on the pond This is to prevent large clumps of debris blocking the inlets and restricting the ow 2 Follow the maintenance section Ensure pipework is not blocked leaking or is laid so th...

Page 10: ...cate the impeller and shaft in the pump and inspect for damage and clear the ttings and parts of any waste build up 4 Ensure that the plastic propeller part of the impeller is attached to the magnetic...

Page 11: ...GE 220 240V 220 240V 25 32 38mm 25 32 38mm AquaECO 8000 5 6 25 32 38mm HOSETAIL CONNECTOR mm MAX HEAD m 8000 L H MAX FLOW RATE MODEL AquaECO 10000 6 10000 L H AquaECO 12000 6 5 12000 L H 70w WATTAGE 8...

Page 12: ...are not covered by your warranty and a charge may be required for replacements of these This warranty does not apply to any unit that has been subjected to misuse accidental damage negligence tamperi...

Page 13: ...www allpondsolutions co uk All Pet Solutions Limited Trading as All Pond Solutions Unit 203 Riverside Way Uxbridge Middlesex England UB8 2YF...

Reviews: