background image

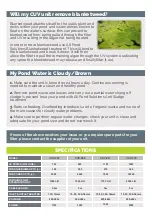
SPECIFICATIONS

CUV-224

24W

16000

4500 L/H

5m

THROUGH FLOW
STERILISATION AT:

FOR PONDS UP TO (L):

UV POWER (WATTAGE):

CABLE LENGTH:

VOLTAGE:

450

FOR AQUARIUMS UP TO (L): 

MODEL:

220-240v

POWER:

INLET & OUTLET ADAPTER

19, 25, 32 & 38mm

CUV-236

36W

20000

6000 L/H

5m

600

220-240v

19, 25, 32 & 38mm

CUV-272

72W

35000

6000 L/H

2 x 5m

220-240v

19, 25, 32 & 38mm

26W

40W

80W

1300

Summary of Contents for CUV-207

Page 1: ...POND AQUARIUM UV STERILISER CUV 207 209 211 218 224 236 272 ...

Page 2: ...h liquids other than water Do not use with water above 90F or 30C Do not carry or pull the unit by its electrical cable Do not use this unit if it has a damaged cord if it is malfunctioning or it is dropped or damaged in any manner Do not attempt to modify this unit in any way and only use attachments and the recommended parts for replacement recommended by the manufacturer Before installing maint...

Page 3: ...nit in a sheltered area ensuring all water has been drained from it Do not bury the cord for this unit Ensure it does not cause a trip hazard or it at risk from damage from lawn mowers strimmers or other garden equipment To avoid overheating do not operate when dry PLEASE NOTE this appliance can be used by children aged from 8 years and above and persons with reduced physical sensory or mental cap...

Page 4: ...u regularly inspect the cable for damage and deterioration Do not connect to any voltage other than that stated You consult a qualified electrician if in doubt about any aspects of wiring A residential current device RCD is used for additional safety You have complied with Local Electricity Authority regulations if permanently installing to the mains supply Please Ensure The power supply must be ea...

Page 5: ...wo fall waterfall or indeed a waterfall and a filter The steriliser is also supplied with a separate glass viewport which can be used to replace one of the hosetails for use as a one in one out unit INSTALLATION USE 3 Add fixing brackets to your unit CUV 211 model only There should be one at each end of the unit You can then use them to secure the unit on flat surface PLEASE NOTE CUV 207 209 218 224 ...

Page 6: ...ensure this is water tight 6 Aquarium installation place your CUV unit securely on a flat surface Connect outlet pipework from aquarium pump or external filter to CUV inlet hosetail Connect pipework to hosetail outlet to return water to aquarium Secure all pipework using hose clip clamp to ensure this is water tight 5 Connect your CUV to the mains connect the unit to the mains using a residual curre...

Page 7: ...e to do so may result in damage to your unit and may invalidate your warranty We recommend that a regular cleaning and maintenance schedule is followed to ensure responsible fishkeeping Depending on water volume and stocking levels regular cleaning of the quartz sleeve and inlet outlet pipework will help ensure that the product works efficiently and your pond remains healthy For further maintenance g...

Page 8: ...he bulb and quartz sleeve Make sure to inspect the unit s cable for damage or excessive wear IMPORTANT Disconnect mains electricity supply before handling or attempting maintenance Quartz sleeve UV bulb to access UV bulb unfasten the clip located on the side CUV 207 209 and 211 models only or using a coin push down the clear plastic button on top of the ballast CUV 218 224 236 272 models only Gent...

Page 9: ... 272 models only Clean body and all attachments Reassemble CUV 218 224 236 272 CUV 207 209 211 IMPORTANT When reassembling your unit you must replace all O rings as per the parts diagram as otherwise this can cause the unit to leak which will cause permanent damage to the UV operation Common Reassembly Questions CUV 207 209 211 when reassembling your unit you must make sure the black O ring sits o...

Page 10: ...MPORTANT The replacement does not require removal of the gold outer shell protecting the bulb CUV 207 209 and 211 models only The top of the gold outer shell has sharp edge DO NOT touch this part 2 Once cooled UV bulb can be safely removed by gently moving it from side to side CUV 207 209 211 and pulling free of unit 3 You can now replace your UV bulb and reassemble the unit Ensure O rings are rep...

Page 11: ...ery 6 months if used for aquarium and 12 months if used for pond The uses a 7w PLS UV bulb CUV 207 The uses a 9w PLS UV bulb CUV 209 The uses an 11w PLS UV bulb CUV 211 The uses an 18w PLL UV bulb CUV 218 The uses a 24w PLL UV bulb CUV 224 The uses a 36w PLL UV bulb CUV 236 The uses 2 x 36w PLL UV bulb CUV 272 PARTS DIAGRAM CUV 207 1 2 3 4 5 6 7 8 QUARTZ SLEEVE UV BULB UV BALLAST QUARTZ SLEEVE O R...

Page 12: ... DIAGRAM CUV 209 QUARTZ SLEEVE UV BULB UV BALLAST QUARTZ SLEEVE O RING HELIX 1 2 3 4 5 1 2 3 4 5 6 7 8 9 HOSETAIL UV BODY 6 7 HOSETAIL O RING 8 5 NUT 9 10 VIEWING GLASS O RING 10 10 UV VIEWING GLASS 11 10 11 ...

Page 13: ... DIAGRAM CUV 209 QUARTZ SLEEVE UV BULB UV BALLAST QUARTZ SLEEVE O RING HELIX 1 2 3 4 5 1 2 3 4 5 6 7 8 9 HOSETAIL UV BODY 6 7 HOSETAIL O RING 8 5 NUT 9 10 VIEWING GLASS O RING 10 10 UV VIEWING GLASS 11 10 11 ...

Page 14: ...TS DIAGRAM CUV 211 QUARTZ SLEEVE UV BULB UV BALLAST QUARTZ SLEEVE O RING HELIX 1 2 3 4 5 1 2 3 4 5 6 7 10 8 9 11 HOSETAIL UV BODY 6 7 HOSETAIL O RING 8 5 NUT 9 10 FIXING BRACKETS 10 10 UV VIEWING GLASS 11 ...

Page 15: ...EWS UV BALLAST O RING 3 UV BULB 1 2 3 4 5 6 QUARTZ SLEEVE 7 CLAMP SCREW 8 1 2 3 4 5 6 7 9 10 11 12 13 14 15 8 5 O RING 4 9 10 HELIX 10 FILTER BOTTOM 11 NUT 11 12 CUV BODY 12 FIXING BRACKETS HOSETAIL O RING 13 14 15 HOSETAIL OUTLET 16 UV VIEWING GLASS 16 ...

Page 16: ...G 1 SCREWS UV BALLAST O RING 3 UV BULB 1 2 3 4 5 6 QUARTZ SLEEVE 7 CLAMP SCREW 8 5 O RING 4 9 10 HELIX 10 1 2 3 4 5 6 7 9 10 11 12 13 14 15 8 FILTER BOTTOM 11 NUT 11 12 CUV BODY 12 FIXING BRACKETS HOSETAIL O RING 13 14 15 HOSETAIL OUTLET ...

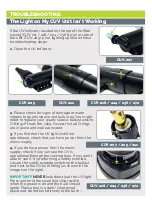
Page 17: ... in place and well lubricated 3 If you find that the UV light is still not operational check that you have power from the mains supply 4 If you do have power from the mains supply check if you can see the UV is operational through the viewing hole If you aren t able to see it try performing a safety override Locate the safety override switch on the ballast end next to the UV bulb fitting as shown in...

Page 18: ...above checks or there is an obvious casing crack you will need to replace the body casing on the unit we recommend covering the bulb with kitchen roll or similar You should still be able to see the glow of the bulb through this 5 If the above does not solve the issue replace the UV bulb 6 If you find that the UV light is still not operational after the bulb replacement the UV ballast may have devel...

Page 19: ...he summer if exposed all day Try and shade your pond water surface floating pond plants such as Lilies are a great way to do this 2 Pump s Flow Rate the flow rate of the pump exceeds the maximum flow rate that the UVC is able to handle Check your unit s specifications and reduce the pump flow rate if needed 3 Filter the pond filter works with the UV steriliser to keep the water clear by removing the dea...

Page 20: ... STERILISATION AT FOR PONDS UP TO L UV POWER WATTAGE CABLE LENGTH VOLTAGE 180 FOR AQUARIUMS UP TO L MODEL 220 240v POWER INLET OUTLET ADAPTER 13 19mm CUV 209 9W 4000 1500 L H 5m 250 220 240v 19 25 32 38mm CUV 211 11W 7000 1700 L H 5m 220 240v 19 25 32 38mm CUV 218 18W 12000 2500 L H 5m 340 220 240v 19 25 32 38mm Blanketweed attaches itself to the walls plant and rocks within your pond and is somet...

Page 21: ... AT FOR PONDS UP TO L UV POWER WATTAGE CABLE LENGTH VOLTAGE 450 FOR AQUARIUMS UP TO L MODEL 220 240v POWER INLET OUTLET ADAPTER 19 25 32 38mm CUV 236 36W 20000 6000 L H 5m 600 220 240v 19 25 32 38mm CUV 272 72W 35000 6000 L H 2 x 5m 220 240v 19 25 32 38mm 26W 40W 80W 1300 ...

Page 22: ...V bulbs are not covered by your warranty and a charge may be required for replacements of these This warranty does not apply to any unit that has been subjected to misuse accidental damage negligence tampering or customisation It does not apply to units which have been assembled incorrectly improperly maintained or where the instructions and safety information in this manual has not been followed ...

Page 23: ...www allpondsolutions co uk All Pet Solutions Limited Trading as All Pond Solutions Unit 203 Riverside Way Uxbridge Middlesex England UB8 2YF ...

Reviews: