background image

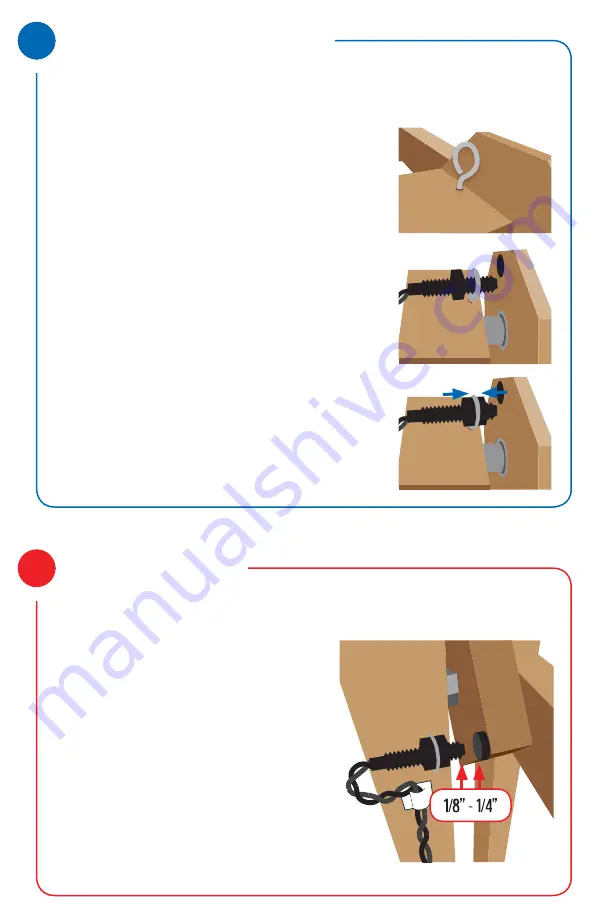
The screw eye is used to mount the rotation counter onto winders with wood or 

plastic bases.

Attach the Rotation Counter

3

4

The magnet has an adhesive back and sticks directly to the winder arm, hub, or 

drive wheel.

A.  Clean the surface of the arm or hub 

with a lightly damp cloth or isopropyl 

alcohol.

B.  Peel off the adhesive backing.
C.  Press the magnet to the arm or hub 

firmly for 30 seconds.

D.  Measure the distance from the magnet 

to the rotation counter when they are 

directly across from each other. If it’s 

not in the 1/8” - 1/4” range, move the 

rotation counter forward or backward 

by adjusting the nuts.

Attach the Magnet

A.  Screw the eye into the winder base. Brute force 

usually works, though you can also drill a small 

pilot hole.

B.  Take one nut off the rotation counter, leaving 

the other toward the cord end.

C.  Stick the rotation counter through the eye.

D.  Thread the other nut onto the rotation counter, 

firmly sandwiching the screw eye between the 

two nuts.

Summary of Contents for Skeinminder

Page 1: ...goes on the fixed base of your winder and the magnet goes on the moving arms hub or drive wheel They need to be 1 8 1 4 apart and the magnet should pass directly in front of the counter B Make a note of where the counter will attach to the base and where the magnet will sit on the arm hub or drive wheel If you already have a rotation counter on your winder you may be able to position the SkeinMind...

Page 2: ...for 30 seconds D Measure the distance from the magnet to the rotation counter when they are directly across from each other If it s not in the 1 8 1 4 range move the rotation counter forward or backward by adjusting the nuts Attach the Magnet A Screw the eye into the winder base Brute force usually works though you can also drill a small pilot hole B Take one nut off the rotation counter leaving t...

Page 3: ...rface of your winder with a lightly damp cloth or isopropyl alcohol B Peel off the adhesive backing C Press each cable guide firmly to your winder for 30 seconds D Gently clip the cable into each guide The adhesive will firm up after 24 hours but the guides can creep or move before then Tidy your Cables 6 strain relief loop A With your winder still plugged directly into a wall outlet turn it on an...

Page 4: ...minis from larger hanks please see the complete SkeinMinder User Guide A Set up your yarn as usual B Decide how many rotations you need for the final yardage you want at the skein circumference your winder arms are set to Ex A 400 yd skein wound at 2 yds will need at least 200 rotations A 400 yd skein wound at 1 5 yds will need at least 267 rotations C Adjust the set point to the rotations desired...

Reviews: