AM-64x DAT High Capacity Tape Drives
Page 19
PDI-00649-00, A01
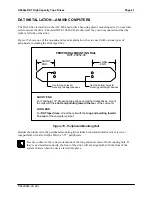
DAT INSTALLATION—AM-1400 AND AM-1600 DESKTOP
COMPUTERS
1. Remove the four Phillips head screws (two on each side) that hold the top cover in place.
Remove the top cover and place it in an area where it won't get damaged.
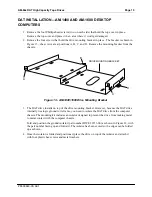
2. Remove the four screws that hold the drive mounting bracket in place. The bracket is shown in
Figure 13—the screws are at positions A, B, C, and D. Remove the mounting bracket from the
chassis.
DRIVE MOUNTING BRACKET
A
B
C
D
Figure 13 - AM-1400/1600 Drive Mounting Bracket
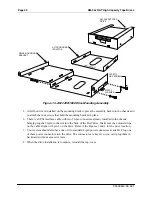
3. The DAT drive installs on top of the drive mounting bracket. However, because the DAT drive
internally ties logic ground to its frame, you need to isolate the DAT drive from the computer
chassis. The mounting kit includes an isolator designed to prevent the drive from making metal
to metal contact with the computer chassis.
Fold and position the ground isolator (part number DWF-20713-00) as shown in Figure 14, with
the part number facing up and forward. The isolator has been scored so the edges can be folded
up as shown.
4. Once the isolator is folded and positioned, place the drive on top of the isolator and attach it
with four plastic hex screws and metal washers.


