background image

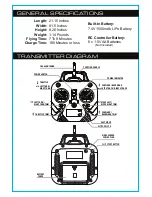
Built-In Battery:

7.4V 1500mAh LiPo Battery

RC Controller Battery:

6 x 1.5V AA Batteries 

         (Not Included)

21.15 Inches

81.5 Inches

8.26 Inches

Length:

Width: 

Height:

1.14 Pounds

7 To 9 Minutes

180 Minutes or less

Weight:

Flying Time:

Charge Time:

GENERAL SPECIFICATIONS

TRANSMITTER DIAGRAM

2.4GHz ANTENNA

POWER SWITCH

POWER INDICATOR

CARRYING HANDLE

LEFT TURN /

RIGHT TURN

LEFT TURN /

RIGHT TURN TRIM

MOVE LEFT /

MOVE RIGHT TRIM

THROTTLE

THROTTLE TRIM

EASY MODE

ALTITUDE LOCK

VIDEO SCREEN

POWER PLUG

FLIP STUNT BUTTON

BATTERY

COVER

LEFT STRAFE / RIGHT STRAFE

FORWARD / BACKWARD

FORWARD /

BACKWARD TRIM

Summary of Contents for SPY DRONE

Page 1: ...4 5CH 2 4GHz LIVE FEED VIDEO RC HEXACOPTER ...

Page 2: ...eries may explode if disposed in a fire causing injury Remove the AA batteries in the transmitter if you are not going to fly the drone for a long period of time Store AA batteries in a cool dry place Keep AA batteries away from heat The drone s battery pack is Lithium polymer Li po batteries pose higher operational risks compared to other battery packs so it s important to follow the instructions...

Page 3: ...Minutes or less Weight Flying Time Charge Time GENERAL SPECIFICATIONS TRANSMITTER DIAGRAM 2 4GHz ANTENNA POWER SWITCH POWER INDICATOR CARRYING HANDLE LEFT TURN RIGHT TURN LEFT TURN RIGHT TURN TRIM MOVE LEFT MOVE RIGHT TRIM THROTTLE THROTTLE TRIM EASY MODE ALTITUDE LOCK VIDEO SCREEN POWER PLUG FLIP STUNT BUTTON BATTERY COVER LEFT STRAFE RIGHT STRAFE FORWARD BACKWARD FORWARD BACKWARD TRIM ...

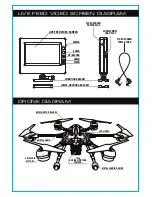
Page 4: ...LADES LED LIGHTS 6 METAL ARMS 720p HD VIDEO PICTURE CAMERA METAL LANDING SKIDS 6 ELECTRIC MOTORS POWER MINI MEMORY CARD SLOT VIDEO SCREEN POWER PLUG VIDEO SCREEN POWER CORD ENTER UP RECORD DOWN MENU LOWER MOUNTING BRACKET LIVE FEED VIDEO SCREEN MOUNTING BRACKET ...

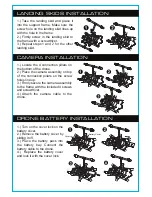
Page 5: ...ra assembly on top of the connection pillars so the screw holes line up 3 Firmly secure the camera assembly to the frame with the included 4 screws and screwdriver 4 Attach the camera cable to the drone 1 Turn on the cover lock on the battery cover 2 Remove the battery cover by sliding it off 3 Place the battery pack into the battery bay Connect the battery cable to the drone 4 Replace the battery...

Page 6: ...rying handle 2 Place the video screen assembly on top of the carrying handle so the mounting brackets surround the carrying handle Firmly secure the video screen by screwing in the 4 included screws to the mounting bracket 3 Plug the video screen power cord to the power plug on the side of the video screen and on the back of the remote INSTALLING TRANSMITTER BATTERIES INSTALLING LIVE FEED VIDEO SC...

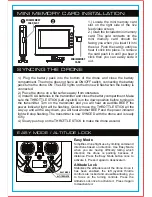
Page 7: ...rd in until you hear it click into place To remove the card push it in until you hear it click then you can easily slide it out 1 Plug the battery pack into the bottom of the drone and close the battery compartment The drone does not have an ON OFF switch connecting the battery pack turns the drone ON The LED lights on the drone will flash when the battery is connected 2 Place the drone on a flat ...

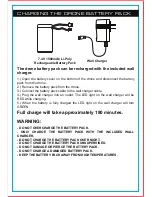
Page 8: ...lly charged the LED light on the wall charger will turn GREEN DO NOT OVERCHARGE THE BATTERY PACK ONLY CHARGE THE BATTERY PACK WITH THE INCLUDED WALL CHARGER DO NOT CHARGE THE BATTERY PACK OVER NIGHT DO NOT CHARGE THE BATTERY PACK UNSUPERVISED DO NOT DAMAGE OR PIERCE THE BATTERY PACK DO NOT CHARGE A DAMAGED BATTERY PACK KEEP THE BATTERY PACK AWAY FROM HIGH TEMPERATURES 7 4V 1500mAh Li Poly Recharge...

Page 9: ... the Rotor Blades in their corresponding position Wrong placement will greatly affect its performance FLIGHT CONTROLS REPLACING THE ROTOR BLADES ASCEND LEFT JOYSTICK LEFT JOYSTICK LEFT JOYSTICK LEFT JOYSTICK DESCEND TURN LEFT TURN RIGHT RIGHT JOYSTICK RIGHT JOYSTICK MOVE LEFT MOVE RIGHT RIGHT JOYSTICK RIGHT JOYSTICK FORWARD BACKWARD ...

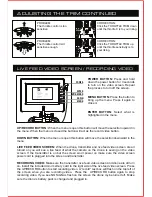
Page 10: ...o the left PROBLEM When hovering the drone moves FORWARD without your control input CORRECTION Click the BACKWARD TRIM down until the drone stops moving forward PROBLEM When hovering the drone moves BACKWARD without your control input CORRECTION Click the FORWARD TRIM up until the drone stops moving backward PROBLEM When hovering the drone moves to the LEFT without your control input CORRECTION Cl...

Page 11: ...WER BUTTON Press and hold down the power button for 3 seconds to turn on the video screen Repeat the process to turn off the screen RECORDING VIDEO Make sure the transmitter live feed video screen and drone are all turn on Install the included mini memory card to the right side of the live feed video screen Press the UP RECORD button to start recording video A record text box will flash on the top...

Page 12: ...olor saturation option Highlight this option and press enter to select the chroma option Press the up and down button to adjust the screen color saturation The higher the number the more saturated the colors will appear on the screen 100 is the max and 0 is the minimum Default is set at 50 CONTRAST Screen contrast option Highlight this option and press enter to select the contrast option Press the...

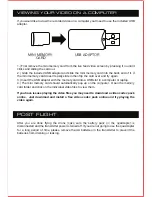
Page 13: ...a USB slot in a computer or laptop 4 The mini memory card should automatically pop up on the computer Open the memory card folder and click on the individual video files to view them If you have issues playing the video files you may need to download a video codec pack online Just download and install a free video codec pack online and try playing the video again MINI MEMORY CARD USB ADAPTOR After...

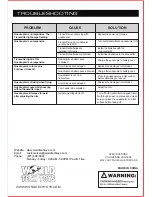
Page 14: ...oth transmitter and quadcopter Go through power on process and make sure you place the quadcopter on a flat surface before taking off Transmitter batteries are installed incorrectly Transmitter and or quadcopter is not powered ON Turn both transmitter and quadcopter ON Transmitter batteries are drained Quadcopter s battery pack is drained Rotor blades are damaged Replace the damaged rotor blades R...

Reviews: