background image

Eisbaer LT  


Alphacool International GmbH 

21 


ENGLISH 

SAFETY INSTRUCTIONS 


READ THE SAFETY INSTRUCTIONS BEFORE STARTING THE INSTALLATION. 

• Not suitable for children under 6 years. (contains small parts which could be swallowed). 
• Do not run any cooling components without ensuring that cooling liquid is flowing through the cooling system. Coolers operated without coolant 
can become very hot. Caution: Burn Hazard! 
• Coolers that have no coolant flowing through them can destroy the computer hardware. When switching on the hardware, always make sure that 
the pump is working. 
• Please note when tightening the connectors or fittings, no tools such as screwdrivers, pliers, or wrenches should be used. All plastic products or 
metal threaded connections, which are linked with plastic parts, are easily over-loaded with tools. Cracking or other damages incurred in this way, 
as well as damage from leaking coolant, are not covered under the warranty! 
• Use only connectors with a sealing o-ring. When using a sealing ring a firm tightening with the hand is enough. Your instruction manual will 
clearly refer to the use of tools in exceptional cases. 
• If you have not done so yet, please check your hardware and cooling system (tightness, pump function and fans). This will minimize time spent 
searching for possible problems. ALPHACOOL INTERNATIONAL GMBH accepts no liability on the warranty of the manufacturer of the electronic 
components. The assembly of the cooling system takes place at your own risk. 
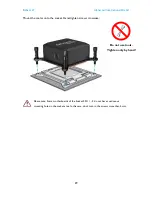
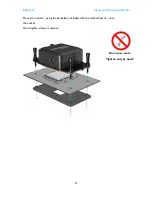
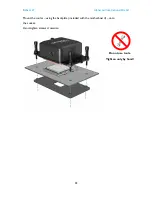
• The screws should not be tightened too firmly. If you tighten the screws excessively, the knurled nuts can loosen and the cooler´s uniform 
pressure is no longer guaranteed. 
• Fasten the connections of your choice to the cooler. Do not use tools such as wrenches for fastening the connections. Connectors with 8mm long 
threads may stop the flow. 
• We recommend a tightness test before assembling/installing the cooler. The water pressure in the water cooling loop can be at a maximum of 
0.8 bar. DO NOT use tools on the connectors. 
• Ensure that the cooler is touching all components to be cooled through thermal grease and thermal pads. 
• Only use distilled water or ALPHACOOL CAPE KELVIN CATCHER in your cooling circuit. Damage caused by unsuitable coolant is not covered 
by the warranty! 
 

Specified normal operation 

All ALPHACOOL INTERNATIONAL GMBH cooling components are constructed and licensed for ALPHACOOL INTERNATIONAL GMBH 
computer construction parts. The warranty expires in case of misuse. 
 

Warranty 

1. Data, designs, illustrations, technical data, weight, measurement and specifications, contained in folders, catalogues, circulars, announcements 
or price lists, have a purely informative character. We do not undertake warranty for the correctness of these data. As to the kind and the range of 
delivery, the data contained in the order and confirmation of order alone are decisive. 
 
2. If there is a lack of warrantor, you are entitled, on the basis of the legal regulations to require subsequent delivery, to withdraw from the contract 
or reduce the purchase price. If you are a consumer, the limitation period of warranty claims for the supplied commodity amounts to two years 
starting from receipt of goods (§ 13 BGB). If you are an entrepreneur, in accordance with legal conditions the limitation period amounts to only one 
year (§ 14 BGB). 
 
3. The warranty claim is valid only in combination with the original invoice, the sales slip or an ALPHACOOL confirmation on warranty claim. 
 
4. It is ALPHACOOL INTERNATIONAL GMBHs own discretionary authority to replace or repair the defective product or defective component. The 
replaced product or component changes into property of ALPHACOOL INTERNATIONAL GMBH. 
 
5. All warranty claims are accomplished by ALPHACOOL INTERNATIONAL GMBH or its authorized dealers. If the repair is carried out by a non-
authorized or assigned person, ALPHACOOL INTERNATIONAL GMBH does not take over either costs or liability, unless the repair has been 
previously agreed upon with ALPHACOOL INTERNATIONAL GMBH. 
 
6. All costs resulting from refitting of the products are not taken over by ALPHACOOL INTERNATIONAL GMBH. 
 
7. ALPHACOOL INTERNATIONAL GMBHs warranty excludes the following points: 
 

7.1. Regular controls maintenance and repair or the replacement of parts subject to regular wear and tear. 


7.2. Improper manipulation or defects caused by incorrect installation. 


7.3. Damages caused by storm, water, fire, overvoltage, acts of God, war, incorrect connection to the net, insufficient or incorrect 
ventilation or other reasons over which ALPHACOOL INTERNATIONAL GMBH has no influence. 
 
7.4. Damages resulting from transportation or improper packaging. 

 
8. Consumer´s rights are valid in the respective country; demands made to the salesman, as explained and laid down in the sales contract, will not 
be covered by this warranty. ALPHACOOL INTERNATIONAL GMBH, its Branch Office and Distributors, are not responsible for direct or indirect 
damage or losses, as far as the 
compelling legal regulations do not oppose it. 
 
9. ALPHACOOL INTERNATIONAL GMBH does not take over the warranty of the manufacturer of the electronic construction units and 
components. The assembly of the cooler takes place at your own risk. 


Contact an authorized waste management company in your 
country. A waste removal with the municipal waste (unsorted 
garbage) or similar mechanisms for the collection of local wastes 
is not permissible!


Summary of Contents for Eisbaer LT 120

Page 1: ...Eisbaer LT Alphacool International GmbH 0 EISBAER LT...

Page 2: ...BETRIEBNAHME 18 ERWEITERN MIT EISWOLF AIO 19 MEHR ERWEITERUNGSM GLICHKEITEN 20 ENGLISH 21 SAFETY INSTRUCTIONS 21 MOUNTING MATERIAL 22 TECHNICAL DETAILS 23 EISBAER LT MOUNTING 25 PREPARING THE CPU 25 7...

Page 3: ...43 PR PARATION CPU 43 775 1156 1155 1150 1151 1366 44 2011 2011 3 2066 46 AM2 AM2 AM3 AM3 FM1 FM2 FM2 C32 G34 48 AM4 RYZEN 50 MONTAGE DE RADIATEUR 52 BRANCHER VENTIATEUR POMPE 53 MISE EN SERVICE 54 E...

Page 4: ...haben rein informativen Charakter Wir bernehmen keine Gew hr f r die Richtigkeit dieser Angaben Hinsichtlich der Art und des Umfangs der Lieferung sind allein die in Bestellung und Auftragsbest tigun...

Page 5: ...x30 Schrauben Anzahl variiert je nach erworbenem Produkt PWM Adapter Version variiert je nach erworbenem Produkt CPU K HLER 1x W rmeleitpaste 4x Druckfedern 4x 0 8 mm Unterlegscheiben 4x Muttern AMD 1...

Page 6: ...GmbH 5 Einlass TECHNISCHE DETAILS Ma e in mm CPU K HLER PUMPE DC LT 2600 Ultra Low Noise Ceramic Leistungsaufnahme 3 2 W max F rderh he 1 m Spannungsbereich 7 13 5 V Anschluss 3 Pin Maximaler Durchfl...

Page 7: ...Eisbaer LT Alphacool International GmbH 6 240MM RADIATOR 360MM RADIATOR...

Page 8: ...tfernen Sie Reste der W rmeleitpaste von der CPU Nehmen Sie ein Tuch oder Wattest bchen zur Hilfe Mit Spiritus l sst sich auch eingetrocknete W rmeleitpaste entfernen Tragen Sie einen erbsengro en Kle...

Page 9: ...Halterung Schrauben Stecken Sie zun chst die Halterung zusammen Stecken Sie im zweiten Schritt die Druckfedern und Unterlegscheiben auf die Schrauben auf und befestigen Sie diese mit den Muttern an d...

Page 10: ...aer LT Alphacool International GmbH 9 Montieren Sie den K hler mit Hilfe der beiliegenden Backplate am Sockel Die Schrauben dabei kreuzweise handfest anziehen Kein Werkzeug benutzen Nur handfest anzie...

Page 11: ...rung Schrauben Stecken Sie zun chst die Halterung zusammen Stecken Sie im zweiten Schritt die Druckfedern und Unterlegscheiben auf die Schrauben auf und befestigen Sie diese mit den Muttern an der Hal...

Page 12: ...ckel Die Schrauben dabei kreuzweise handfest anziehen Beachten Sie Einige Mainboards des Sockel 2011 3 haben keine durchgehenden Montagebohrungen im Sockelbereich Drehen Sie die Schrauben in diesem Fa...

Page 13: ...e Halterung Schrauben Stecken Sie zun chst die Halterung zusammen Stecken Sie im zweiten Schritt die Druckfedern und Unterlegscheiben auf die Schrauben auf und befestigen Sie diese mit den Muttern an...

Page 14: ...lphacool International GmbH 13 Montieren Sie den K hler mit Hilfe der AMD Backplate liegt dem Mainboard bei am Sockel Die Schrauben dabei kreuzweise handfest anziehen Kein Werkzeug benutzen Nur handfe...

Page 15: ...ung Schrauben Stecken Sie zun chst die Halterung zusammen Stecken Sie im zweiten Schritt die Druckfedern und zwei verschiedene Unterlegscheiben auf die Schrauben auf und befestigen Sie diese mit den M...

Page 16: ...lphacool International GmbH 15 Montieren Sie den K hler mit Hilfe der AMD Backplate liegt dem Mainboard bei am Sockel Die Schrauben dabei kreuzweise handfest anziehen Kein Werkzeug benutzen Nur handfe...

Page 17: ...n individuell gew hlt werden Wir empfehlen die L fter so zu montieren dass sie aus dem Geh use heraus blasen Achten Sie bei Push Pull Betrieb darauf dass die L fter in die gleiche Richtung blasen Der...

Page 18: ...Eisbaer LT Alphacool International GmbH 17 L FTER PUMPE ANSCHLIE EN Verbinden Sie die L fter mit dem PWM Adapter Anschlie end schlie en Sie den L fter und die Pumpe am Mainbard an Pumpe L fteradapter...

Page 19: ...n Der erh hte Ger uschpegel der Pumpe entsteht durch Luftbl schen im geschlossenen System Diese Bl schen entstehen durch Transport oder Montagebewegungen berpr fen Sie noch einmal ob der Radiator ober...

Page 20: ...lung einsetzen 4 Eisbaer Auslass rot mit Eiswolf Einlass blau verbinden 5 Radiatoren zu geschlossenem Kreislauf verbinden Es werden immer rote mit blauen Schnellverschlussteilen gekoppelt 6 Fl ssigkei...

Page 21: ...und damit im Handumdrehen kombinierbar Alphacool Eiswand 360 CPU Externer Radiator mit eingebautem Ausgleichsbeh lter und zwei Pumpen Schnellverschl sse liegen lediglich dem CPU Bundle bei Eisbaer Rea...

Page 22: ...ogues circulars announcements or price lists have a purely informative character We do not undertake warranty for the correctness of these data As to the kind and the range of delivery the data contai...

Page 23: ...hased product M3x30 screws version varies depending on purchased product PWM adapter version varies depending on purchased product CPU COOLER 1x thermal paste 4x springs 4x 0 8 mm washers 4x nuts AMD...

Page 24: ...al GmbH 23 Inlet TECHNICAL DETAILS Dimensions in mm CPU COOLER PUMP DC LT 2600 Ultra Low Noise Ceramic Power consumption 3 2 W max flow rate 70 l h Operating voltage 7 13 5 V max head 1 m Power connec...

Page 25: ...Eisbaer LT Alphacool International GmbH 24 240MM RADIATOR 360MM RADIATOR...

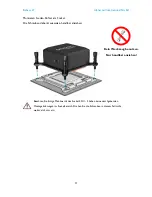
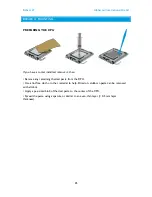
Page 26: ...move it then Remove any remaining thermal paste from the CPU Use a lint free cloth or other material to help Dried on stubborn paste can be removed with alcohol Apply a pea sized blob of thermal paste...

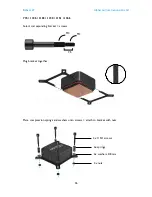
Page 27: ...GmbH 26 775 1156 1155 1150 1151 1366 Select corresponding bracket screws Plug bracket together Place compression springs and washers onto screws attach to bracket with nuts M3 M4 7 5 4x 115X screws 4x...

Page 28: ...Eisbaer LT Alphacool International GmbH 27 Mount the cooler using the included backplate onto the socket Hand tighten screws crosswise Do not use tools Tighten only by hand...

Page 29: ...ional GmbH 28 2011 2011 3 2066 Select corresponding bracket screws Plug bracket together Place compression springs and washers onto screws attach to bracket with nuts M4 4x Intel 2011 3 screws 4x spri...

Page 30: ...cooler onto the socket Hand tighten screws crosswise Please note Some motherboards of the Socket 2011 3 do not have continuous mounting holes in the socket area In this case don t turn in the screws...

Page 31: ...0 AM2 AM2 AM3 AM3 FM1 FM2 FM2 C32 G34 Select corresponding bracket screws Plug bracket together Place compression springs and washers onto screws attach to bracket with nuts UNC 6 32 M4 10 5 4x AMD sc...

Page 32: ...Eisbaer LT Alphacool International GmbH 31 Mount the cooler using the backplate included with the motherboard onto the socket Hand tighten screws crosswise Do not use tools Tighten only by hand...

Page 33: ...4x washers 2 0 mm AM4 RYZEN Select corresponding bracket screws Plug bracket together Place compression springs and two different washers onto screws attach to mount with nuts UNC 6 32 M4 10 5 4x AMD...

Page 34: ...Eisbaer LT Alphacool International GmbH 33 Mount the cooler using the backplate included with the motherboard onto the socket Hand tighten screws crosswise Do not use tools Tighten only by hand...

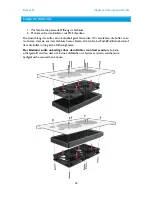
Page 35: ...crews The direction of the fans can be selected individually We recommend to mount the fan so that they blow out of the case Make sure the fans blow in the same direction in Push Pull mode The radiato...

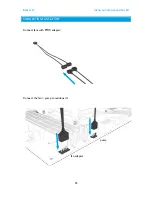
Page 36: ...Eisbaer LT Alphacool International GmbH 35 CONNECTING FANS PUMP Connect fans with PMW adapter Connect the fan pump to mainboard fan adapter pump...

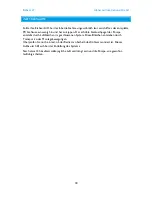
Page 37: ...lp The higher volume level of the pump occurs due to air bubbles in the closed system These bubbles form during transport or due to movement during installation Double check that the radiator is mount...

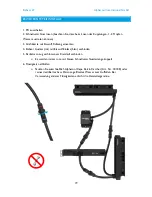
Page 38: ...Insert graphics card with Eiswolf cooler 4 Link Eisbaer outlet red with Eiswolf inlet blue 5 Connect the radiators to a closed circuit Always combine red with blue quick release parts 6 Add liquid On...

Page 39: ...quick release connectors and can be combined easily Alphacool Eiswand 360 CPU External Radiator with included reservoir and two pumps Quick Connectors only included in the CPU bundle Eisbaer Ready Ra...

Page 40: ...ur de la justesse de ces informations Concernant le type et volume de la livraison seulement les informations contenues dans la commande et la confirmation de la commande sont d cisives 2 En cas de d...

Page 41: ...vis Le nombre est d pendant du produit achet Adapteur PWM La version est d pendant du produit achet BLOC DE REFROIDISSEMENT PROCESSEUR 1x p te thermique 4x ressorts 4x 0 8 mm rondelles 4x crous AMD 1x...

Page 42: ...GmbH 41 entr e BLOC DE REFROIDISSEMENT PROCESSEUR POMPE DC LT 2600 Ultra low noise Ceramic Puissance consomm e 3 2 W Hauter de refoulement 1 m Tension 7 13 5 V Connecteur d alimentation 3 Pin D bit ma...

Page 43: ...Eisbaer LT Alphacool International GmbH 42 240MM RADIATEUR 360MM RADIATEUR...

Page 44: ...d les composants Enlever les r sidus de p te thermique du processeur Servez vous d un tissu ou d un coton tige L alcool m nag re aide nettoyer la p te thermique s che Poser la p te thermique taille d...

Page 45: ...ternational GmbH 44 775 1156 1155 1150 1151 1366 Choisir support et vis Assembler support Enfiler ressorts et rondelles sur vis fixer avec des crous sur support M3 M4 7 5 4x 115X vis 4x ressorts 4x ro...

Page 46: ...Eisbaer LT Alphacool International GmbH 45 Installer refroidisseur socket l aide de plaque arri re incluse Serrez les vis de mani re crois la main Ne pas utiliser d outils Serrer qu la main...

Page 47: ...ol International GmbH 46 2011 2011 3 2066 Choisir support et vis Assembler support Enfiler ressorts et rondelles sur vis fixer avec des crous sur support M4 4x Intel 2011 3 vis 4x ressorts 4x rondelle...

Page 48: ...froidisseur socket Serrez les vis de mani re crois la main Remarque Certaines cartes m res du Socket 2011 3 n ont pas de trous traversants dans la zone de socket Dans ce cas ne pas serrer les vis de p...

Page 49: ...onal GmbH 48 AM2 AM2 AM3 AM3 FM1 FM2 FM2 C32 G34 Choisir support et vis Assembler support Enfiler ressorts et rondelles sur vis fixer avec des crous sur support UNC 6 32 M4 10 5 4x AMD vis 4x ressorts...

Page 50: ...aer LT Alphacool International GmbH 49 Installer refroidisseur socket l aide de plaque arri re incluse avec la carte m re Serrez les vis de mani re crois la main Ne pas utiliser d outils Serrer qu la...

Page 51: ...GmbH 50 4x rondelles 2 0 mm AM4 RYZEN Choisir support et vis Assembler support Enfiler ressorts et deux rondelles diff rentes sur vis fixer avec des crous sur support UNC 6 32 M4 10 5 4x AMD vis 4x re...

Page 52: ...aer LT Alphacool International GmbH 51 Installer refroidisseur socket l aide de plaque arri re incluse avec la carte m re Serrez les vis de mani re crois la main Ne pas utiliser d outils Serrer qu la...

Page 53: ...rs peut tre s lectionn individuellement Nous vous recommandons de monter le ventilateur de sorte qu ils soufflent au dehors Assurez vous les ventilateurs soufflent dans la m me direction durant l op r...

Page 54: ...Eisbaer LT Alphacool International GmbH 53 BRANCHER VENTIATEUR POMPE Connecter les fans avec adaptateur PWM Connecter les ventilateurs pompe mainboard pompe ventilateur...

Page 55: ...t arri re Le bruit est d aux petites bulles d air dans le syst me Ces bulles sont dues aux mouvements lors de l envoi et de l installation V rifiez encore une fois que le radiateur soit bien install a...

Page 56: ...swolf refroidisseur 4 Combiner Eisbaer outlet rouge avec entr e Eiswolf bleu 5 Raccorder les radiateurs un circuit ferm Toujours combiner le rouge avec les parties bleues de d gagement rapide 6 Ajoute...

Page 57: ...s rapide et peuvent tre combin s facilement Alphacool Eiswand 360 CPU Radiateur externe avec r servoir et deux pompes inclus Connecteurs rapides uniquement inclus dans le CPU bundle Eisbaer Ready Radi...

Page 58: ...Eisbaer LT Alphacool International GmbH 57...

Page 59: ...Eisbaer LT Alphacool International GmbH 58...

Page 60: ......

Page 61: ......

Reviews: