background image

25

-EN

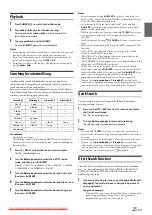
Playback

1

Press 

SOURCE



 to switch to the iPod mode.

2

Press 

 or 

 to select the desired song.

Pressing and holding 

 or 

 will fast backward/fast 

forward the current track.

3

To pause playback, press 



ENT

.

Pressing 



ENT

 again will resume playback.

Notes

• A song playing on the iPhone/iPod while it is connected to this unit will 

continue to play from where it was paused after disconnection.

• If you listen to an episode from a selected Podcast or Audiobook, the 

episode can be changed by pressing 

1

AF

 or 

2

.

• An episode may have several chapters. The chapter can be changed by 

pressing 

 or 

.

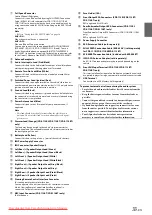
Searching for a desired Song

An iPhone/iPod can contain hundreds of songs. By using file tag 
information and keeping these songs organised in playlists, this unit’s 
search functions will ease song searches.
Each music category has its own individual hierarchy. Use the Playlist/
Artist/Album/Song/Podcast/Genre/Composer/Audiobook search mode 
to narrow searches based on the table below.

For example:

Searching by Artist name
The following example explains how an ARTIST search is performed. 
Another search mode can be used for the same operation, although the 
hierarchy differs.

1

Press 



ESC

 to activate the search selection mode.

The “

” indicator lights up.

2

Turn the 

Rotary encoder

 to select the ARTIST search 

mode, and then press 



ENT

.

PLAYLIST 

 ARTIST 

 ALBUM 

 SONG 

 PODCAST 

 GENRE 

 COMPOSER 

 AUDIOBOOK 

 PLAYLIST

3

Turn the 

Rotary encoder

 to select the desired Artist, and 

then press 



ENT

.

4

Turn the 

Rotary encoder

 to select the desired Album, and 

then press 



ENT

.

5

Turn the 

Rotary encoder

 to select the desired Song, and 

then press 



ENT

.

Notes

• After pressing and holding 



ENT

 for at least 2 seconds while in 

each hierarchy (except SONG and AUDIOBOOK hierarchy), all songs 
of the selected hierarchy are played back.

• After selecting [ALL] in the search mode with“

*

”, press and hold 



ENT

 for at least 2 seconds to play back all songs in the iPhone/

iPod or selected search mode.

• While in the search mode, if you press and hold 



ESC

 for 2 seconds, 

or no operation is performed for 10 seconds, the search mode is 
cancelled.

• In the search mode, pressing 

SOUND

 will return to the previous 

mode.

• When search is made during M.I.X. play, the M.I.X. play mode will be 

cancelled.

• “NO SONG” will be displayed if there are no songs in the selected 

playlist in the PLAYLIST search mode.

• “NO PODCAST” will be displayed if there is no podcast data in the 

iPhone/iPod in the PODCAST search mode.

• “NOAUDIOBOK” will be displayed if there is no audiobook data in the 

iPhone/iPod in AUDIOBOOK search mode.

• If “iPod name” stored in the iPhone/iPod is selected in the desired 

Playlist search mode, and 



ENT

 is pressed, you can search for all 

songs in the iPhone/iPod. Also, if you press and hold 



ENT

 for at 

least 2 seconds, all songs in the iPhone/iPod are played back.

• Depending on the iPhone/iPod, podcast search is not supported.
• If any one of the 

preset buttons (1 through 6)

 is pressed in the 

search mode, a search can be made quickly by skipping to the specified 
location. For details, refer to “Direct Search Function” on page 25.

Quick Search

You can search a song from all songs in the iPhone/iPod without 
selecting an album, artist, etc.

1

Press and hold 



ESC

 for at least 2 seconds to activate 

the Quick Search mode.

The “

” indicator lights up.

2

Turn the 

Rotary encoder

 to select a desired song.

The selected song is played back immediately.

Notes

• Press  and  hold 



ESC

 for at least 2 seconds in the search mode to 

cancel. Or, the search mode is cancelled if no operation is performed for 
10 seconds.

• If many songs are in the iPhone/iPod, it takes time to search for songs.
• If any one of the 

preset buttons (1 through 6)

 is pressed in the 

search mode, a search can be made quickly by skipping to the specified 
location. For details, refer to “Direct Search Function” on page 25.

• This function is inactive during repeat (

) playback.

Direct Search Function

The unit’s direct search function can be used to search for an album, 
song, etc., more efficiently. In PLAYLIST/ARTIST/ALBUM/SONG/
PODCAST/GENRE/COMPOSER/AUDIOBOOK mode, you can 
quickly target any song.

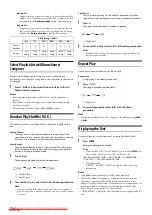
1

In the search mode, press any one of the 

preset buttons (1 

through 6)

 to quickly skip over a designated percent of 

your song content.

Song search example:

If there are 100 songs in your iPhone/iPod, they are divided into 6 
groups using percentages (shown below). These groups are 
assigned to the preset buttons (1 through 6).

Hierarchy 1

Hierarchy 2

Hierarchy 3

Hierarchy 4

Playlist

Song

Artist

*

Album

*

Song

Album

*

Song

Song

Podcast

Episode

Genre

*

Artist

*

Album

*

Song

Composer

*

Album

*

Song

Audiobook

Downloaded from Caradio-Manual.com Manuals

Summary of Contents for CDE-111R

Page 1: ...αρακαλούμε διαβάστε το πριν χρησιμοποιήσετε τη σνσκενή ALPINE ELECTRONICS MARKETING INC 1 1 8 Nishi Gotanda Shinagawa ku Tokyo 141 0031 Japan Phone 03 5496 8231 ALPINE ELECTRONICS OF AMERICA INC 19145 Gramercy Place Torrance California 90501 U S A Phone 1 800 ALPINE 1 1 800 257 4631 ALPINE ELECTRONICS OF CANADA INC 777 Supertest Road Toronto Ontario M3J 2M9 Canada Phone 1 800 ALPINE 1 1 800 257 46...

Page 2: ...Downloaded from Caradio Manual com Manuals ...

Page 3: ...el Treble Level Balance Between Left and Right Fader Between Front and Rear Defeat 13 Setting the Bass Treble High Pass Filter 13 Setting the Bass Control 14 Setting the Bass Centre Frequency 14 Setting the Bass Bandwidth 14 Setting the Bass Level 14 Setting the Treble Control 14 Setting the Treble Centre Frequency 14 Setting the Treble Level 14 Adjusting the High Pass Filter 14 Turning Loudness O...

Page 4: ... Call History 22 Dialing a Number In The Phone Book 22 Voice Dial Operation 22 Adjusting the volume when receiving a Call 22 Call Switching Operation 23 USB Memory optional Playing MP3 WMA AAC Files with the USB Memory optional 23 USB Memory Connection optional 23 Connect USB Memory 23 Remove USB Memory 24 About MP3 WMA AAC File of USB Memory 24 iPhone iPod optional Connecting an iPhone iPod 24 Pl...

Page 5: ... to heed them can result in injury or material property damage HALT USE IMMEDIATELY IF A PROBLEM APPEARS Failure to do so may cause personal injury or damage to the product Return it to your authorized Alpine dealer or the nearest Alpine Service Centre for repairing PRECAUTIONS Product Cleaning Use a soft dry cloth for periodic cleaning of the product For more severe stains please dampen the cloth...

Page 6: ... the market for protecting the disc surface and improving sound quality However most of them will influence the thickness and or diameter of the disc Using such accessories can cause the disc to be out of standard specifications and may create operational problems We recommend not using these accessories on discs played in Alpine CD players On handling Compact Discs CD CD R CD RW Do not touch the ...

Page 7: ...e USB Memory according to the terms of agreement Depending on the settings of the USB Memory type memory state or encoding software the unit may not play back or display properly A file that is copy protected copyright protection cannot be played back USB Memory may take time to start playback If there is a particular file other than audio in the USB Memory it may take considerable time before the...

Page 8: ...Attaching the Front Panel 1 Turn off the unit power 2 Press Release at the lower left side until the front panel pops out 3 Grasp the left side of the front panel and pull it out Notes The front panel may become hot in normal usage especially the connector terminals on the back of the front panel This is not a malfunction To protect the front panel place it in the supplied carrying case When detac...

Page 9: ...eatedly until the desired radio band is displayed F1 FM1 F2 FM2 F3 FM3 MW LW F1 FM1 3 Press TUNE A ME to select the tuning mode DX SEEK Distance mode SEEK Local mode OFF Manual mode DX SEEK Note The initial mode is Distance mode Distance mode Both strong and weak stations will be automatically tuned in Automatic Seek Tuning Local mode Only strong stations will be automatically tuned in Automatic S...

Page 10: ... CDE 114BTi Setting RDS Reception Mode and Receiving RDS Stations The RDS Radio Data System is a radio information system using the 57 kHz subcarrier of regular FM broadcast The RDS allows you to receive a variety of information such as traffic information station names and to automatically re tune to a stronger transmitter that is broadcasting the same programme 1 Press FUNC SETUP so that the ind...

Page 11: ...2 Press or to select your desired traffic information station When a traffic information station is tuned in the TP indicator lights up Traffic information is heard only when it is being broadcast If traffic information is not being broadcast the unit is set in the standby mode When a traffic information broadcast begins the unit automatically receives it and the display shows TRF INFO for 5 secon...

Page 12: ...ch discs can be played on which models 1 Insert a disc with the label side facing up The disc will be pulled into the unit automatically Note When a disc is already inserted press SOURCE to switch to the DISC mode 2 While playing back MP3 WMA AAC press 1 AF or 2 to select the desired folder Pressing and holding 1 AF or 2 will change folders continuously 3 Press or to select the desired track file ...

Page 13: ...SC for at least 2 seconds in the search mode to cancel Or the search mode is cancelled if no operation is performed for 10 seconds When CD Text Search is made during M I X play the M I X play mode will be cancelled Folder File Name Search concerning MP3 WMA AAC Folder and file names may be searched and displayed during playback 1 During MP3 WMA AAC playback press ESC to activate the search mode Th...

Page 14: ...nd bit rates MP3 WMA AAC This device may not play back correctly depending on sampling rates ID3 tags WMA tags This device supports ID3 tag v1 and v2 and WMA tag If tag data is in an MP3 WMA AAC file this device can display the title track title artist name and album name ID3 tag WMA tag data This device can only display single byte alphanumeric characters up to 30 for ID3 tags and up to 15 for WM...

Page 15: ...Between Left and Right Fader Between Front and Rear Defeat 1 Press Rotary encoder AUDIO repeatedly to choose the desired mode Each press changes the mode as follows SUBWOOFER BASS LEVEL TRE LEVEL BALANCE FADER DEFEAT VOLUME SUBWOOFER When the subwoofer mode is set to OFF its level cannot be adjusted Note If no operation is performed for 5 seconds the unit automatically returns to normal mode 2 Tur...

Page 16: ... You can change the Treble Frequency emphasis to create your own tonal preference Setting item TREBLE Setting the Treble Centre Frequency 1 Press BAND TA to select the desired treble centre frequency 10 0 kHz 12 5 kHz 15 0 kHz 17 5 kHz 10 0 kHz Emphasises the displayed treble frequency ranges Setting the Treble Level 1 Turn the Rotary encoder to select the desired treble level 7 7 You can emphasis...

Page 17: ...with CD text 3 ID3 tag WMA tag If an MP3 WMA AAC file contains ID3 tag WMA tag information the ID3 tag WMA tag information is displayed e g song name artist name and album name All other tag data is ignored When displaying Text the following indicators are lit according to the mode 1 Tag information If there is no tag information ARTIST ALBUM SONG is displayed 2 The root folder of disc is displaye...

Page 18: ...GUAGE BT IN 1 Displayed only when INT MUTE is set to OFF and the mode is set to other than BT AUDIO 2 Displayed only when BT IN is OFF 3 Displayed only when AUX SETUP is ON 4 CDE 112Ri CDE 113BT CDE 114BTi only 5 Displayed only when SUBWOOFER is ON 6 CDE 112Ri CDE 113BT only 7 Refer to Receiving RDS Regional Local Stations on page 9 8 Refer to PI SEEK Setting on page 9 3 Turn the Rotary encoder to...

Page 19: ...fer is off Setting the Subwoofer System Select either SYS 1 or SYS 2 for the desired subwoofer effect Setting item SUBW SYS Setting contents SUBW SYS 1 Initial setting SUBW SYS 2 SUBW SYS 1 Subwoofer level changes according to the main volume setting SUBW SYS 2 Subwoofer level change is different from the main volume setting For example even at low volume settings the subwoofer is still audible Ch...

Page 20: ...A MP3 CD DA Only the CD data in Session 1 can be played back CDDA MP3 CD data MP3 WMA AAC files in mixed mode and multi session discs can be played back Note Perform this setting before inserting a disc If a disc has already been inserted remove it first Turning Mute Mode On Off INT MUTE If a device having the interrupt feature is connected audio will be automatically muted whenever the interrupt ...

Page 21: ...n a mobile device or personal computer over short distances This enables a hands free call or data transmission between BLUETOOTH compatible devices Notes Depending on the BLUETOOTH version a BLUETOOTH compatible device may not be able to communicate with this unit Proper function of this unit with all BLUETOOTH compatible devices is not guaranteed For handling of the BT compatible device consult ...

Page 22: ... Turn the Rotary encoder to change the settings 4 Press and hold FUNC SETUP for at least 2 seconds The SETUP mode is cancelled Setting the BLUETOOTH Device Select one of 5 connected BLUETOOTH compatible devices that you previously registered Setting item PAIRED DEV 1 Turn the Rotary encoder to select a BLUETOOTH compatible device you want to use you want to change connection and then press ENT Not...

Page 23: ...our BLUETOOTH firmware please visit your local Alpine web site or choose your country from Alpine Europe top page http www alpine europe com Setting item FW UPDATE Hands Free Phone Control Hands free calls are possible when using a HSP Head Set Profile and HFP Hands Free Profile compatible mobile phone with this unit Notes Avoid performing a hands free call in heavy traffic or on narrow or winding...

Page 24: ...e number is not displayed you cannot redial from the unit in this case Redialing a Number In Outgoing History Previously dialed telephone numbers are stored in dialed calls history You can redial a number by searching from dialed calls history Setting item DIALED Dialing a Number In Incoming History Telephone numbers from received calls are stored in the Received List You can redial these numbers ...

Page 25: ... Memory optional If you connect a USB Memory containing MP3 WMA AAC you can play these files on this unit The following table shows which files in the USB Memory can be played 1 Press SOURCE to switch to the USB AUDIO mode 2 To pause playback press ENT Pressing ENT again will resume the playback Notes The root folder is displayed as ROOT in the Folder Name Search mode When a search is made in the ...

Page 26: ... 400BT and an iPhone iPod are connected at the same time be sure to disconnect the iPhone iPod from BLUETOOTH INTERFACE KCE 400BT while turning ACC to OFF CDE 111R CDE 111RM CDE 112Ri only If you connect an iPhone to this unit it can be used as an iPod If you use iPhone as a hands free phone use the unit CDE 113BT CDE 114BTi only in which the BLUETOOTH function is built or use the BLUETOOTH INTERF...

Page 27: ...lay mode will be cancelled NO SONG will be displayed if there are no songs in the selected playlist in the PLAYLIST search mode NO PODCAST will be displayed if there is no podcast data in the iPhone iPod in the PODCAST search mode NOAUDIOBOK will be displayed if there is no audiobook data in the iPhone iPod in AUDIOBOOK search mode If iPod name stored in the iPhone iPod is selected in the desired ...

Page 28: ...X play the songs will not play back randomly even when Shuffle Albums is selected Shuffle ALL Shuffle ALL plays all songs in the iPhone iPod randomly Any one song does not play back again until all songs have been played back 1 Press 6 The songs are played back in random sequence Shuffle ALL 2 To cancel M I X play select off with the above procedure Note If Shuffle ALL is selected the selected son...

Page 29: ...eady in the CD player Eject the CD and remove it The CD is being improperly inserted Make sure the CD is being inserted following instructions in the CD Player Operation section Unable to fast forward or backward the CD The CD has been damaged Eject the CD and discard it using a damaged CD in your unit can cause damage to the mechanism CD playback sound skips due to vibration Improper mounting of ...

Page 30: ...y Connect the USB Memory device after storing songs files A sampling rate bit rate not supported by the unit is used Use a sampling rate bit rate that is supported by the unit A copy protected WMA file was played back You can only play back non copy protected files Text information that is not recognizable by the unit has been input Use a USB Memory device with input text information that is suppo...

Page 31: ... dB Frequency Response 5 20 000 Hz 1 dB Wow Flutter WRMS Below measurable limits Total Harmonic Distortion 0 008 at 1 kHz Dynamic Range 95 dB at 1 kHz Signal to Noise Ratio 105 dB Channel Separation 85 dB at 1 kHz USB requirements USB 1 1 2 0 Max Power Consumption 500 mA USB Class Mass Storage File System FAT 12 16 32 MP3 Decoding MPEG 1 2 AUDIO Layer 3 WMA Decoding Windows Media Audio AAC Decodin...

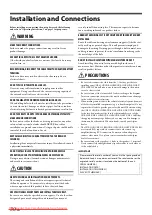
Page 32: ... securely install the unit in place This may cause parts to become loose resulting in hazards or product failure ARRANGE THE WIRING SO IT IS NOT CRIMPED OR PINCHED BY A SHARP METAL EDGE Route the cables and wiring away from moving parts like the seat rails or sharp or pointed edges This will prevent crimping and damage to the wiring If wiring passes through a hole in metal use a rubber grommet to ...

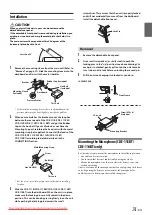
Page 33: ...ke sure the locking pins are fully seated in the down position This can be done by pressing firmly in on the unit while pushing the locking pin down with a small screwdriver This ensures that the unit is properly locked and will not accidentally come out from the dashboard Install the detachable front panel 1 Remove the detachable front panel 2 Use a small screwdriver or similar tool to push the l...

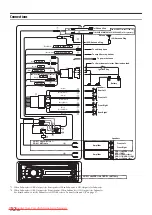
Page 34: ...ASO Antenna Plug To vehicle phone To power antenna To the instrument cluster illumination lead Ignition Key Pink Black AUDIO INTERRUPT IN REMOTE TURN ON Blue White Red IGNITION Black GND Blue POWER ANT Amplifier Amplifier Battery Speakers Rear Left Front Left Front Right Rear Right Speakers Front Left Front Right CDE 112Ri CDE 113BT CDE 114BTi Rear or Subwoofers 1 CDE 111R CDE 111RM Front or Subwo...

Page 35: ...O Power Supply Connector ISO Connector Speaker Output Left Rear Speaker Output Lead Green Left Rear Speaker Output Lead Green Black Left Front Speaker Output Lead White Left Front Speaker Output Lead White Black Right Front Speaker Output Lead Grey Black Right Front Speaker Output Lead Grey Right Rear Speaker Output Lead Violet Black Right Rear Speaker Output Lead Violet Steering Remote Control In...

Page 36: ...Downloaded from Caradio Manual com Manuals ...

Page 37: ...Downloaded from Caradio Manual com Manuals ...

Reviews: