21
-EN
Opening screen Customisation
You can set a BMP image that is stored on a USB flash drive as the
opening screen.
This setting requires the following image format, folder name and file
name.
Usable file format:
- BMP image
- Image size: 800 × 480 pixels (RGB 24 bit or less/number of colour bit:
24, 8, 1 bit)
- Compression format: non-compressed
- Folder name*
1
:
OPENINGFILE
- File name*
2
:
openingfile.bmp
1
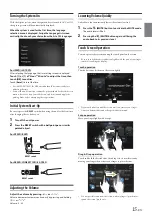
Connect the USB flash drive to the USB extension cable.
A message confirming the opening screen change is displayed.
2
Touch
[OK]
.
An update indicator “
(Loading)” is displayed, and update for
the opening screen starts.
3
After the update is complete, the following message is
displayed.*
3
“Customisation succeeded. Please remove USB memory and
press OK.”
4
After removing the USB flash drive, touch
[OK]
.
The opening screen setting is complete.
*1
Be sure to save the folder to the first layer of the USB flash drive.
*2
Only one BMP image can be set as the opening screen.
*3
If “Customisation failed,” is displayed, touch
[OK]
and then check that
the folder name, file name and file format are correct.
• Do not perform the following actions during the update.
- Do not turn off the ACC to the car.
- Do not unplug the USB flash drive.
- Do not turn off or operate the unit.
• To return the opening screen to its original image, you must Clear All
Settings. Be careful of this operation, as your other settings are also
initialised. For details, see “Initializing the System” (page 39).
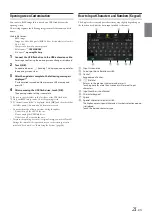
How to Input Characters and Numbers (Keypad)
The displayed screens and procedures may vary slightly depending on
the function used, but the basic input method is the same.
Input screen area.
Cursor position alteration switch
Cancel
Keypad mode finishes.
(Delete)
Returns to the previous character and erases it.
Touching here for more than 2 seconds will erase all input
characters.
Input number is confirmed.
Character keypad
Space
Special character selector switch
The Alphanumeric/Special characters/Symbols selection popup
is displayed.
Touch the desired character type.
Summary of Contents for i902D
Page 97: ......

